Easter is a great bright holiday. Surely, many people from childhood still have a feeling of something extraordinary, purity and prosperity associated with it. And multi-colored eggs - an indispensable attribute - were perceived not quite as food, but rather as a trifle toy. At all times, giving and exchanging eggs is to wish good and prosperity. There are dozens of ways to make an Easter egg. Many of them are so easy and fun that a child will like it. The result of joint leisure time for a creative activity - a unique souvenir - will delight loved ones, and the child will pass on an Easter mood.
IMPORTANT: only natural dyes and adhesives are used for coloring and decorating boiled chicken eggs. If you need to use glue, paints, then you cannot eat such an egg. In order for it to retain its attractiveness as a souvenir longer and does not deteriorate, it is recommended to use only eggshells. In the egg, you need to pierce two holes (top and bottom) and pour out (blow out) the contents. To prevent the fragile shell from breaking during manipulations over it, it is poured with gypsum, polyurethane foam, or simply covered with cereal. You can also use ready-made wooden, plaster, foam eggs.
Papier-mâché Easter egg
Everyone is familiar with the papier-mâché technique since school labor lessons. With its help, various crafts are created, including decorations for Easter.
You will need:
balloon;
White paper;
colored crepe or corrugated paper;
flour or starch;
ribbon.
Operating procedure:
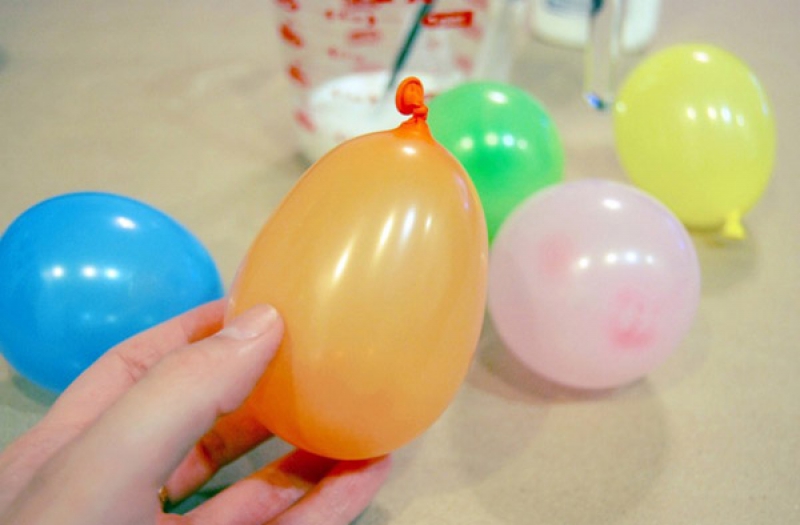
1. Inflate a small balloon. You can hang it by a string or use a stand for ease of use.
2. All paper must be cut into squares.
3. Make a paste from flour or starch.
4. Dip each square into a paste, glue on a ball, smoothing out the folds. The first layer of crepe paper, then a few of white and the final - again crepe.
5. Let the craft dry.
6. Deflate the balloon and remove it.
7. Draw an oval window and cut it out.
8. Decorate the edges of the window with pieces of paper rolled into balls and soaked in paste.
9. On top, fasten the ribbon tied with a bow.
10. Inside, you can put green corrugated paper cut into strips - it's like grass - and put there a souvenir or chicken made from threads.
Delicate, airy, very sweet and simple to perform
Another great option for a surprise gift: carefully cut the finished shell, put sweets or a souvenir inside. Seal by inserting a thread to open the surprise.

Pull the string - surprise!
Easter souvenirs made of thread
Using a similar technique, you can make an egg from threads. To do this, you will need: a ball, threads, glue and small details for decoration. The threads moistened with glue should be wrapped around the ball, allowed to dry, remove the ball and decorate the finished frame with beads, ribbons, buttons.

Adorable Easter bunnies will decorate the nursery
But this way of decorating with threads is far from the only one. Using foam as a base (it allows you to stick in pins), you can create an egg from threads with a ready-made openwork window.
You will need:
foam egg;
threads;
pins;
glue;
film (so that the threads do not stick to the base);
ribbon and decor.
It is necessary to collect such a craft from two halves - to make the front and back separately, since it will be impossible to pull out the base. The halves are glued together and decorated with a matching ribbon at the joint.

Another interesting thread weaving technique

Crafts from threads - decoration of any corner of the house
Easter egg made of beads
A very popular way to decorate. Such an egg looks very rich, resembling something like a piece of jewelry like the famous Faberge. But making such an Easter egg with your own hands is quite difficult without mastering at least an elementary beadwork technique. Special weaving patterns allow you to paint pictures with beads.

Stunning beaded paintings are almost a work of art
However, there are simple options for making such eggs.
- Option 1. Coat the blank with glue and carefully roll it in beads. By the way, the same method can be used to prepare edible Easter eggs, using protein instead of glue and sprinkling for pastry.

Food dusting as egg decor
- Option 2. If you have a lot of patience, reproduce the drawing by gluing the beads of the desired colors with tweezers. Better to use glue "Moment"

Beads as sprinkles and bead designs
- Option 3. String the beads on a long thin wire, fishing line or thread. Moving in a spiral, glue the strung beads onto the workpiece. If you use beads of different colors, you can get interesting patterns.

Very distinctive colors
- Option 4. Another original and uncomplicated method for which you will need:
Beads;
sequins;
narrow ribbons;
tailor's pins;
actually, the egg is made of foam.
The essence of the work: string a bead on each pin, then a sequin and pin it to the egg. It is more convenient to move in a spiral too, alternating rows of beads and sequins with rows of ribbons.

A lot of pins and hard work, but the result is worth it
Easter eggs with appliques
Appliques do not require much effort and skill, and you can make them from anything, creating an endless number of bright decorative souvenirs. For applications, they use whatever comes to hand: fabric, napkins, colored paper, floss threads, and in addition, pasta, cereals and shells of already colored eggs.

Bright applications of threads and paper

In the course of cereals and pasta

You can decorate the shell ... with the shell!
The decor you like is chosen, glued to the blank at random or a pattern is laid out, decorated with sparkles, rhinestones, foil - voila, quickly and easily!
You can apply the decoupage technique. In addition, you will need an acrylic primer, paint and varnish. Operating procedure:
1. Degrease the workpiece, prime it.
2. Paint with acrylic paint in two or three coats using a sponge.
3. Cut out parts of the design from a decorative napkin.
4. Glue with diluted PVA glue.
5. Allow to dry.
6. Cover with varnish in several layers.

Delicate romantic decoupage
Easter crafts in vintage style
Dim, but tasteful, but very unusual Easter eggs: a master class on them is presented below.
You will need:
PVA glue and "Moment";
blank;
newspapers;
lace;
buttons, decor;
coffee and cinnamon as coloring agents.
Operating procedure:
1. Finely tear the newspaper.
2. Apply an overlap with PVA and smooth the pieces of newspaper on the blank.
3. Allow to dry.
4. Prepare a solution for toning from water, PVA glue, coffee and cinnamon.
5. Apply the tinting solution with a brush.
6. Cover with a layer of varnish or PVA glue.
7. Decorate with lace and decorative elements.

Old newspapers sometimes come in handy in the most unusual ways
Easter ribbon decorations
Such stylish, elegant eggs will become a worthy decoration of the interior - a chest of drawers or a mantelpiece. Satin ribbons add a special chic and extravagance to such decorative elements. They are simple to perform and do not require special preparation: you need a blank, ribbons, double-sided tape and rhinestones (optional).
Operating procedure:
1. Stick the tape on top and bottom.
2. Attach the ends of the ribbons to the tape.
3. Gently pulling the tapes, wrap the workpiece.
4. Secure the ends with a hairpin.
5. Make a decoration from a separate tape: fold in half, fix the corner and shift the tails in turn until an accordion is formed. Secure the other end.
6. Sew on the decoration in a spiral.
7. Fix the tails with rhinestones or stones.
You can also make bows, flowers from ribbons, decorate a stand for a souvenir with them.

Difficult at first glance work is not so difficult

Impressive stylish result
Extraordinarily beautiful, bright, festive crafts using the quilling technique delight the eye, delight and touch. But you shouldn't be jealous of those who possess this technique - it's better to take paper for quilling, a special tool (at first, an awl, a toothpick, a large needle will do) and try to do paper rolling yourself. All complex patterns in quilling consist of many small standard elements, which are not so difficult to create - a little skill is enough.
Thin strips of paper are rolled up. The rolls are loosened, the tip is fixed with glue. For leaves and petals, the rolls are compressed at the edges. Each detail must be coated with glue in the places of the greatest contact of the curls, and the excess glue must be removed.
The finished parts are dipped in glue and laid out with a pattern on the base.

For such a craft, two simple quilling elements are enough

The result is excellent!
Crafts and decorations for Easter are a great option for family leisure, and ready-made gifts, made by hand, with soul and imagination, are an excellent tribute to Easter traditions and related values. Everyone can try all the charm of creating their own little masterpiece!
With the approaching bright holiday of Easter, people think not only about how to decorate the festive table - home decoration is also of great importance. Try to make artificial eggs for Easter with your own hands - they can be used not only for interior decoration, but also as a pleasant present for family and friends.
Blank for craft
Real eggs are not suitable for DIY Easter crafts - they quickly deteriorate and start to smell bad, so it's best to leave them for the dinner table. Instead, try making a dummy that you can safely decorate without fear of its lifetime.
From the shell
An interesting paradox: to make artificial eggs for Easter with your own hands, you need real ones - give preference to large chicken or duck eggs.
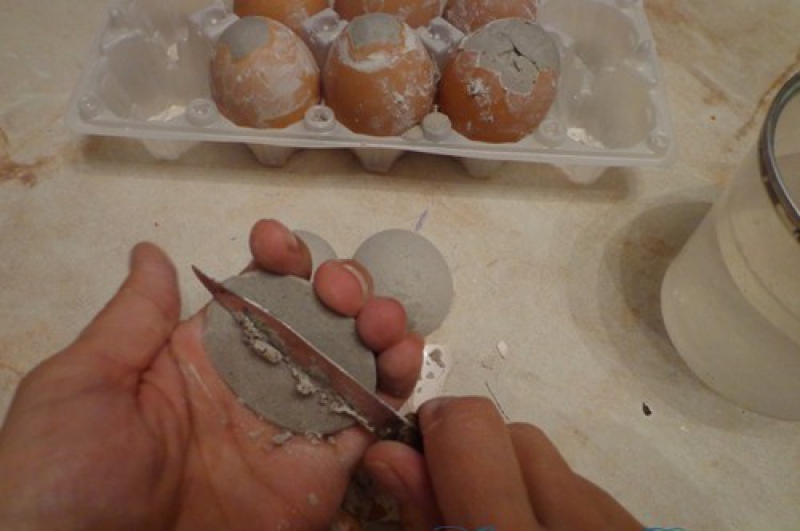
Since eggshells are an excellent material for decorating their natural shape, you will now learn how to peel the insides of them and prepare them for decoration. Rinse all testicles thoroughly beforehand.
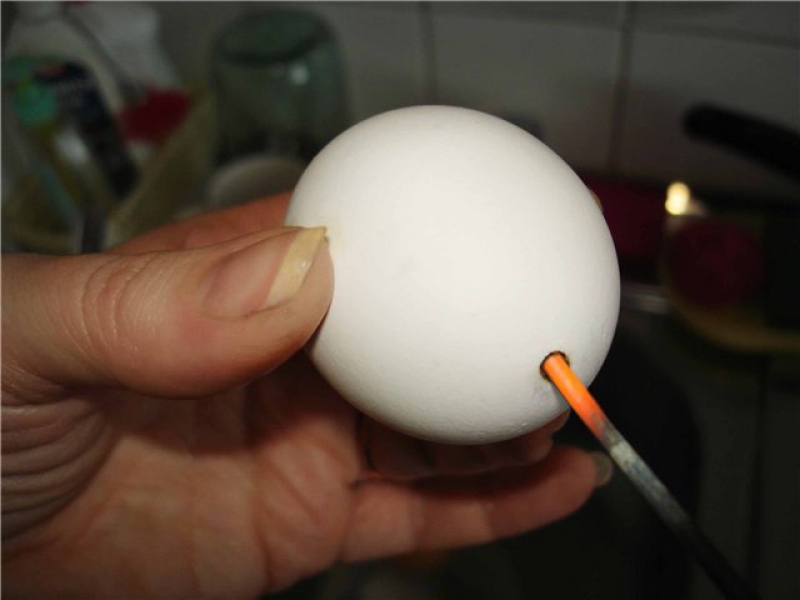
- In the centers of the top and bottom points of the testicle, make small marks with a simple pencil. Using a sharp knife or needle, carefully make holes in place of the marks - on the wide side, the hole should be larger than on the narrow one.
- Place a small, deep container under the egg and start blowing into the smaller hole so that the contents begin to flow out of the larger one. Sometimes the substance stops pouring - the film shells inside can interfere. Simply insert the sharp end of the needle deep inside and move it there.

Don't throw away the raw contents - you can cook them!
- Even after blowing, a little film remains inside the shell, which may start to smell bad. To get rid of it, take a thin knitting needle, heat it red hot, push it through a wider hole and gently walk along the walls from the inside.
- Submerge the workpieces in water and press down slightly with your hand so that they are completely filled with water. Sometimes after that, the water pours out on its own, and sometimes it also needs to be blown out - rinse the products 1-2 times to completely clean them of the insides.

- The last step is to dry the eggs for Easter. Just leave them in a dry, ventilated area for about half a day. If you need to speed up the process, put them on a knitting needle with a curved end and heat them over the burner at a short distance from the fire, otherwise it may crack and burn.

Ready-made shells can be decorated in any convenient way - for example, many craftsmen now like the technique of diamond painting.
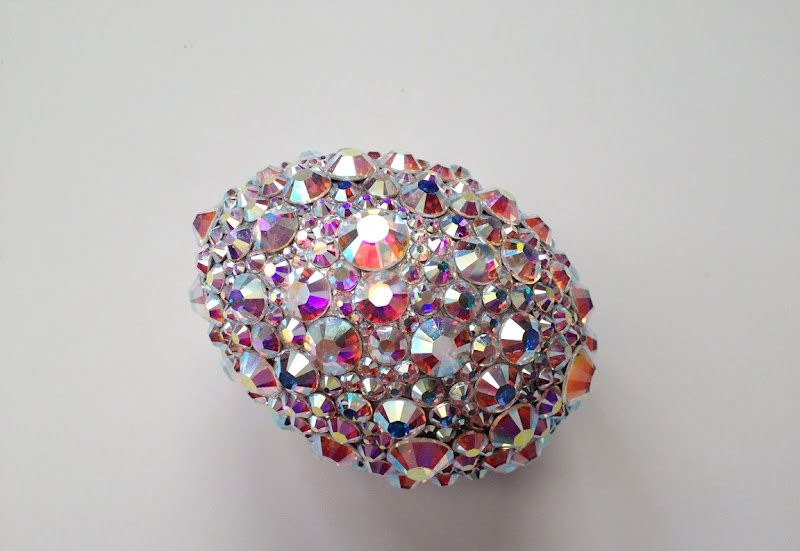
The original style of performance will surely surprise your friends.
From plaster
Unfortunately, eggshells are quite fragile: they often break, so only professionals can work with them - not to say about joint needlework with children. Hand-made gypsum blanks for Easter will help to correct this situation.
All you need: the same eggshell with a slightly wider opening at the bottom, or any other mold (plastic toys, kinder surprise packages, etc.).
- Dissolve the gypsum with water to a medium-thick sour cream consistency.
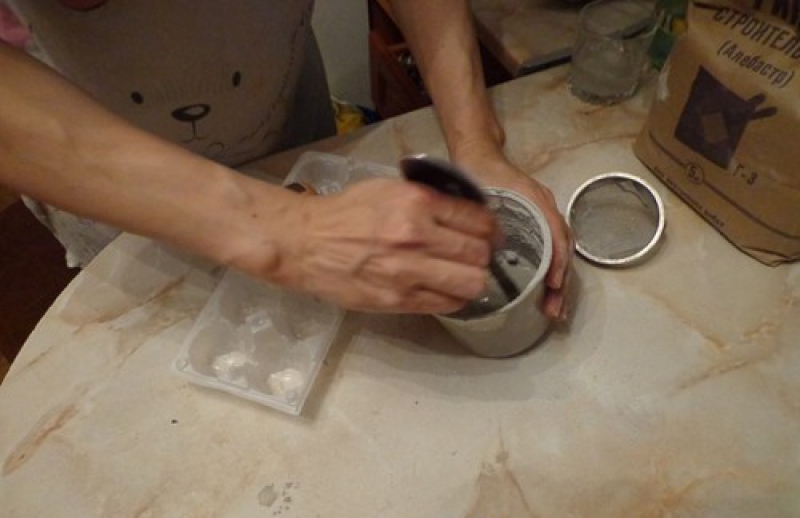
- Pour the solution into molds and leave to dry completely - depending on the consistency of the mixture and the type of gypsum, it will take from an hour to a day.
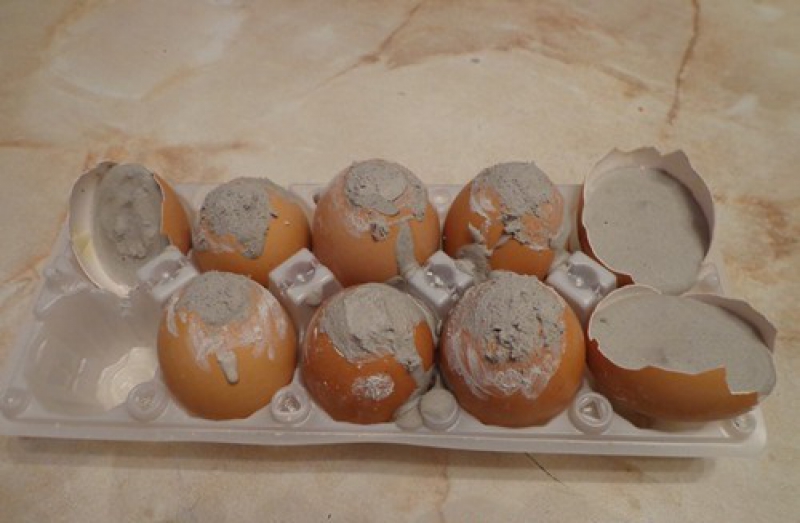
- Peel the blanks from the shell.
- Scrape off the bumps and fill in any excess cracks with plaster, smoothing the surface.

- Prime the gypsum with acrylic paint on top.

Now fake eggs for Easter are ready, and you can decorate them yourself.
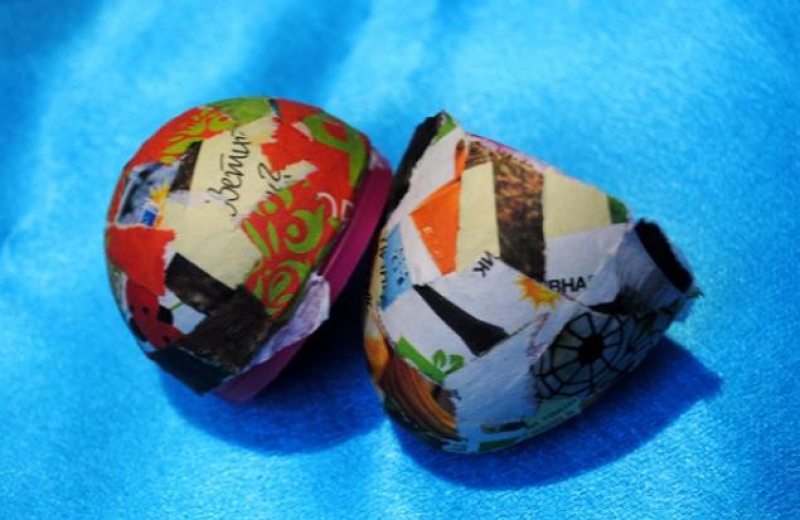
Decorating eggs with paper
Artificial eggs for Easter can be made from almost any material in the technique that you like. For example, below is a master class on creating and decorating Easter eggs with your own hands using the papier-mâché technique.
You will need: a solid oval-shaped blank (you can use a plaster of paris, but it is better to take a plastic testicle, consisting of 2 halves), an old newspaper, a special papier-mâché paste (it can be easily replaced with PVA glue).
- Coat the oval blank with hand cream, petroleum jelly or plain water to prevent the paper layer from sticking to it, and then it will be easier to remove.
- Gently stick the first layer of small pieces of newspaper on top.
- The second layer must be added, carefully smearing each piece of paper with paste. Paste the product until it is dense enough.
- Leave the workpieces to dry completely in a well-ventilated place. Remove the dry paper halves from the plastic ones and prime them with white paint.

The secret of this craft is that a cavity is formed inside which you can put a small surprise for the recipient of the gift: a coin, hairpin or candy.

- Connect the halves by gluing them together with paper, while masking the joint.
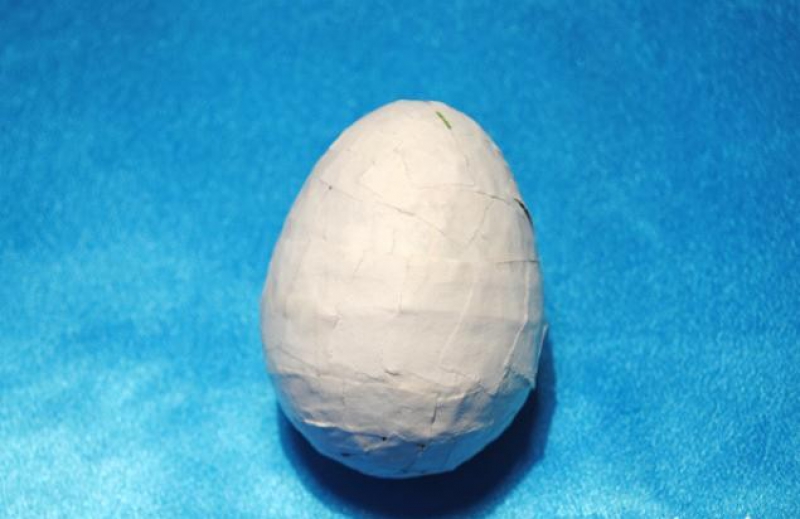
Leave the work to dry again. The product is ready! The easiest way to decorate it is to cover it with acrylic paints or gouache and fix it with clear varnish.

However, do not stop there - decorate paper Easter eggs with coasters made of the same material with your own hands.
- Cut the pressed cardboard egg holder, on which they are sold in stores, into cups, depending on how many Easter eggs you made from paper.

- On a white A4 sheet, draw or print blanks in the form of parts of the body of animals and cut into pieces.

- Color the parts and cups as you like, then glue the desired parts to the eggs and coasters.

- Place Easter items in the coasters.

Your wonderful Easter crafts are ready! This master class is very simple to perform, so you can attract children to work - they will surely enjoy decorating holiday gifts with their own hands.
How to make eggs from thread
Another idea for how to make eggs for Easter with your own hands is to create beautiful large transparent crafts from threads. They will be a wonderful decoration for your home and festive table.
There are several ways to make Easter eggs from string - just choose the most convenient one and start creating!
On the air balloon
Making decorations for Easter from threads based on a balloon is very easy because the workpiece is then easy to get out of the finished work.
- Inflate the balloon tightly and tie.
- Pour PVA glue into a deep bowl and immerse a skein of multi-colored thread in it.

- Wind the threads randomly around the ball.
- Leave the workpiece hanging until completely dry.

- When the product is dry, pierce the balloon, and gently pull the remains out with tweezers through one of the holes.

Lay Easter eggs made of string next to each other, gather in a wreath or garland.

No matter how you lay the thread crafts with your own hands, they will look very beautiful.
On foam
This option is a little more complicated than the previous one, but it allows you to get beautiful carved holes in the product.
- Buy a ready-made oval foam blank - you can also cut it yourself.
- Wrap the base in plastic and stick sewing pins in a circle, dividing the craft into 2 halves. On one of the halves with the same pins, draw the shape of the future hole (in the master class this is the sun).
- Wrap the pins soaked in glue tightly, leaving the hole free.

- When the workpiece is dry, carefully remove the pins and remove the workpiece - you have the front half of the egg.
Now again outline half of the shape with pins and make the second part of the product in the same way. But already without a hole. When both halves are ready, simply glue them together.
You can put sweets, gifts and toys in these Easter eggs made of threads.
Another option, how to make deliciously beautiful eggs for Easter with your own hands using the kanzashi technique, you can spy on in the following video tutorial:
Take it for yourself, tell your friends!
Read also on our website:
show more
Or, what are we going to do now, make Easter eggs.
It used to be believed that if you leave them in the house until next Easter, then they will bring a lot of happiness and protect you from illness and disease. That is, they will be considered a talisman. But real chicken products will not work for this in any way, so leave them on the table along with Easter cakes, and we will make dummies that can be stored, donated, worn to school or kindergarten.
To learn how to make an Easter egg, you need to prepare triangular modules for it. What is needed for this:
1. Take A4 paper and, using a utility knife or scissors, cut 32 rectangles by folding and cutting the halves of this sheet.

2. Now take one of the rectangles and fold it in half.

3. Now fold the length in two and return back to its original position. As you can see, you still have a line


6. After folding, roll up.

7. Fold your structure in half and the module is ready.

You can also take a look at the module diagram.

But now we move on to the next stage, collecting eggs with a stand from the modules. But colored paper comes in handy here.
We will need:
- Greens - 110 pcs.;
- Yellow - 356 pcs.;
- Orange - 275 pcs .;
- Blue - 125 pcs.;
- Blue - 8 pcs.;
- Pink - 8 pcs.;
- Red - 8 pcs.;
- The glue is for paper.
1. Take 2 orange triangles and put the third in them.

By the way, grease the pockets of the modules with glue so that the egg is strong.

3. Thus, we collect 1, 2, 3 rows of 8 orange modules, closing the whole chain in a circle.

4. Look what we got.

5. For the next fourth row, take 16 orange ones and put 2 triangles in one module, each with one pocket.

6. The fifth row is done sequentially, alternating green with orange, as if holding them together.

7. So we collect to the end of the row.

8. Make the sixth row 16 green. Connect the corner of the green to the orange.


10. This is the kind of beauty you should get.

11. Connect the eighth row: orange, yellow, green, yellow.

12. 2 yellow, 2 green we connect the ninth row.

13. Now we do the tenth row: pink, green, yellow, green.

14. Eleventh: 2 green, 2 orange.

15. Twelfth: yellow, orange, green orange.

16. Collect the thirteenth row as follows, 2 yellow, 2 orange.

17. Fourteenth row: blue, yellow, orange, yellow.

18. Connect the fifteenth row: 2 yellow, 2 orange.

19. The sixteenth row must be connected yellow, orange, blue, orange.

20. Blue, 2 orange, blue will be 17 next.

21. The eighteenth row is assembled from red, gray-green, orange and blue again.

22. In the nineteenth row we connect 2 blue, 2 yellow.

23. Twentieth row: blue, yellow, orange, yellow.

24. The next row 21 make connections from 2 yellow and 2 green.

25. Twenty-second row alternating yellow, 3 blue.

26. The twenty-third row, we put on 3 corners, but it is all from blue modules.

27. With orange modules we make the 24th row.

Well, the chicken product has been assembled, now you need to make what to put it on.
Egg stand:
1. In the first and second rows, collect 18 yellows. The third is made from 2 yellow and orange.


3. Now bend and make the 4th row of yellow.

4. Fifth row alternating green and yellow.

5. All yellow will be done next to 6.
6. We begin to collect 3 parts. Two rows of 18 yellow, and 3 - 2 yellow, orange.

7. Fourth row: 2 orange, yellow.

8. The fifth row is the same as the fourth.

9. Now on the contrary, we collect the 6th row from one orange and 2 yellow ones.
10. Collect the cloves: 2 and 1 yellow.

11. All parts of the stand must be glued.

12. Finally, we place the egg.

As you can see for yourself, there is no difficulty in this craft, so let's move on to the next one.
Crochet Easter Egg Videos
Now after watching, I think there will be no difficulties. Knit, give, you can even put it as a souvenir on a festive table.
How to make beaded Easter egg crafts - 3 ways to decorate
Now I will tell you the easiest way to make a beaded testicle quickly and easily. Such crafts are suitable for a competition for a school or kindergarten.

We need:
- Titanium glue;
- Eggs;
- Alabaster;
- Water;
- Beads;
- Crochet thread;
- The wire is thin.
1. First, pour the yolk and white out of the egg.
2. Stir alabaster with water and pour into our egg molds.

To prevent the testicles from falling, they can be temporarily put in bottle caps.
3. As soon as the shape hardens, take the wire, bend it around the thread and wind it in order to make it easier to put on the beads.

4. String on it 2 - 2.5 meters of beads (it all depends on the size of the egg).

Since this glue dries slowly, you can safely straighten the beads with your hand.
6. As the titanium on the shell runs out, we continue to spread and wind it further.

8. We do this to the end.

9. In the middle of the top, you can glue a larger bead.

10. In the same way we make testicles from a different shade of beads, but do not forget to correct the rows with your finger so that there are no gaps.

Well, that's done. I also want you to watch a similar video for better understanding. This method will be a little harder than the first, but still understandable and easy to do. Only harvesting an egg from a tree.
Now it became clear how easy it is to decorate them at no extra cost. But that's not all! Now I will describe an option that will also amaze you with its beauty.
We need:
- Elastic bands for weaving;
- Beads;
- PVA glue.
1. Use rubber bands on the egg to mark the areas to which we glue the beads.

Most importantly, when applying PVA, don't go beyond the rubber bands.

3. Thus we decorate the whole egg.

Everything is ready, choose which craft you like and do, and we move on to the next chapter.
How to make an egg from threads?
As you know, the best gift is considered one that is made by hand. Therefore, I would like to consider another way to craft.

We need:
- PVA glue;
- Threads of different colors;
- Small oval ball.
1. We dilute PVA a little with water and release the threads into it so that they are well saturated.
2. We begin to tie them around an inflatable ball, winding on it in different positions.

3. Dip it again in glue and hang to dry for 10 - 12 hours.
4. As time passes, we pierce the ball with a needle and take it out.

Now you can make a small hole, and put some other souvenir inside, but this is at your discretion.
Making an Easter egg from pasta and a balloon
Items found in your home may look original. The most important thing is that a person would have a good imagination and then an interesting craft from pasta will turn out.

We need:
- PVA glue;
- Pasta;
- Ball;
- Thermal glue.
1. Draw a circle or oval on an inflatable ball with a pen.
2. Pour glue into a plate and pour pasta into it, mix well.
The most important thing is not to interfere for a long time, otherwise they will become limp and it will be difficult to work with the products.
4. Let the product dry and deflate the ball. Remove the remnants of the glue from the walls with tweezers and a cloth.
5. Now with thermal glue we glue the 2nd row of pasta or any decorative items with the pattern you want. Also let it dry.
6. We paint from a spray can in any color.
7. Make a stand of 2 inverted Chinese noodle cups glued together. We also glue pasta to it.

8. Paint in the desired color.

As you can see, there is no difficulty in this production, you just need to spend a little time, but believe me, it's worth it. You can put some kind of souvenir there and put it on the festive table or give it to your friends.
Easter egg master class using quilling technique
Quilling is the process of creating beautiful things with your own hands from paper ribbons. This handicraft is considered the most popular activity, so I want to show you how to make an egg craft using this technique.

We will need:
- Brush;
- Scissors;
- Colored paper for quilling 3 or 5 mm .;
- Egg or a form for it;
- Thick PVA glue;
- Tool for curling paper (rod from the handle);
- Egg holder (plastic bottle cap).
1. If there is no form, you can take a boiled egg.
2. In the center of the form, wrap a strip of colored paper, remembering to glue it.

3. Take a strip and apply a little glue to the beginning. This is done so that the hole in the middle is even and not oval.

4. Twist the strip, but only evenly. If it suddenly becomes uneven, then we turn it over again. We remove carefully from the rod.

5. All rounds must be the same size. This is easy to do. We release every detail and equate it with others. We also glue the end.

6. You need to wait until the glue dries and press down a little, that is, give the shape of an eye.

7. We glue them on the rim, which is already on the form. Apply glue to the peephole and to the base. We attach all the round pieces in a circle.

8. While letting the product dry, we make blanks from a different color, in our case pink. We make it in the form of a droplet, that is, we press the circle on one side. We glue them through one peephole.

9. Yellow eyes as well as green ones. We put it in the third row, between the pink droplets.
10. In the fourth row, I glue orange rounds.
By the way, in order not to wait a long time for our workpieces to dry, you can fix them with a thread.


12. Leave to dry and proceed to the second half. To do this, mark the ends of the eyes on our form with a marker or felt-tip pen, so that it is easy to dock the second half.

13. That's all, remove the glued half from the egg.

14. Turn the egg over with the other side and try to glue the ends of the peak of the following blanks to the points indicated with a felt-tip pen. You can glue it in the same pattern or arbitrary, which we will do.


16. Now we assemble the stand using round timber, gluing them together.

17. We put the testicle on the stand.
Well, that's all, I think you understand how to make crafts for Easter. What is not clear write in the comments, I will answer. Happy holiday to you friends!
Bright Easter - the Resurrection of Christ, the time of sweet cakes and colored eggs. It is believed that a donated Easter egg has the power of a talisman and protects its owners from evil deeds and thoughts, both their own and those of others. The Easter egg amulet was often made of wood. Those who were richer could afford malachite, turquoise or jasper. Well, the kings glorified Faberge eggs by ordering these precious masterpieces of jewelry art for themselves and their family members.
Few people dare to take a shot at the work of the great master, there are enough craftsmen, but it is too expensive. Therefore, we take the most affordable materials and create an equally exclusive gift - do-it-yourself Easter eggs.
Here are master classes on how to make eggs for Easter with your own hands with step-by-step photographs in a variety of techniques. Follow our instructions to create your own unique gifts and inimitable souvenirs for Easter.
How to make eggs for Easter
What to give for Easter? Of course, the egg! But not simple, but magical red gold.

We will need:
- Newspaper or magazine
- A couple of relevant pictures
- Threads
- PVA glue
- Napkins or soft paper towel
- Lentils
- Millet
- Gouache red
- Gold color paint
- Sequins, rhinestones, beads
- Glue type "Monolith"
Tools:
- Brushes
- Pencil
- Felt-tip pen in the color of the main tone
- Scissors
- Skewer
Let's get started:
1. Crumple the newspaper sheet and give it the shape of an egg. We fix the workpiece with threads.

2. We coat the blank with PVA and glue it with pieces of a magazine page. We glue the pictures. Let the paper dry dry.

3. We tear the napkin and repeat the process of forming a paper crust. Torn edges are less noticeable, smooth them with a brush, abundantly moistened with glue. Dry again.

4. On a dry workpiece, make a sketch of the ornament, first with a pencil, then outline it with a felt-tip pen.

5. From a napkin cut into strips we "strand" paper strings. It is not scary if the paper breaks during the twisting of the flagella, our ornament does not contain long curls and waves along the entire circumference.
6. We glue the workpiece with cereals and prepared flagella. A skewer is an indispensable tool for a brush. We do not regret PVA glue, the cereals should be very thickly smeared, the excess will be absorbed into the paper by itself. And again we send the product to dry.


7. We paint an egg for Easter in the main tone, we have it one of the shades of red, a color symbolizing health and wealth. We work with a brush, painting thoroughly under each grain and curl. Now the expediency of using a red felt-tip pen is fully justified, there are no white clicks.

Although in the paper art technique, which translates as paper plastic, it is customary to use dark or even black colors, in my opinion, this is unacceptable for Easter eggs.
8. Cover the dried gouache with varnish and select all the bulges with gold. Everyone chooses the intensity of gilding.


9. We glue decorative elements. The main thing here is not to overdo it, otherwise the Easter egg will turn into a Christmas tree decoration.


If you still don't have enough time for souvenirs made with your own hands, go to the store for chicken eggs.
A consecrated egg, dyed with pigments contained, for example, in onion skins, can be safely stored until next Easter. Proven by personal experience, stood on a shelf in a glass, did not deteriorate, only dried up and became the size of a quail.

Such a jute design with decorative ribbons looks very beautiful and natural. Having wrapped such eggs in gift wrapping, you can safely present them to all your friends, family and friends. Such a gift will stay with them for a long time and will decorate the Easter table every year.

To make such a souvenir you will need:
- Foam base in the form of an egg.
- Jute twine.
- Glue gun.
- Decor elements (decorative tape).

The end of the twine is attached with hot melt glue in the middle of the lower part of the workpiece.

You need to wait until the glue takes up well and begin to glue the cord in a spiral around this starting point.

It is not necessary to apply glue to the entire surface of the egg. You can use no more than two to three points of glue in one turn.

Thus, you need to wrap the entire Easter egg with twine.

Then you can start decorating. To do this, take three pieces of decorative tape.

Wrap the egg with one and fix with hot glue the joint of the tape and on the opposite side.


Glue the ends of the shorter segment on top of each other - this is the basis for the bow. Put the shortest one on the table with the wrong side up and glue its edges inside. It turns out the core.

With this strip, wrap the middle of the bow and glue the back.


Attach the bow to the egg in front.

The decorative Easter egg is ready.

Easter bunny made of felt - onlay for eggs
You can make such an original overlay for an egg with your own hands from felt.


Knitted easter egg
In this tutorial, I suggest crocheting an egg. Such a product will be an excellent souvenir for this bright holiday.

For knitting you will need:
- Yarn "Children's novelty" in blue, pink and green;
- Hook 1.75mm;
- Scissors;
- Needle;
- Sintepon.
You can knit such an egg from any yarn. But it is not advisable to use too thin. Then the finished product will be too small.
Let's start with 2 VP. Then we will knit 8 sc in 2 loop from the hook. Then we knit 3 sc, and in 4 loop 2 sc in a row. Then again 3 sc and again 2 sc in a loop.
We knit a new row. We will also add in it. We knit 4 sbn 1 in a loop. And in the 5th loop we will tie 2 sbn. So we will repeat until the end of this series.

We now have 12 loops for a part. We continue to add. Now we will tie 2 sbn 1 in a loop. In the 3 loop of the row, we immediately perform 2 sbn So we repeat the whole row.
In the next row, first we will knit 3 sbn, and in 4 loop we will knit 2 sbn. And so we knit the whole row.
We have 20 loops. In the next row, we will simply knit 1 sbn in each of the loops. That is, at the end of the row there should still be 20 loops.

In the new row, we continue to add. We knit 4 sc, then 2 sc in 1 loop. So we repeat the whole row.
There is no need to make any increments in the next row. Just perform 1 sc in each loop.
In the new row, we continue to make subtractions. Now you need to knit 9 sbn, and knit 10 and 11 loops together. So we knit the whole row.
We finish knitting. Therefore, we knit 1 sbn, then 2 loops together. Then again 1 column and 2 loops together. So we knit the whole row.
At this stage, we fill the part with padding polyester.

Then, to close the part, knit 2 loops together the entire row until the hole closes. We do 1 VP. Cut the thread and tighten it. We hide the tail inside the egg.

The Easter egg is ready. Let's connect decorative elements.
Take a green thread for the leaf. We need to cast on 7 loops. We knit 1 ss, then 1 ss, 1 pssn, 2 ssn. We knit everything in a separate loop. In the last loop we will knit more pssn. You need to knit 3 such parts.

Take a pink thread for the flower. We make a sliding loop. We make 3 VP, then we knit 2 PRS. Again 3 VP and 1 ss inside the loop.
So repeat 4 more times to form 5 petals.
We tighten the sliding loop.

Sew the leaves to the bottom of the egg.

Sew the flower in the center, slightly going into the middle leaf.

Here is such an Easter egg! You can knit many of these items and decorate them in different ways.


01. Decoupage style


04. Crochet egg for Easter


Decorating an egg for Easter with a thermal label
Easter is a magical and holy holiday filled with deep meaning and wonderful mood. Today I will teach you how to paint eggs for the holiday in an unusual way, namely, using a label.

Take medium sized chicken eggs and boil them hard.

As soon as they are cooked, we grab one by one with a slotted spoon.

We take stickers of different colors and patterns, straighten them.

We put stickers on the eggs.

We put it in boiling water, wait a few seconds (the main thing is that the shell does not crack from the temperature).

We carefully remove it from the water, wait for it to cool completely.

Easter eggs decorated with thermal labels
That's all, our eggs in a colorful wrapper are ready to be presented for Easter or put on a festive table. This way of decorating eggs will really appeal to those who honor traditions, but do not like to tinker with onion skins. Even small children can put on labels.

Such stickers can be chosen not only with Easter patterns, but also with cartoon characters or with beautiful landscapes. For girls, you can choose Cinderella stickers, and boys can get an egg decorated with Spiderman stickers.

DIY jelly crafts for Easter video tutorial
DIY workshop on making a souvenir-egg for Easter from a light bulb
Chickens are also a symbol of Easter. Therefore, you can make a souvenir that will be decorated with Easter chickens.
At the first stage, you will need materials:
- Light bulb (you can use a burned out one).
- Bulb holder (holder fixed to a piece of wood).
- Acetone.
- Cotton pad.
- A piece of sponge.
- White acrylic paint.

Stage 1.
1. We screw the bulb into the socket.

2. Degrease the surface of the light bulb with acetone and a cotton pad.
3. Let the bulb dry.
4. Then you need to make the base. To do this, the edge of the sponge should be soaked in white paint and pointwise walk along the surface of the light bulb.

5. Let the paint dry and apply the second base coat.

Then you should give the bulb a light yellow tint. To do this, mix yellow and white acrylic paints in the palette and paint the light bulb with a sponge.

Stage 2.
The next step is to decorate the light bulb using the Decoupage method. To do this, you need to prepare:
- PVA glue.
- Fan synthetic brush.
- Decoupage napkin (chicken drawing).

1. Select the desired pattern on the napkin. 3 chickens are enough for a light bulb.

2. Leave 1 layer of napkin, detach 2 others.

3. Place each chick in turn on the surface of the light bulb and glue the chicks with a brush and glue.

4. Let the glue dry.
5. Then color in the white space around the chicks. To do this, mix red and white acrylic paints until a pink color is obtained. Then, using a sponge and paint, cover the light bulb in the right places.

Stage 3.
The final stage will be varnishing the bulb.
Necessary materials:
- Glossy yacht varnish.
- Synthetic fan brush.

1. Cover the surface of the light bulb with a thin layer of varnish.
To get a beautiful souvenir, you should also take care of the decoration of the basement. It can be hidden under a hat, which will later serve as a decoration and a pendant.
To make a hat, take:
- Thin cardboard.
- A simple pencil.
- A ruler.
- Stapler.
- Knitting.

Cap.
1. We measure the cardboard 3 * 11.5 cm in size. Cut the cardboard to size.

2. We fold a strip of cardboard into a tube, and connect the edges with a stapler.
3. Measure and cut light and bright yellow threads 15 cm long.

4. Tie threads around the cardboard cylinder, alternating colors.

5. Thus, we tie the entire cylinder.

6.Using glue, glue the loop to the lamp base.

7. We put a hat on the light bulb. Then we collect the protruding edges of the threads into a bundle and tie.

The finished souvenir can be hung on a willow twig.

Three easiest ways to decorate eggs for Easter with your own hands
As we all know, one of the attributes of the holiday, in addition to Easter cakes and the greeting “Christ is Risen! Truly he is risen! " are Easter eggs. Now I will tell you about the three simplest and most original ways to decorate them.
Method number 1 - Corrugated paper

What do you need for this? Actually, you will need a small amount of corrugated paper of different colors, as well as small stripes of satin. You can also use lace or laces in bright colors instead.


Wrap the egg in a small square of paper and tie the edges of the paper with tape or string.


Then carefully flatten the bow and the edges of the paper.


So our Easter souvenir is ready.


If you want to make your Easter eggs brighter and more beautiful with your own hands, you can use fabric or lace instead of paper.
Method number 2 - Lace and braid
You can also make your Easter souvenir more festive and beautiful by tying it in small pieces of braid or fine lace. To avoid spoiling its appearance, hide the ends of the ribbons or lace. This can be done using buttons or beads.


Method number 3 - Eyes
Yes Yes! It didn't seem to you. Adhesive eyes for toys can make your souvenir very funny and interesting. To do this, it is enough to glue them to the egg and draw some kind of uncomplicated muzzle. The best tools for this kind of creativity are colored pencils and paper.

How to paint Easter eggs
In order for the painted eggs on the table to look the most beautiful on the Easter holiday, they use the easiest and not expensive method. It is recommended to paint them the day before the solemn event.

Coloring eggs for Easter with food colors
Painting with onion husks
Would need:
- Eggs;
- Salt;
- Vinegar;
- Onion peel.
To prevent the eggs from cracking, let them stand at a warm indoor temperature before boiling.
Then we take a large saucepan and fill it with the removed onion husk and fill it three centimeters. The more husk, the brighter the color. Pour water and put on fire to cook for an hour without eggs. When the contents of the saucepan are boiling, reduce the heat and leave to simmer under the lid.
After an hour has passed, add the eggs and add a large pinch of salt, as well as a teaspoon of vinegar. This will help keep them from cracking, and the vinegar will brighten them up. Cook over low heat for 15 minutes.
Extinguish the stove and wait until the water cools down without removing the eggs. As soon as the water has cooled, the pot with the contents is placed in the refrigerator and left overnight. Take out in the morning. The eggs will acquire a bright and very rich color and will be the most beautiful at the holiday.

Painting with coffee
Would need:
- Eggs;
- Vinegar and salt;
- Brewed coffee.
Pour three large spoons of coffee into the bottom of the pot. Boil for twenty minutes. Pour in vinegar and salt. Then use a spoon to put the eggs in the pan. Cook for up to 20 minutes. Allow to cool in water and leave the pan in the refrigerator to infuse overnight. They will turn bright brown. These recipes can be alternated and the eggs in the basket will be of different colors.

Now you know how to make your Easter eggs colorful, bright and original using simple tools. You can please with such creativity not only yourself, but also your family and friends.
Create, create, be original! I congratulate you on the upcoming holiday of the Resurrection of Christ! Christ is risen! Happy Easter, great mood and more happy days!
5 ways to paint Easter eggs in an original way video tutorial
DIY Easter eggs photo gallery


Unusual options for decorating Easter eggs
Master classes presented in this article
Easter is one of the most important Orthodox holidays, it is very bright, kind and spring. On this day, each family dyes dozens of chicken eggs in advance, blesses them in the temple in order to carry out the traditional rite of breaking and eating them on Easter. But in addition to edible attributes, decorative items in the form of eggs must be present. They are used to decorate a festive table and are presented to each other as a souvenir.
Read how to do it here.
Useful Tips
Easter crafts from different materialsEaster is one of the most important and beautiful church holidays, which is loved very much not only by believers. This year, Orthodox Easter is celebrated quite late - 5 May... This means that you will have more time to prepare for it, to do interesting crafts-gifts and decorations for family and friends.
Most popular the symbol of Easter and the rebirth of a new life is the egg... Chicken eggs are painted in all sorts of colors, decorated with drawings and patterns and given to each other as edible gifts. You can read more about Easter eggs and how to paint them. But you can make eggs yourself.
DIY Easter eggs
Making a DIY Easter egg is not so difficult. To do this, you do not need to be a famous Faberge master or have unique artistic abilities. You just need to attach a little patience and imagination.

For work we need:
Plaster of paris (alabaster)
A saucepan to dilute the solution
Measuring cup
Funnel
Spoon and knife
A plastic egg made up of 2 halves, or regular chicken eggs

Let's get to work:
1) On the blunt side of the egg, make a hole for casting plaster using knife or scissors... If your plastic egg has sharp holes, cover them with tape. You can also use as a form the shell of a regular eggfrom which to pour the contents.

2) Dilute gypsum with water at the rate 5 heaped tablespoons of gypsum in 180 ml of water... You should have the consistency of liquid sour cream without lumps so that the liquid can be poured into the egg.


3) Pour plaster of Paris into the hole of the egg and leave it to dry for an hour, then remove the plastic halves or peel the shell.

4) As a result, you should get perfectly shaped gypsum eggwhich is ready for further processing and any possible embellishments.

DIY Easter eggs (Video)
How to make Easter eggs from string?
One of the easiest ways to get an original DIY Easter egg is braid the shape with threads with glue... The form is usually used balloon, which can be easily removed, leaving the braided frame. You can also vary the size of the egg itself by inflating the balloon more or less.

For work we need:
Balloon
PVA glue or starch with water
Drying stand
Details for jewelry
Let's get to work:
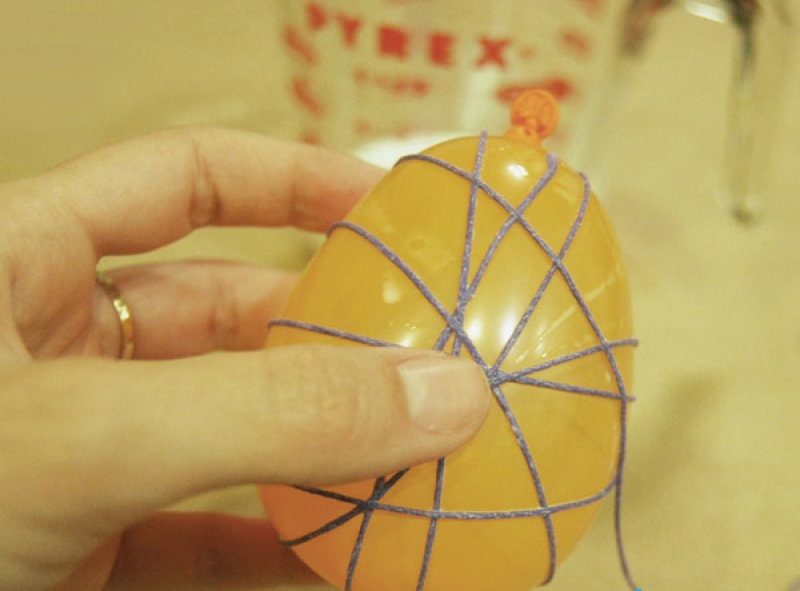
1) Inflate the balloon of the desired size and pull it well with the string to keep air out.

2) While wetting the threads with glue, wrap them around the ball so that there are holes.

3) When the ball is completely wrapped, place it on the stand and let the glue dry during the day.

4) After drying, pierce the ball with a needle and pull it out through the holes. The thread frame will retain its shape.

5) To decorate the resulting egg from threads, you can use multi-colored ribbons, buttons, beads, toys and much more.

6) With your imagination, you can get these original Easter crafts:

Easter eggs from beads
Beading may seem like a daunting task to some, requiring a lot of time and patience. But with the help of small beads, you can decorate an artificial or natural Easter egg in just a couple of minutes without complicated techniques.

For work we need:
Beads or decorative sprinkling in the form of balls
Glue and brush
Capacity
Drying stand
Details for jewelry

Let's get to work:
Cover natural or artificial eggs with glue and roll well in beads or sprinkles.

Sprinkles are commonly found in shops, baking decorations, and are often found on Easter cakes and other sweets.

If you have very small beads, you can roll a testicle in them, however, for this purpose you are better off using artificial eggs - wooden or plasterso that they serve as decoration for a long time.

If you still want to learn how to weave beaded jewelry, you can use the following video tutorials on beading:
Easter eggs from beads master classes (video):
Easter pasta eggs
There are a lot of decorations for Easter eggs, but we would like to offer the most simple and original decorationsthat are easy to make at home.

For work we need:
Wooden eggs or shells without contents
PVA glue and brush
Drying stand
Small starter pasta
Dry glitter

Let's get to work:
1) Apply glue to the wooden egg and glue to it in even rows raw pasta stars... However, they can be arranged in any order you wish. Let the glue dry well.

2) Paint the eggs along with the stars with paint, decorate with sparkles... In order for the glitter to hold well, apply glue to the egg in the right places, sprinkle with glitter, and after 15 minutes shake off the excess.

3) As a result, you should get an original bright craft:

4) Eggs can be placed in an Easter basket decorated with feathers.

Easter egg stand
The simplest stand for Easter eggs you can make with your children from the simplest materials: cardboard, lace, corrugated paper.
For work we need:
Not too thick cardboard or base from a toilet paper roll
PVA glue and brush
Lace
Needle and thread
Scissors
Details for decoration
Let's get to work:
To make the first version of the stand, take base from a roll of toilet paper and cut it into several pieces so that the stand is not too high.
Of corrugated paper cut out a wide strip and glue it to the cardboard in the form of a skirt.
Top decorate soft wire or organza pieces... You can also add vibrant details in the form of fake paper flowers. You can read about how to make corrugated flowers.

In the second option, you replace the corrugated paper lace, which with the help of a thread with a needle must be made in the form of the same skirt. As additional decorations were used string of pearl beads.

Easter wreath
A simple Easter wreath can be made with your own hands from egg cartonsas well as corrugated paper, ribbons, artificial flowers and other decorations.

For work we need:
Empty carton boxes for eggs
PVA glue and brush
Scissors
Details for decoration
Let's get to work:
1) Carefully cut the core out of the cardboard packaging and cut it with scissors so that it turns out something like flowers with petals.

2) You should have enough of these "flowers" to put them one into the other and get a wreath.

3) Use corrugated paper thread to make leaves and stems. Also use ready-made paper flowers. Flowers can be easily made on their own or bought ready-made. Place the cardboard "flowers" one into the other, rearranging them with paper flowers and leaves, fixing well with glue.

Easter wreath It will look great on a festive table, or it can be hung on a door or wall as a decoration.

Easter or Easter napkin for the festive table
This unusual napkin serves not only as a decoration for the holiday, it can be presented as a gift to loved ones, filled with Easter eggs and sweets.

For work we need:
Colored cotton fabric
Lace
Scissors
Ruler and chalk
Sewing machine
Non-woven
Safety pins
Let's get to work:
1) Prepare 6 identical circles from fabric diameter 40 centimeters... Each circle needs to be glued with non-woven so that the resulting product keeps its shape well even after you wash it. If you do not find non-woven fabric, you can do without it, but use denser fabric.

2) Fold in two circles with the wrong sides of the crochets facing each other and sew over the edges with lace. In the end, you should get three rather dense round rag blanks.

3) Fold the three pieces together and secure them with pins. Then, using a ruler and chalk, draw four straight lines, thus dividing the circle. in 8 equal parts... Use a saucer to outline the center with chalk.

4) Stitch along the chalk lines, stitching all three circles together.

5) Using a needle and thread, make wide stitches around the coreby capturing the top two layers. Then, pull off the thread and tie it in a knot. On the diagram, it will look like this:

It is necessary to tighten the thread so that the upper layers straighten a little and rise:

6) Place in the egg wells colored eggs, and on top you can put Easter cakes, cookies, candies or any other sweets. You can add a couple of details from lace trimmings.

DIY Easter basket for eggs
This simple basket can be made with thick scraps of paper. Even children will help you with this.

For work we need:
Colored paper (thick)
Stapler
Scissors
Ruler and pencil
Let's get to work:
1) For the base of the basket, cut 5 strips of paper 25 cm long and 3 cm wide... Fold them vertically side by side, and at the top using glue and a stapler, attach a horizontal strip-rim of a different color, the size of which should be 30 by 2 centimeters... There should be 2 more such strips.

2) Fold the headband into a circle and secure it with a stapler on the opposite side.