Wood is a material in demand in construction: houses and outbuildings are built from timber, floors are made from boards, walls are finished with them. Band saws are often used for sawing lumber at home. Factory models of equipment are not available to everyone due to the rather high cost. But you can save money by making a band saw with your own hands. Depending on the size and the installed cutting blade, it will also be possible to work with different metals and their alloys, stone, synthetic materials, such as polypropylene.
Home inventors have proposed various design options for machine tools with band saws. For self-assembly, a sawmill model with vertical cutting blade, consisting of the following main components and parts:
- frames (framework);
- table for sawing;
- drive;
- pulleys;
- saws.
These structural elements of the machine and smaller parts with basic dimensions are shown schematically in the drawing below.
As a drive, electric motors operating from a 220 V mains are often used..At the same time, the more massive it is planned to cut the workpieces, the more powerful it is recommended to install the engine. Three-phase motors(designed for 380 V) are also used. But for stationary networks, this option is associated with some additional problems: you will need to adapt the electric motor to a 220 V network by installing phase-shifting and starting capacitors for this. Instead of electric, it is quite possible to use gasoline (diesel) internal combustion engines.
The solid cutting blade is fixed on the pulleys. Sawing blanks occurs due to its movement along a closed oval or circular path.
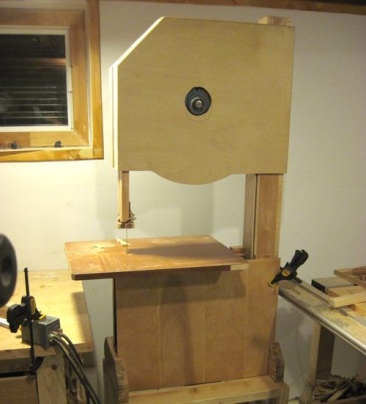
Can do small desktop machine. The jigsaw model is shown in the photo below. Based on it, assembling the device will not cause any problems, even without a detailed description of the entire process.
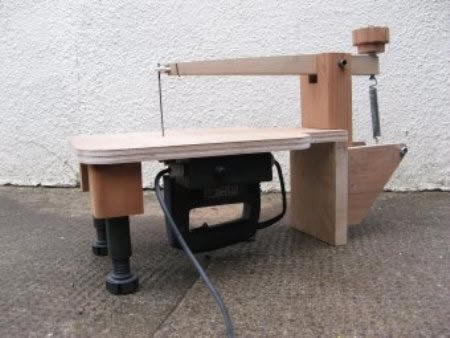
Important! In the general case, the dimensions of the equipment being created depend on the upcoming tasks that are planned to be solved with its help. For the dissolution of logs into timber or boards, a large-sized unit is required. For owners of apartments with loggias, only a desktop mini-machine is suitable.
Preparatory activities
Before proceeding with the assembly activities, guided by the drawing, you should prepare the necessary materials and tools. This will allow, first of all, to find out whether there is everything you need for work (you will need to buy the missing ones), and also not to be distracted by trifles during the process.
Necessary materials and tools
To make a band saw, you will need the following: materials and details:
- boards or a sheet of plywood (or chipboard) from which the frame, table, pulleys will be made;
- sheet steel (for saws);
- a channel used to create a support frame, or metal corners, or wooden bars and slats;
- bearings;
- steel bar - for the manufacture of pulley axles;
- electric motor;
- self-tapping screws, bolts with nuts and washers;
- polyurethane adhesive;
- rubber from a bicycle tube;
- textolite;
- bushings;
- wedge belt;
- varnish or paint.
To work, you will need tools:
- screwdriver (with drills);
- hammer;
- wrenches (bolt size);
- screwdrivers;
- pliers;
- Sander;
- Bulgarian;
- grinder;
- jigsaw.
Power tools can be easily replaced and manual counterparts. But in this case, the assembly will require more time and labor costs. When using metal corners or a channel instead of wooden bars, you will also need a welding machine and electrodes. The use of bolted connections creates additional problems with tight fitting parts.
Making a cutting blade with your own hands is quite difficult. For these purposes, tool steel grades U8 or U10 is needed. The saw must be flexible. Its thickness for relatively soft wood species is from 0.2 to 0.4 mm, and for hard wood - from 0.4 to 0.8 mm. The length of the blade for the assembled version of the machine will be about 1.7 m. You will need to cut the teeth yourself, properly spread and sharpen them. To solder the tape into a solid ring (while end-to-end), you will need to use a gas burner and solder. The connecting seam must be sanded afterwards.
It is much easier and more convenient to purchase a good quality ready-made cutting blade in a store so as not to waste time making it. The width of the products is from 18 to 88 mm. In this case, you need to focus on the material to be cut. Manufacturers offer the following types of saws according to this criterion:
- bimetallic designed to perform work on metal (stainless steel and relatively strong alloys);
- diamond, with which you can saw marble, quartz, granite and other hard materials;
- carbide, allowing processing high-strength alloys;
- from stripes tool steel used for cutting wood.
The latter variety is often equipped with machine tools assembled at home. This is due to its affordability and practicality. But if you have to work with hard materials, then it is better to purchase a saw that is stronger, more durable and more expensive in order to minimize the likelihood of a band break.
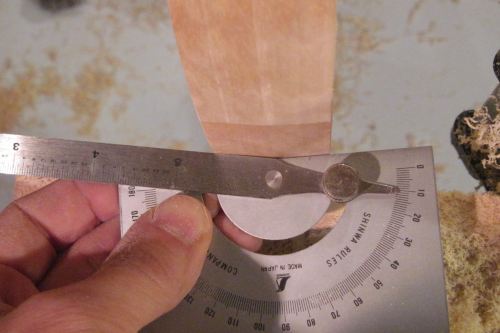
If planned with a band saw made make a curved cut, then you need to select the width of the canvas, taking into account the radius of curvature. Some relationships between these quantities are shown in the photograph below.

Advice! For even longitudinal sawing of lumber, wide cutting blades should be used. They allow for a smoother cut.
When choosing a saw for wood, you also need to consider the pitch of her teeth(distance between their centers). The hardness of the wood that can be sawn depends on this. The following are the most common tooth profiles, their markings and applications.

You also need to pay attention to tooth sharpening quality. The cutting edge must be sharp and even. You should also ask the sales assistant about the possibility of sharpening it again and how many times this can be done. For your own safety, it is recommended to give preference to better canvases.
Important! For installation on the machine, it is better to choose universal saws suitable for processing wood of different hardness. This will make it much less likely to change such blades when replacing the processed material.
Steps for making a homemade band saw
To make it easier to assemble the machine according to the drawing at home, the whole process can be divided into separate stages:
- assembly of the frame (frame or bed);
- production of pulleys;
- installation of the cutting blade;
- checking the performance of the created machine.
Before starting assembly work, it is necessary to determine the installation site of the band saw being created so that there are no problems with its placement and power supply. To do this, you may even need a canopy or a special room.
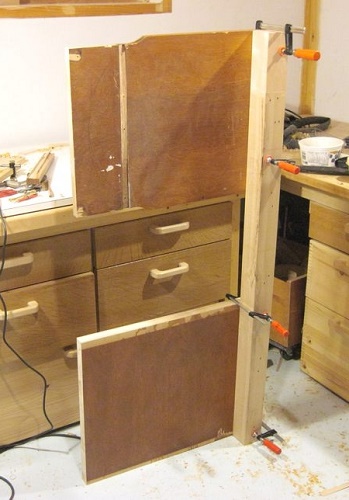
Assembling the frame, table top and bar
The assembly of the C-shaped frame includes the manufacture of a tabletop with a bar for pulleys, a section with an electric motor. Construction details are made according to the dimensions shown in the drawing above. The sequence of actions in this case is as follows:
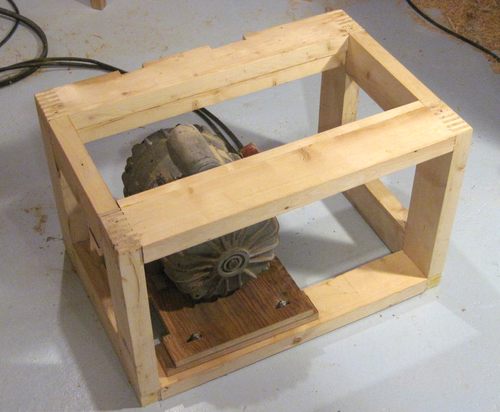
- from the boards make a frame in the form of a box (pedestal) with dimensions of 42x72x50 cm;
- an electric motor is installed inside;
- a bar is made from a bar measuring at least 8 by 8 cm;
- they are attached to it at the top and bottom along a support for plywood pulleys, placing them at such a distance from each other that it is possible to conveniently cut workpieces of different sizes;
- connect the cabinet with the frame;
- in the lower support under the pulley, a hole is made (approximately in the center), into which a sleeve with two bearings is then inserted;
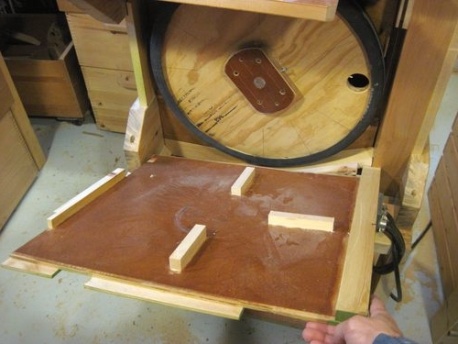
- a plywood tabletop 20 mm thick is laid on top (with textolite glued to its working surface and a slot for the cutting blade);
- sheathe the sidewalls so that later it is easy to remove sawdust (waste) and clean the saw.
A hole in the lower support with bearings is needed to connect the pulleys from the motor and from the cutting belt. They will be fixed on one shaft of steel bar. To adjust the height of the machine to your own height, make a stand additionally increasing the stability of the created structure. Using welding, you can make a metal frame
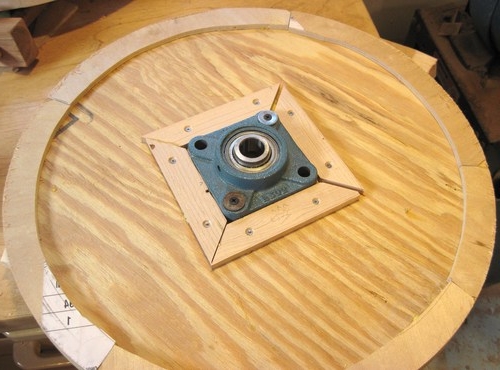
Production and installation of pulleys
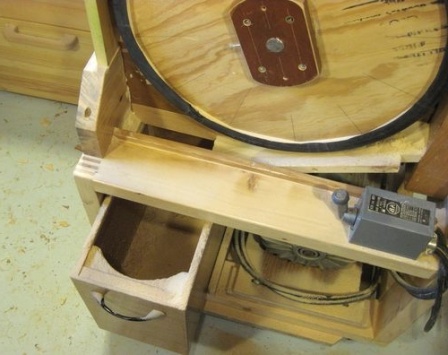
The pulleys are cut out of plywood in the form of circles, which are then glued together to make a part 3 cm thick. Three of them are needed in total: one for the belt drive (with a groove), and two for the belt. The latter are made with an edge convex at an angle of 5 to 10 degrees (as in the photo below), so that web self centering during operation of the equipment.
A pulley with a belt drive is placed inside the cabinet.
Its diameter is selected depending on the number of revolutions of the installed engine: it must provide a saw speed of 30 m / s.
One of the pulleys that drive the saw is installed at the bottom, and the other at the top. A hole is made in the center of the latter. Insert the bearing into the sleeve. Using glue and wooden slats, it is fixed in a prepared seat.

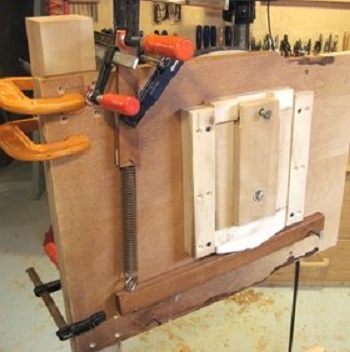
The upper pulley is movably attached so that the cutting belt can be pulled. The simplest lifting mechanism is shown below in the photo. Its main structural elements are spring with lever, which is fixed in the desired positions at different levels with bolts.
The lower pulleys are fixedly fixed on one shaft. A belt is put on the leader (transmits movement to the saw from the engine).

After mounting the pulleys, you need to align them so that they are in the same vertical plane. Washers are used for these purposes. The entire setup process is schematically depicted in the photo below.

It should be borne in mind that the larger the diameter of the pulleys that move the cutting blade, the longer it will last, the saw will work better. For these parts with a diameter of 40 cm, a tape with a thickness of 4-6 mm is suitable.
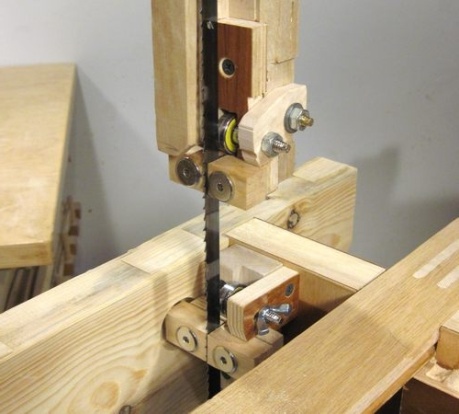
Installing the cutting blade and guides
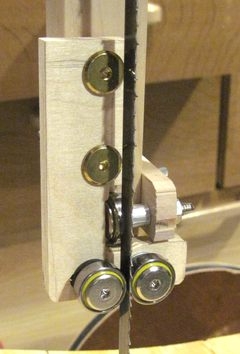
The cutting tape is fixed on the pulleys. For even sawing of lumber, a home-made machine is equipped with guide mechanism. It is mounted along the side of the blade without teeth. Due to the guide, the tape will not bend with a bar. The easiest way to make this assembly is from three roller-type bearings: one of them is located on the blunt side of the saw, and the other two are on the sides of it. The detailed design of the mechanism is shown in the photo below.
Important! The guides should be almost perfectly aligned at the point of attachment to the support. If this is not done, then even a slight deviation will lead to a rather significant displacement of the tape on the opposite side.
To improve the assembly, you can attach limiters made of wooden slats instead of bearings, and also mount guides under the tabletop. You will get a mechanism similar to the one shown in the photo below.
It is better to place the guides closest to the workpiece to be sawn, the ideal distance is approximately 4 cm. If you have to process parts of different sizes, then you should provide guide rail adjustment mechanism, which will allow you to change their height from the countertop.
Finishing, setting up and testing the machine
The upper pulley at the end of the assembly of the machine should cover. On the one hand, it will improve the appearance of the created equipment, and on the other hand, it will increase the safety of its maintenance (it will delay the canvas when slipping).
An electric motor with pulleys and a belt drive also needs to be protected from dust and sawdust by a casing. But first it is connected to the network through a start button located in a convenient place. It would also be useful for personal safety to supply power to the equipment from a separate differential machine or install it in an electrical circuit. residual current device
After assembly, the vertical band saw needs to be set up and tested. These activities are performed in the following sequence.
- Pull the belt to the maximum with the help of the upper (driven) pulley.
- Check that the canvas is at an angle of 90 degrees to the countertop.
- Remove guides.
- They perform a test run of the unit and a trial cut, practically without exerting a load on the tape. In this case, the pulleys should rotate smoothly, without any jerks.
After checking, the guides are mounted in place - this will allow you to work with a load on the canvas. Then the equipment needs to be covered antiseptic composition and varnish. Such an operation will protect materials from rotting and extend the life of the band saw.
For the convenience of sawing workpieces to the countertop, it is recommended to adapt guide rail or metal corner. This must be done in such a way that it can be easily changed its position when processing materials of different sizes.
Be aware that skewed bands can cause serious injury and not only prevent the equipment from operating properly.
A homemade band saw, when properly assembled and configured, will provide an acceptable quality of work and increase their productivity. Also, its use allows you to save money: it is more profitable to cut lumber into blanks of the desired size on your own than to buy finished products. If the premises are heated with wood, then thanks to the use of the unit, it will not be difficult to prepare them. When working with self-made equipment, you must always observe safety precautions.