A mini tractor for the household is a very useful technique. With it, you can easily move and lift any loads, collect, for example, hay or cultivate a plot. At the same time, the range of capabilities of this technique can be significantly expanded; for this, it is enough to equip it with several additions. However, today we will not talk about attachments, but about how to make a mini-tractor for the household with your own hands.
Frame
This element is the most important and necessary for most pieces of special equipment (including such as a mini-tractor). Therefore, in order to avoid unpleasant consequences, it is necessary to draw up a drawing or diagram of the future design in advance. After that, you can safely proceed to its manufacture. For the frame, several lightweight metal channels should be selected and interconnected by automatic or semi-automatic welding. Also pay attention to the length of this element. The dimensions of the frame must be proportional to the dimensions of the mini-tractor. The longer this element, the larger the whole technique.
Other details
After welding the channels, holes are made along the contour, which will serve to fasten various attachments and other structural elements. You should also think about the steps, they cling to both sides of the frame. The main material used here is an 8 mm St-3 steel sheet, which will also be used for the steering column transverse bracket. For additional strength of the joints, the transverse segments are supplied with “kerchiefs” made of the same steel that was previously used for the steps (however, the width of the sheet here will be slightly less, 5 millimeters).
How is a homemade mini-tractor made further? After that, bushings of the bridge hinge are welded to the front transverse beam. They will also be made of ST-3 sheet metal. Sheet thickness - 2 centimeters. After that, bridges (front and rear, respectively) are attached to the frame.
Homemade: mini-tractors and parts for them. Learn more about bridges and beam
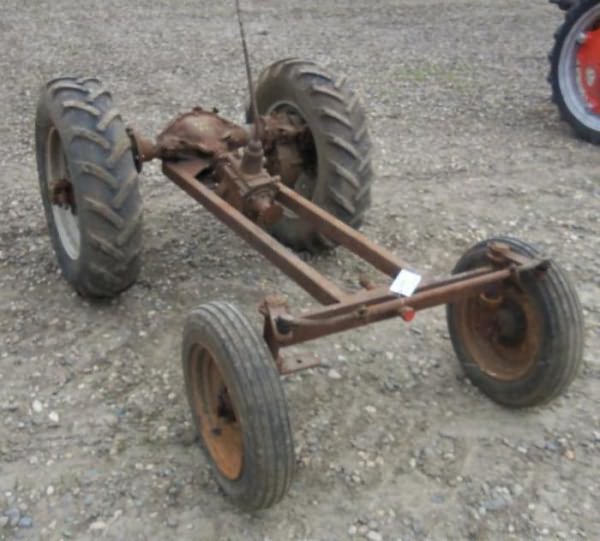
The bridge is made from individual parts and assemblies taken from similar agricultural equipment. Some use bridges from the 24th "Volga"
or "Moskvich". But in our case, such parts will not be used, because they simply do not fit into the dimensions of the mini-tractor. The exception is the rear axle. We will talk about it in more detail a little later.
Details to be done by yourself
Details such as bushings for rotary, wheel and support axle shafts must be made by hand. The cross beam is also independently manufactured. To do this, take a piece of pipe with a square section measuring 65x65x5 millimeters. 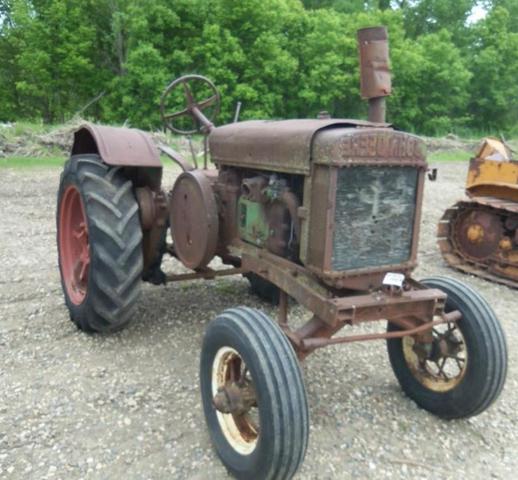 If there is none, the beam can be made from metal corners. The axle shaft bushings are made of structural steel. Slewing mechanisms are made from pieces of a metal pipe. To do this, a pipe with a cross section of 70x14 millimeters is taken and cut into several pieces 120 millimeters long each. They also need to make seats for bearings. After that, the resulting part is covered with metal welded covers. An assembled assembly is welded into the center of the beam (it must consist of 2 roller bearings and a cylindrical cage), with the help of which the rolling of this bridge will be allowed.
Bolts and nuts marked "M-30" should be used as fasteners of this assembly. They completely fasten the entire front beam. When tightening, place a special spring washer under the nut. It is worth noting that with each tightening of the bolted connection, you reduce the amount of play on the front axle relative to the mini-tractor. Thus, you will have the opportunity to adjust this node, if necessary, before each new implementation of agricultural work.
About the rear axle
Unlike the front one, it is not necessary to make it yourself. It is quite enough to install a standard "Volgovsky" element here. But, since the width of the mini-tractor does not correspond to the dimensions of the GAZ-24 bridge, we will have to shorten it to 80 centimeters. To do this, the “stocking” fixation is removed, the heads of the rivets are cut off, and the rest is pushed deeper. The bridge is disconnected from the gearbox housing using a sledgehammer with the first element fixed in a special mandrel. 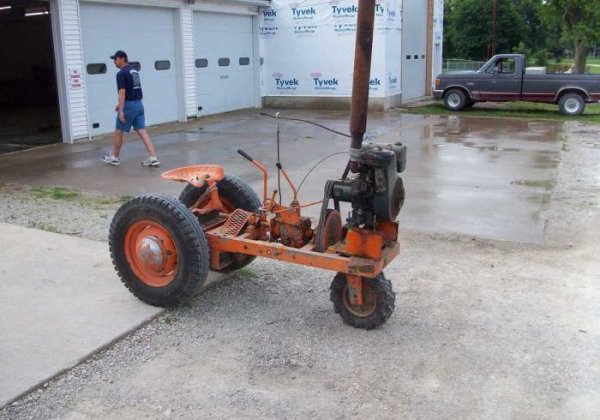
Thanks to these actions, you will ensure docking with the reverse gear, so that the cardan break will be excluded. Also, you will no longer need to balance and install counterweights on mini-tractors for summer cottages, which will significantly speed up the time of work performed.
In order to fix the shortened "stockings" in the holes, a thread ("M-12") is cut and screws are screwed in there. The resulting bridge is attached to 8 plates. The latter are welded with bolts ("M-10", 4 for each plate) and nuts to the spars. The spring washer locks the connections. To do this, identical plates are welded onto the bridge. At the final stage, home-made brackets are installed under the mounting of the hinged frame. For the lifting mechanism, the body of the lift shaft is welded to the axle housing.
The final stage
Now the matter remains small: a seat is welded to the resulting structure, and all equipment is painted in one monotonous color (if desired, several aerosol cans of different shades can be used). A towing device is installed behind the equipment for the possibility of working in a hitch with a plow.
How to make a mini tractor for the household with your own hands? Method number 2
This method is simpler than the previous one, but here you will need to have your own walk-behind tractor to complete the work. At the same time, it is not necessary to purchase a new one; some old Soviet Ural or Neva is quite suitable for a tractor.
What do we take from a walk-behind tractor?
The "heart" will be removed from this unit, that is, the motor, which will be the main traction device of the tractor. All other parts can be used for spare parts. In addition, during the work you will need a launcher, bridges and wheels for them. 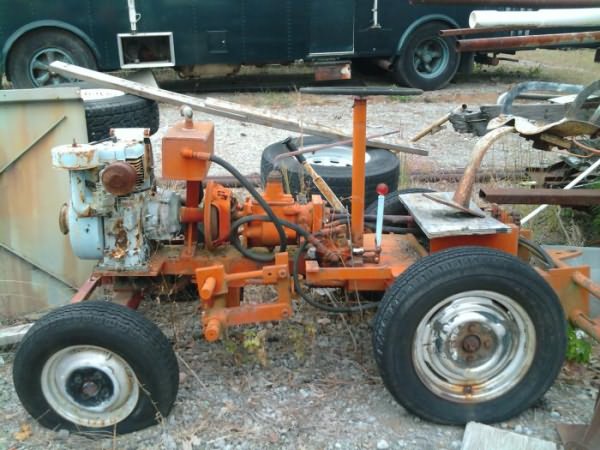 Further assembly technology practically does not differ from the previous one; a welding machine, metal pipes and sheet steel are also involved here.
Getting Started
So, how are mini-tractors made from a walk-behind tractor? First, the kinematic system of technology is designed. Traction forces coming from the internal combustion engine of the walk-behind tractor must be transmitted through the roller chain to the intermediate shaft. Also, with the help of the penultimate device, power will be transmitted to the drive wheels. A brake (band) is located on the output shaft, and a gearshift lever is installed along the axis. The engine will be started via the starter pedal. In principle, a mini-tractor for the household is not such a complicated technique as it seems at first glance, so you can make it based on just one drawing. 
The frame will be made of steel pipes and corners. It is also necessary to provide a fork with a bushing for turning the trailer (if the tractor is coupled with it or a plow). The so-called "cheeks" are attached to the housing of the bearing assembly, and the output shaft is tightly welded to the "kerchiefs" of the socket. We do the front beam and the rear axle in the same way as the previous method.
Further, the home-made mini-tractor is supplied with a metal body with a side height of at least 30 cm. All this must be made of sheet steel. At a distance of 80-85 centimeters from the end of the spinal beam, a soft seat is installed from a thin sheet of plywood (you can additionally sheathe it with leatherette filled with foam rubber). 
At the final stage, we equip a mini-tractor for the household with a tow hitch. After that, the equipment goes through the procedure of priming and painting.
So, we figured out how to make a mini tractor for the household with our own hands.
fb.ru
Homemade mini tractors are ideal for cultivating small plots of land. Almost anyone who is at least a little versed in technology can assemble a mini tractor with their own hands.
According to technical characteristics, homemade products are significantly inferior to factory models. But using a powerful tractor in small areas is at least not rational. Even the cost of maintenance and fuel and lubricants will not be justified. But a small tractor, assembled with your own hands, is very appropriate. In this article, we will tell you how to make a mini tractor at home.
Advantages and disadvantages of homemade mini tractors
A do-it-yourself mini-tractor is much cheaper than factory models, and in terms of its functionality it can sometimes give odds to more powerful tractors. Home-made can be used in vegetable gardens and orchards, for processing sown areas (not exceeding 10 hectares), transporting small loads and harvesting.
Homemade mini tractor 4 * 4
The cost of such a machine pays off in just one season, because the main components and mechanisms are usually removed from broken equipment or purchased at bargain prices. Some farmers convert other equipment into a mini-tractor. In this case, the manufacturing process of equipment is greatly simplified.
Among the shortcomings can be noted the difficulty in the selection of suitable parts. In addition, if some components fail, there may be problems with replacement or repair. After all, whatever one may say, the tractor is assembled from junk, so some details cannot be found.
To prepare drawings, you must have technical skills and knowledge. After all, a mini-tractor must work with attachments and trailers, for this it is necessary to calculate the engine tractive effort.
Advice! A mini-tractor assembled with your own hands must be registered with the traffic police. Otherwise, when leaving on the road, a homemade product may go to a penalty parking lot, and you will be issued a fine.
Homemade mini tractor 4 * 2
We prepare drawings
Some craftsmen are able to assemble any technique, having only a bunch of old iron and a general work plan that is kept in mind. There are only a few such people, and if you are not one of them, you must first prepare drawings of the main components of the future machine.
If you do not have the necessary knowledge, you can ask friends or acquaintances to make drawings. Finally, the necessary information can be found on the Internet.
Having the drawings at hand, assembling a mini-tractor at home will resemble a children's designer. That is, you take part A and connect it to coupling B.
It is worth noting that some of the components and parts that the homemade product will consist of may need to be adjusted or additionally processed. Agree, explaining to a turner or welder what is required of them is much more convenient not on the fingers, but having a ready-made project and drawings at hand.
By the way, at this stage, you need to decide what kind of mini-tractor you want to make with your own hands. The 4x4 break is very popular with farmers. This is a small model on an articulated (breaking) frame, with four-wheel drive. This homemade product is best suited for work on farms.
How to assemble a mini tractor with your own hands
Having prepared diagrams and drawings, you need to find suitable parts. At a minimum, you will need an engine, transmission, frame, and steering. Finding the right parts at home is very problematic, so you can take a walk through the flea market and look through sites selling spare parts. Here you can literally buy the parts you need for a penny.
Frame
The fracture is usually made from a metal channel No. 5 or No. 9. The structure of this material has a sufficient margin of bending strength. From the channel, two half-frames are welded, which are interconnected by a hinged joint. For these purposes, you can use cardan shafts from trucks.
If the fracture does not suit you, you can make a mini-tractor on an all-metal frame. Such a design usually consists of four elements: the right and left side members, the front and rear traverses.
Spars can be made from channel No. 10, rear and front traverse from channels No. 16 and No. 12, respectively. A metal bar can be used as a transverse beam.
Engine
For work, a do-it-yourself mini-tractor can be equipped with any engine of suitable power. The best option is a power plant with a capacity of 40 horsepower.
Most often, M-67, MT-9, UD-2 and UD-4 engines are installed on home-made units. There are models equipped with an engine from domestic passenger cars of the Zhiguli or Moskvich series.
If the homemade product is made according to the 4x4 formula, for the M-67 unit it will be necessary to increase the gear ratio of the transmission, otherwise the power plant will not have enough power to provide the necessary force for the wheelsets. Please note that the power package may require an additional cooling system.
Transmission
The gearbox and power take-off shaft can be removed from the GAZ-53. The clutch will fit from the old GAZ-52. In finished form, these knots will not fit, additional fitting will be required.
To synchronize the clutch with the engine, you will need to weld a new clutch basket and fit it to the required dimensions. At the engine flywheel, it will be necessary to shorten the rear plane and drill an additional hole in the center. These operations can be done on a lathe.
Mini tractor in the process of being assembled
Steering
This assembly should include hydraulic cylinders, this will provide the mini-tractor with better handling. It is impossible to make a hydraulic system at home with your own hands. Therefore, it is necessary to remove the ready-made hydraulic system from any agricultural machinery. Please note that a pump is needed to circulate the oil in the hydraulics.
rear axle
You can take a suitable unit from a car and a truck and install it on a home-made structure. It is first necessary to shorten the axle shafts on a lathe.
If there is no finished bridge, a composite structure from different machines is allowed. The front axle is not driving, so any node that fits in size will do.
wheels
The radius of the wheels depends on how the mini-tractor will be used. For transporting loads, discs with a radius of 13 to 16 inches are best suited. To perform agricultural work, you will need wheels of 18-24 radius.
Mini-tractor from the motoblock "Zubr"
A self-made mini-tractor should give out about 2,000 engine revolutions when plowing, at a speed of 3 km / h. To achieve such indicators, it is necessary to adjust the transmission scheme.
Ideally, each wheel of the driven rear axle should be equipped with a separate reduction gear. In this case, the rotation is set by a four-section hydraulic distributor.
With this steering scheme, there is no need for a driveshaft and rear axle differential. Hydraulics will be responsible for steering the wheels. The necessary equipment (pump and hydraulic cylinder) can be borrowed from the MTZ-80 tractor.
As you can see, making a mini tractor with your own hands is not difficult at all. Despite the fact that this is a rather time-consuming process, the result will more than cover all the efforts expended. Moreover, assembling a home-made structure is a very exciting activity.
farmerznaet.com
Let's consider each of these characteristics in more detail.
Power
Power directly depends on the area of the territory that you are going to process. That is, the more space your site occupies, the stronger the walk-behind tractor should be.
Fuel
The gasoline engine runs less noisily, and due to the low level of compression, it starts with a half turn even in cold weather. Diesel much more economical fuel consumption, creates stronger traction and ensures stable engine speed. At the same time, the area of the site and the quality of its soil also play a role in the choice of fuel: diesel is better at handling large volumes of work on firm ground.
Weight
The weight of the walk-behind tractor also largely depends on what kind of soil you are going to cultivate. If you prefer a light plow for hard, dry soil, your future tractor is unlikely to be able to cope with the tasks assigned to it.
The more difficult the soil to cultivate, the heavier the walk-behind tractor should be, and vice versa - for soft, loose soil, a lighter model will be quite enough.
Plow size
To determine this parameter, you need to consider 3 factors: processing depth which you are counting on your perseverance level, and . If you want to process the maximum area in the minimum amount of time, then it is better to take a cutter with a wide grip. In one pass, she will be able to capture a larger area. But at the same time, the load on your arms and back will increase significantly, and the depth of penetration of the device into the ground will not be too high.
The best choice would be a model that can be disassembled, while adjusting its width. In this case, you can independently configure it to the most suitable parameters for a particular situation.
Price and manufacturer
These two criteria are inextricably linked, therefore we consider them in one paragraph. If financial possibilities allow you to choose a more expensive model foreign production from the brands "Meccanica", "Benassi" (Italy), "Honda" (Japan) or "MTD" (Germany), then you can safely buy it. Each of these brands is known all over the world for the high quality and reliability of their products and will not disappoint you.
If the budget is limited, you will have to do Chinese counterparts these walk-behind tractors from the brands "Dawn", "Aurora", "Forte", "Centaur". But, of course, for less money you will get a less efficient unit.
In order not to go to extremes, it is best to give preference Russian manufacturers"Neva", "Favorite", "Salute" and "Tarpan". They can not be called cheap, but they do not belong to premium-class equipment either. But for a more or less reasonable price, you get pretty good quality.
Step-by-step instruction
Depending on which walk-behind tractor you choose, there are some nuances for creating a mini-tractor for it. But first of all, you must know the basic assembly procedure, and then make your own changes to this list, depending on the features of the components and your own wishes.
Draw a kinematic diagram
Without it, it is impossible to start the assembly, since this scheme will be your cheat sheet throughout the work, suggesting what and where to install. If you are well versed in technology and drawing, you can make it yourself. If you are not sure of your knowledge, it is better to look at examples on the Internet. It is likely that among them you will find an option that suits you perfectly.
Drawings with dimensions:
We make a frame
The material for it will be metal pipes and corners. To connect the elements, it is best to use bolts (and a drill to help them). Also, you can not do without a welding machine, which will need to stock up in advance.
Making a body
This is not a mandatory step, but it is better to do it. This is necessary to protect yourself and the mechanisms from dirt, which will fly in all directions when the unit is put into operation. The best coating material is leafwow stainless steel. When working, you can turn on your imagination and create your own original design of the machine.
Attaching the driver's seat
To begin with, choose a chair in which you will feel most comfortable. A suitable option can be found among the front seats from old passenger cars.
Installing the steering wheel
This step must be done after installing chair to be able to properly adjust its height and angle.
Make sure that it is convenient for you to reach the “steering wheel” and that it does not restrict the movement of your legs.
Choosing wheels and tires
If you want to save money, you have to take wheels from an ordinary old car. But they will create difficulties during the operation of an already assembled tractor. The fact is that the ideal diameter of the front tires for such a unit is from 12 to 14 inches. With a smaller size, the walk-behind tractor will sink into the ground, and with a larger one, it will become much more difficult to steer. Tires, of course, are selected according to the size of the wheels.
Installing the levers
In order to make the control process as convenient as possible, you need, at a minimum, to equip your brainchild with levers responsible for the clutch and brake. The easiest option for your actions is to install a cable drive that will communicate with the motor unit.
We paint the surface
This is necessary not only in order to improve the design of the unit, but also in order to prevent the destructive effects of corrosion.
We run in
Before loading the finished mini-tractor with field work, it must be run in. This way you check how well it functions and if any parts are loose. It is better to do this in advance in order to immediately fix any problems. Don't let your creation break on its first day of work.
Attaching the trailer
To do this, you must first install a socket for fixing the trailer on the body and connect it to it. We roll again. Now pay attention to how securely the trailer is holding and whether it rolls when cornering.
Anyone can make a motobur if they have the necessary components and detailed assembly instructions. Ampel geranium can decorate any room or yard. You will find a description of the plant and tips for caring for it in this article.
We do tuning
When all the basic assembly work of the mini-tractor is done, you can improve it in any way your heart desires: install lights, a signal, a canopy over the driver's seat, or even a hydraulic system. In general, everything that has enough money and imagination to make the process of working on this unit more comfortable.
More details about the process are described in the video:
Now that all the work on the manufacture of your own mini-tractor is completed, you can safely put it into action and work the land, while making much less effort than before.
1decor.org
It is not always pleasant to work on a personal plot. Most people try to mechanize this hard physical labor by purchasing walk-behind tractors, cultivators or mini tractors. Some craftsmen, after having worked with a walk-behind tractor, decide to make a mini tractor from the Neva walk-behind tractor with their own hands. To make the task easier, you can buy a special adapter with a seat, thanks to which the walk-behind tractor will turn into a four-wheeled assistant.
We make a mini tractor from the Neva walk-behind tractor with our own hands
Having made a minitractor from the Neva walk-behind tractor with your own hands, you will minimize the time and effort spent, which will result in the appearance of an excellent device to do all the work on the plot. In addition to the adapter, you can buy: a plow, hiller, harrow and other devices.
You can also upgrade the walk-behind tractor into a mini tractor with your own hands from unused parts of other equipment. This conversion option will take more time, but it will pay off with cheap costs.
To create a mini tractor from the Neva walk-behind tractor, the following components will be required: the walk-behind tractor itself, metal pipes, corners, sheets; two wheels; welding machine; driver's seat; tool kit.
Step-by-step process of upgrading a walk-behind tractor into a mini tractor
- Step 1. We develop the design of the kinematic scheme. The main thing in this scheme is the balance of the structure so that additional loads do not destroy the future equipment. This scheme is developed independently, or you can use a ready-made scheme, with a kinematic image of a minitractor.
- Step 2. We make a frame from corners and pipes. During the manufacture of the frame, it is important to consider the location of the fork with the sleeve, which ensure the rotation of the trailer.
- Step 3. We make the body. For the body, a steel sheet will be an excellent material for manufacturing. The height of the sides of the body should not exceed 30 cm.
- Step 4. Install the driver's seat.
- Step 5. Install attachments.
- Step 6. We check the performance of the manufactured mini tractor.
- Step 7. We paint.
One of these options, to create a mini tractor, we will consider using the Neva MB-2s 7.0 PRO walk-behind tractor as an example. This walk-behind tractor is equipped with a Subaru EX 21D engine. If you plow a personal plot with such a walk-behind tractor, then it will be difficult to straighten up within a week. In order to avoid such consequences, we will convert the walk-behind tractor into a minitractor.
Since the SUBARU engine does not have a 12v outlet, the headlights are installed for decoration. To use them, you need to install a battery pack or battery. When plowing the land, the imperfection and inconvenience of this technique is not noticed. This mini tractor was tested on heavy land for plowing. And although when creating a tractor, its traction characteristics were questioned, the tests were very successful.
Also a big plus of this machine is that the driver and the front of the mini tractor are an additional load, which helps the drive wheels to better grip the ground. Installed levers: throttle lever - on the right, semi-axes release lever - on the left. An asterisk with a diameter of 150 mm is used to lift the hitch. It is output by a bicycle chain to a lever or a manual jack.
The installed wheels from the Volga were found in a landfill, previously cleaned of rust and painted. The arrangement of the pedals is similar to automobiles: the right pedal is the brake, the left pedal is the clutch. Speeds are switched by means of the lever. Shoe brakes taken from the Riga-7 moped were installed.
The principle of operation of the clutch pedal is the same as that of a walk-behind tractor: when pressed, the minitractor rides, if released, it stops. A cable is brought to the lever of the left armrest, which unlocks the axles. It is used when turning is required. There are no special nuances when turning right or left. The throttle lever is located in the right armrest. The lift lever is located under the seat.
The wear of the drive belt on the gearbox is the same as that of the walk-behind tractor. The sum of the weight of the driver and the front of the tractor is 100-110 kg, which keeps the front of the minitractor from lifting when the plow is deepened. The value of the processed track is maintained with the motor-block - 630 mm. Stability problems arise if plowing goes deeper than 20 cm.
Tractor from the Neva walk-behind tractor drawings
How to make a mini tractor from the Neva walk-behind tractor with your own hands video selection
June 22, 12:50You can place an order for the conversion of the Neva to a tractor. with the functions of a cutter for beds, potato planters and potato diggers? I live in Khmelnitsky (Ukraine)
- admin111Author June 25, 10:09
Unfortunately, I do not do re-equipment, but if one of the readers agrees to help you, unsubscribe if you find a solution.
Reply to this comment
- Dmitriy March 8, 13:44
Dear readers, is it possible to make an adapter for a Neva walk-behind tractor to order. (Moscow and MO)? If anyone is doing this please respond.
motoblok-cultivator.com
Working on a personal plot is, first of all, hard work, and then - also the pleasure of the result. Many people strive to mechanize heavy operations, for which motor blocks, mini tractors, and cultivators are purchased. The most popular technique is considered to be a walk-behind tractor due to its cheapness.
The Neva walk-behind tractor can be easily converted into a mini-tractor with your own hands - in order to make the assembly of the new device easy, a special adapter equipped with a seat is purchased. Such a device will allow you to quickly change your walk-behind tractor. It is necessary for the simple reason that the Neva is a design designed for field work on foot, but a mini tractor based on a walk-behind tractor is much more comfortable, since the driver is seated.
A homemade mini-tractor from a walk-behind tractor is a great device for work.
You can also buy other useful devices to the adapter itself - a harrow, hiller, plow, and so on.
Necessary materials and tools
To assemble a mini tractor from a walk-behind tractor with your own hands, you will need:
- rolled metal to make a welded frame (square, channel, corner, and so on);
- wheelset (with a solid axle or 2 axle shafts);
- wheel bearings;
- hardware for assembly (nuts, studs, bolts);
- consumables for welding operations - gas, oxygen, wire, electrodes;
- lubricants;
- primer, paint for coloring the assembled product.
Necessary parts for the manufacture of a mini-tractor
To carry out the work, you will need a certain tool:
- locksmith - hammer, chisel, keys;
- welding machine for frame assembly;
- gas cutting kit if necessary;
- grinder for cutting, grinding metal elements;
- electric drill with a set of drills;
- devices for painting and anti-corrosion protection.
Turning equipment may also be required - for working with a wheel pair.
Features of the design of a mini tractor
As already mentioned, you can purchase a ready-made module with wheels and a seat, or you can assemble all these elements yourself. In the latter case, a simple design is created without a drive to the 2nd wheelset and without a full-fledged steering column. Additions in the form of an all-wheel drive and a steering column do not provide obvious advantages during operation, but they significantly complicate the assembly process.
The homemade mini tractor is controlled by turning the entire transmission-motor unit, for which a standard steering wheel is used. The walk-behind tractor is complemented by a module on a hinge, with a seat and a hitch for trailers (for earthworks). In order to implement this low-cost simple option, a rolled metal frame with a wheelset is assembled. A seat and 2 trailer units are mounted on it - for attaching to a walk-behind tractor, for attaching transport or tillage accessories.
The wheels here are not equipped with shock-absorbing devices, since the speed of the minitractor will be low.
How to convert a Neva walk-behind tractor
There is a standard step-by-step upgrade process:
- First of all, answering the question of how to make a mini-tractor from a walk-behind tractor, you should develop a kinematic diagram. In it, be sure to take into account the balance of the structure, otherwise future unbalanced loads may destroy the device. The scheme (and general design drawings) is developed independently, or you can use a typical kinematic image of a minitractor. It consists of an engine, a front and rear axle, a reverse gear, a chain and a driveline. The engine makes the front wheels rotate. Torque is also transmitted through a chain, a reverse gear, a driveline to the rear axle, as a result of which the rear wheels rotate (they are driving).
kinematic scheme
- A frame is made from corners and pipes. Here it is important to correctly position the fork with the sleeve in order to ensure the rotation of the trailer.
- The body is made - as a rule, from a steel sheet. The height of its sides should not exceed 30 cm.
- The driver's seat is mounted.