In the modern sense, a Japanese lantern is a balloon-like structure with a burner inside. It not only heats the air and thus raises the sky lantern up, but also beautifully illuminates it from the inside. On average, the flight of such a flashlight lasts approximately twenty minutes. During this time, a luminous flashlight rises high up and moves away in the direction where the wind blows. Now such products are often used for festive decoration of weddings, anniversaries, banquets and children's parties. In the evening, when it gets dark, Japanese lanterns solemnly launch into the night sky and enjoy the mysterious flickering of a lantern high above for a long time.
These lanterns are called Japanese because several centuries ago, lamps of this kind were launched into the sky to warn of the onset of the enemy. After the end of the wars, sky lanterns began to serve peaceful purposes and were used for holidays. In Japan, they even hold a lantern festival, where you can see a huge variety of lanterns made of rice paper and silk.
In our country, such lanterns can also be bought in stores or in holiday agencies. Or you can make a Japanese lantern with your own hands. Sat down not to approach the definition of a Japanese lantern strictly, then this can be called any translucent lamp made of paper or thin fabric, inside of which there is a light source (candle, burner or electric light bulb). In this regard, there are several ways to make Japanese lanterns.
In traditional Japanese lanterns, the lampshade is made of rice paper, and bamboo sticks are used as the frame. Inside the flashlight is a wick dipped in oil or a candle. By the way, lanterns in Japan are also lowered into the water. In this case, they are placed on a floating state.
Japanese lanterns can be of different shapes (round, square, rectangular), with or without inscriptions, white or multi-colored, with or without inscriptions.
Option one
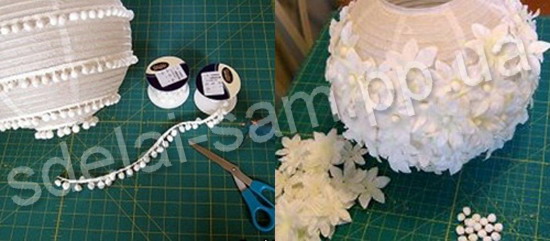
If you want to decorate your home in a Japanese style, then you can use lamps stylized as Japanese lanterns as a light source. For their manufacture, ready-made lampshades in the form of Japanese lamps and decor for them are needed. For decoration, you can use fringe, artificial flowers, braid, etc.
A fringe with pompoms or any other is glued to the selected lampshade at regular intervals. You can combine a white lampshade with contrasting braid and other decor options. If artificial flowers are used for decoration, then they must be separated from the hard plastic base and glued over the entire surface of the lampshade with glue. As a core, you can use fringe pom-poms or beads of a suitable size.
A cartridge with a light bulb is inserted inside the decorated lampshade and the cord is connected to the network. Hang the flashlight from the ceiling on a hook or a special mount.
Option two
- This version of a flashlight from plain paper is quite simple to make. The highlight of these lanterns is the bright colors that you can draw yourself using watercolors.
- To begin with, a background is painted on a sheet of paper with watercolors and allowed to dry completely.
- Next, the bottom of the flashlight and the line of its connection are outlined. To mark the edges of the lamp, the paper is folded as shown in the figure.
- They also make additional ribs on all sides of the Japanese lantern.
- Each of the indicated folds is folded and unfolded several times, and then the structure is assembled and glued.
- After that, all the ribs are gently bent and get a relief shape. The more edges are applied to the paper, the more beautiful and interesting the flashlight will turn out. If paper for a flashlight is saturated with oil, it will turn out to be translucent. Then a candle or burner is placed inside the flashlight.
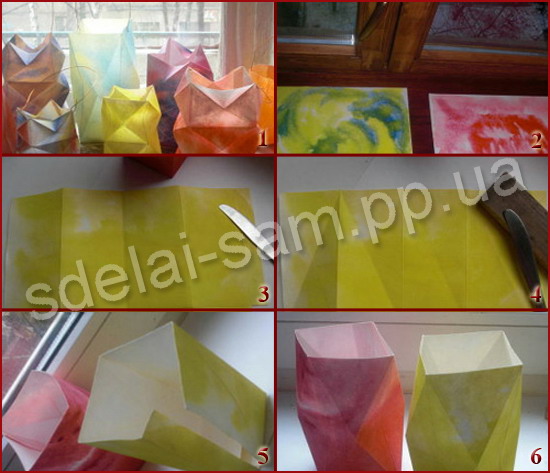
It should be said right away that these flashlights are only suitable for outdoor use, since they are not highly fireproof. The best option would be to place Japanese lanterns on a floating base and launch them into the lake.
Option three
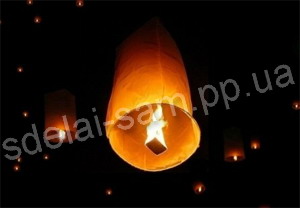
This kind of flashlight is suitable for launching into the sky. It is also made of paper - it should be thin and soft, but at the same time durable. Paper weight should not exceed 25g/sq.m. This is an important condition for the Japanese lantern to take off into the sky. You also need to decide on the shape of the flashlight - it can be in the form of a ball, cylinder or heart.
 The selected paper is impregnated with a flame retardant to reduce its wettability and flammability. Next, four rectangles measuring 80x100 cm are cut out of paper and glued together with glue, for example, PVA.
The resulting flashlight is painted with paints and decorated with various decor - ribbons, braid, sparkles, etc.
You also need to make a burner. To do this, melt the wax and soak a strip of any fabric with it.
The frame on which the burner will be held is prepared as follows: two flat foils are wound onto a knitting needle and two tubes are obtained. They are folded in a cross, a burner is placed inside it and the structure is fixed with wire. In order to prevent paraffin from flowing down, a cup can also be made from foil, which is also attached to the frame.
The entire frame is attached to the flashlight with a stapler or tape.