How to organize the space allocated for the workshop, place the tools so that they are always at hand, and the work brings only joy - this is an article by Sergei Golovkov.
I was lucky: I managed to allocate a small room for a workshop in the basement of the house. This is not my first workshop, there used to be a small workbench in the barn, so by the time the new workshop was equipped, I already had little experience. I spied a lot of ideas in other workshops - often simple, but effective. My workshop is mainly for woodworking, but I can do other work here as well.
layout
Workshop dimensions: 3 x 7 m. Of course, there is no place here for cutting large sheets and processing long materials, and I do this in the garage or in the yard. But for most other jobs, there is enough space, and most importantly, it is warm, light, dry and comfortable all year round. Since the workshop had to be equipped in an existing room, the layout was customized in place.
The workshop has two entrances - from the corridor to the street and from the living quarters. This is very convenient, as it minimizes walking when working both in the yard and in the house.
Initially, in connection with the overhaul of the house, the workshop had a lot of work on welding and cutting metal, so I sheathed the walls with DSP sheets, laid out the electrical wiring and equipped the hood. Then he welded the frames of workbenches (they are all combined into one large rigid structure) and poured concrete on the floor, but first laid pipes for a water-heated floor in places not occupied by tables. Over time, having become interested in woodworking, I moved welding and working with a grinder to the garage, and gradually occupied the workbench for metalworking with woodworking machines.
Since the tools in the workshop consume a lot of electricity, I tried to approach the quality of the wiring responsibly. I brought two cables from the main electrical panel to a small shield into the workshop. One - with a section of 2 x 6 mm specifically for the welding machine, the second - with a section of 2 x 3 mm for other consumers. Further, I led the wiring with a 3 x 2 mm cable to sockets and 3 x 1.5 mm for lighting. Probably, it was better to lay the cross-section of wires with a large margin. But at the time of the start of work, it was difficult to imagine today's abundance of power tools.
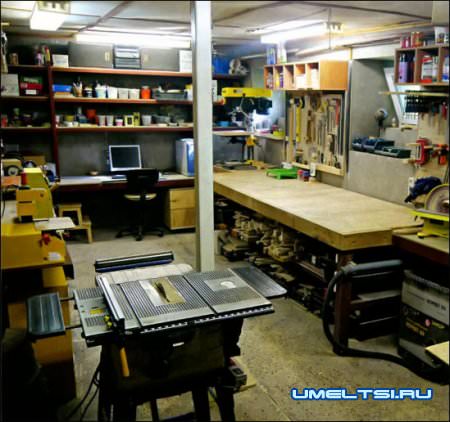
- At the entrance to the workshop is a circular machine. It is located in such a way that if you need to saw a long board, then you can feed it directly through the door from the corridor.
The cross section of wires for sockets may not seem very large, but in my workshop I almost always work alone - and at the same time I do not use a lot of equipment. And since I don’t do welding work in the workshop now, I use a powerful input to connect energy-intensive equipment.
Before concreting the floors, with the help of three pins of 1 m each, I built a ground loop. The frames of the workbenches are metal, their legs are buried in the ground and are also connected to the ground.
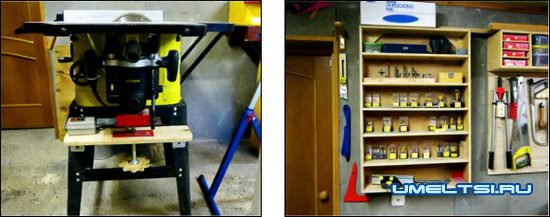
- A milling cutter has been added to the table of the circular machine. To adjust the overhang of the cutter, he invented a homemade elevator. It is very simple, but convenient and accurate.
- To the left of the machine on the wall - a shelf for cutters. Their collection is not very large, but it is constantly growing.
I arranged several blocks of 2-U outlets around the entire perimeter of the workshop. Much of the equipment is always connected, but there are always free sockets for light tools.
The main lighting of the workshop consists of four daylight ceiling lights with 2 lamps of 36 W each. There is also an additional lamp above the table with a computer and a lamp on the band saw.
Dust collection
In my workshop, dust collection is organized on the basis of a powerful household vacuum cleaner. Throughout the workshop, I ran an air duct connected to this vacuum cleaner through a homemade cyclone filter. You can connect the tool to the air duct almost anywhere in the workshop. The system works well, but there is a desire to replace the vacuum cleaner with something more powerful - and then it will be possible to increase the diameter of the distribution pipes from it.
Equipment
Since there is still not a lot of space in the workshop, you have to use all the free space. I store large boards and sheet materials in the basement corridor and garage. In the same place I cut them and process them with a thickness gauge.
The main part of the tool I have is located on the stands. Somehow I saw similar stands on foreign sites and got sick: I want the same ones! There are five stands in the workshop, and I divided them according to the purpose of the tools. For each tool, I cut out individual fasteners and determined a specific place - so all the tools are in sight and always at hand.

As a material for stands, I used old 10 mm plywood, which was covered with laminate flooring from above. Above the stands are small shelves for small items. Made from 12mm plywood.
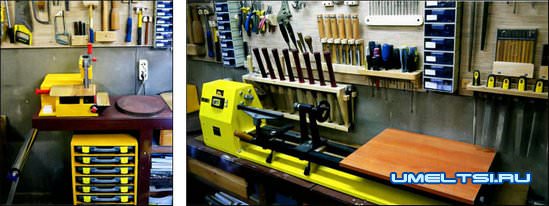
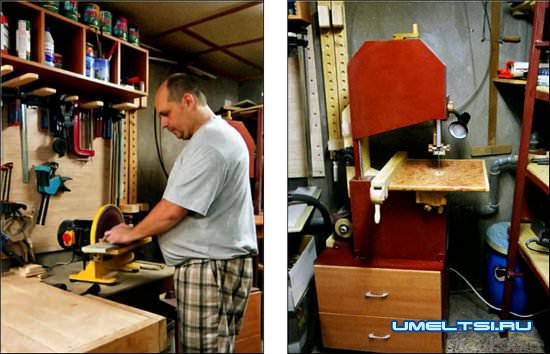
- The self-made grinding machine was designed for processing with narrow grinding belts and circles with a diameter of 125 mm. The machine is very popular when working with small workpieces. There are shelves and drawers under the workbench.
- There is a narrow metal workbench along the left wall. My homemade grinder and wood lathe are located here. Above the workbench there are stands with running tools.
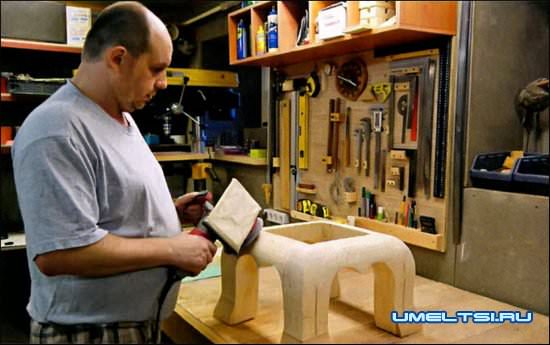
- Almost the entire right side of the workshop is occupied by a workbench lined with wood - this is my main workplace. Above it is another stand for marking tools, above which are small shelves.
- There is a grinding machine next to the workbench, which is rarely idle. Under it is a box for collecting scraps. Above the machine is another stand - for clamps.
- To the right - my homemade band saw. A vacuum cleaner with a homemade cyclone is permanently installed in the corner.