Although the circular roof shape is somewhat unusual for building construction, many examples of circular structures can be found in modern architecture. In this article, we will tell you how to make a round roof of different types, and what are the main differences between them.
The round roof, unusual at first glance, attracts attention primarily by the perfection of its forms, without sharp corners and asymmetry. Often, such structures can be found on religious buildings. When constructing private residential buildings, a round roof is rarely made. In some cases, it is a constituent element of the structure and gives an architectural structure individuality. As a rule, such roofs are erected over decorative verandas, gazebos or turrets.
It should be noted that the rounded shape allows the roof not to be afraid of gusty winds and heavy snowfalls. In addition, the roof space can be used as efficiently as possible. Distinguish between conical, domed and "bulbous" roof types.
Conical roof structure
As a rule, a conical roof is installed on polyhedral or round structures. In this case, a layered rafter system is being built. The ring girder, on which the rafter legs will subsequently rest, is fixed on the central support beam. Its installation is carried out so that the highest point of the cone is not loaded.
The second support element for the rafter system will be the Mauerlat installed along the ring. Mount it on the walls of the building. When placing floor beams, it is necessary to take into account that at the place of installation of the central support, they will have a maximum load.
The ring ridge is fixed on the central support with special braces. Before building a round roof, it is necessary to perform an accurate calculation of all nodes. In order not to make a mistake in the calculations, it is better to entrust such work to specialists.

When constructing a rafter frame, the best choice would be glued beams, which are designed for significant external loads. In particular, ceramic tiles, if they are used to cover the roof, have a large mass - not less than 40 kg per 1 m 2. Therefore, a reliable rafter system is required for installation. Therefore, the timber support members must have good strength.
When arranging a conical roof, the rafter legs act as stiffeners. Their number is calculated based on the type of roofing material and its characteristics.
Often, not only ceramic tiles are used to cover a house with a round roof, but also soft bituminous materials, as well as sheet metal. Please note that in this case it is impractical to use profile materials, since too much waste is generated, and the seams between the sheets need to be very carefully sealed. Nevertheless, all the same, the docking places can cause inconvenience in the future, and the appearance of the roof will not be the most attractive.
Round dome roof device
When organizing a domed roof, its round rafter system is made of hanging rafters, and not layered, as in the previous version. Typically, such a roof is a three-articulated arch made of hanging rafter legs. The lower edge of the arch joins with a Mauerlat bar mounted on the walls. At the same time, the upper edge of the arch rests on a circular girder installed in the upper part of the support beam located in the center of the building.
Of course, if you do not know how to make a dome on the roof, and cannot independently complete the project of the rafter frame, it is better to entrust the calculation to special construction organizations, since such work requires theoretical and practical knowledge of mechanics and resistance to materials. At the same time, according to ready-made calculations, you can build a roof in the form of a dome on your own.

The semicircular domed roof is shaped by the circular sheathing. It is fixed on auxiliary supports, which are joined with the braces of the hanging rafter arches.
The American architect R.B. Fuller once proposed another method for erecting a domed roof. His project was named "Geodesic Dome". The main feature of the design is that it consists of many triangles. Due to very complex calculations and an unusual way of execution, the project was not widely used.
A rafter system for a geodesic dome can be constructed in one of the following ways:
- connector - at the same time, the triangles are assembled together directly above the walls of the building using short bars and connector locks;
- connectorless - panels in the form of triangles are made in advance, and they are assembled into one whole directly at the construction site.
Advantages of the geodesic dome project
- Although rectangular and circular structures are equal in area, the internal volume of the latter is much larger. Thanks to this, significantly more air and light enters the room. In addition, the round design allows material savings of up to 30%.
- The rounded shape of the roof reduces heat loss in winter and also minimizes heat absorption in summer. Consequently, the cost of heating or cooling the space is reduced by about 30%.
- The small mass of the frame of the geodesic dome allows you to do without a reinforced foundation under the house.
- In a building with a round domed roof, any number of windows can be arranged, up to full glazing of the dome structure. At the same time, you do not need to worry about the strength of the roof - it will retain all its characteristics.
- The ball-shaped roof allows the load to be distributed as evenly as possible, so it is not afraid of even very heavy winter snowfalls.
- Due to its aerodynamic properties, the canopy will not suffer from strong wind gusts.
- The rounded roof transmits significantly less external noise inside the building, that is, it provides sound insulation.
- A symmetrical spherical roof is best suited to accommodate solar panels and modules.
- Such a roof structure is simply very beautiful in appearance and looks very original.
How to make an onion-shaped roof
Another version of the round roof, which can be found in the construction of buildings, is the "onion" roof. As a rule, such designs are planted in Christian churches and temples. In private construction, this form is not used - it is too specific. However, for those who are engaged in the reconstruction of religious buildings, for example, in remote villages, where residents do not have the opportunity to hire specialists from construction companies, it will be useful to familiarize themselves with the technique of creating a frame for such a roof.
Provided that the onion-shaped dome does not exceed 3 m in diameter, the frame for it can be made of wood. Specific rafter legs for a bulbous roof are called Zhuravtsy. An inclined type of rafters is usually used. To give the structure strength and rigidity, braces and struts are used. Such elements are mounted in places that bear the maximum load. Thus, they protect the frame from destruction.

To create "zhuravtsov" special templates are used, which are superimposed on a 40 mm thick board. Alternatively, sometimes two boards of lesser thickness are used. A central support is always placed in the center of the dome structure, against which all the rafters rest.
Before covering the round roof in the shape of an onion with sheet metal, over the "Zhuravtsy" it is necessary to fill a crate in 30 cm increments. Therefore, the latter method requires maximum labor and time.

The domes of Orthodox churches during the restoration are often covered with an aspen ploughshare. At the same time, each element is bent in such a way as to exactly repeat the shape of the onion. The material should be laid in such a way that no water leaks between the seams.
For those cases when the dome structure exceeds 3 m in diameter, the frame for it is made of metal. In this case, the fastening of the "Zhuravtsy" to the central support is carried out using metal spacers. The lathing is also made of metal, and it is fastened with an indent within the range of 40-50 cm. A folded roof is usually used as a finishing coating. If a scaly roof is organized, then the seams between the plates after they have been laid need to be soldered in order to exclude the ingress of water.
Dome
The date: 4.2.15 | Section: How to make
 We make a dome on a wooden frame.
Various domed shapes, used in
architecture since ancient times. But here the speech
not about large-scale projects, but about manufacturing
small church dome, for mobile
mobile chapel. It would be more correct
call this form the head, or by
folk dome.
We will continue to work on the manufacture of the dome. List of main parts
and dimensions are given in the first article.
We have already prepared two wooden discs, 300 mm in diameter. and 40 mm thick. ...
Putting them together, we get the base of the product, with a total thickness of 80 mm. ...
This is not a sample, it is better if the base, in the form of a drum, is equal to the height of the dome.
But in this case, there were size restrictions.

In the center of the base, a hole with a diameter of 30 mm will be drilled. ... In the finished
form, the head is mounted on a metal rod.

Eight frame parts, 235 mm wide, have been prepared. , 450 mm high.
and 30 mm thick. ...
When developing the design, I looked at how chapters for churches are made.
In the classic version, a wooden frame is made, which is then
completely sewn up with thin boards. Facade finishing consists of
shingles of a special form, which is called "ploughshare".
But here everything is somewhat simpler, after going through the options, I decided to sheathe the dome
iron, which is also allowed in principle. The only contentious issue
this is the way of sheathing. Here pieces of tin are cut in the form of petals
and sewn onto the edges of the frame parts.
The question arose how to close the joints of the tin. I also chose the simplest option,
close the joints with a T-shaped edge profile with sides, 20 mm wide. ...
For this, the grooves were immediately passed along the outer edges of the frame parts manually
milling cutter, 3.3 mm wide. and a depth of 10 mm. ...

First, I assembled four frame parts with a cross on the base, fastened
screws from the bottom. The frame was assembled on one base part, 40 mm thick. ,
i glued the second disc at the end of the work.
Then I installed four more frame parts evenly. I had to
filing the inner edges with a corner and adjusting the width, so that in the end
all parts formed a regular circle around the outer contour.
I set up a saw at 45 * on a circular and sawed down the inner edge of the parts
frame on both sides.

Fastened the frame ribs together with self-tapping screws in the upper part, where they are
dock. As a result, a 30/30 mm hole was left on top. ...
For the preparation of tin, I first made a template. The actual template was made
even in the design process, I only had to adjust it more precisely,
this is in the first article.

I marked and cut the petals from galvanized sheet according to the template.
Then he took each petal, inserted the bottom edge between the base and the ribs,
fixed from below to the base with a nail from the inside, and pierced with small nails
along the edges to the frame.
I cut the details so that the grooves for the edge remained free and visible.

He hammered the edge into the grooves with glue with a mallet, fixed it with a nail at the top and bottom.

It seems that the whole village is quite tight, I think it will be
hold on for a long time.
For fastening the upper parts of the head, I made a round washer with a diameter of 120 mm.
and 32 mm thick. ... I drilled a hole with a diameter of 30 mm in the center. ...
I installed the washer on top and pulled it to the frame with self-tapping screws.
Perhaps I'll write another article, otherwise it will be too long.
Continued in the article
In recent years, domed houses in our country have moved from the category of exotic to the category of unusual structures. Their owners are no longer perceived as developers who simply decided to stand out against the background of typical cottages, but as people who made an informed choice of such a design.
But the mass distribution of domed houses, as usual, is hindered by stereotypes and a lack of practical information on the design of such structures. Therefore, in this article we will tell you:
- What is the difference between a stratodesic domed house and a geodesic one.
- How to build a domed house yourself.
- How to build a domed house without using connectors.
- How much does it cost to build a domed house?
The difference between a stratodesic domed house and a geodesic one
As practice shows, people who first saw or learned about domed houses are most often divided into two categories. These are those who unconditionally take this form of the house and, we note, the way of life, and those who consider such structures a fad or, as an option, a house not for permanent residence, but a summer cottage "not like everyone else."
We will not go into the details of discussing the advantages and disadvantages of domed houses (and they, like any construction technology, have) and concentrate on practice. So, there is a developer looking to build a domed house. Where to begin? An excellent example of a competent and thorough approach is the story of a portal user with a nickname Rustad.

Rustad FORUMHOUSE user
I decided to build a domed house of a relatively small area, about 100 sq. m, near St. Petersburg. The plot is inclined. The house will be mainly used in summer with infrequent visits in winter. I will build a geodesic dome house using connectorless technology. Such a structure is an accurate mathematical model. It is impossible to build it without calculation and design, because the error in assembling the frame and in the manufacture of parts should not exceed 1 mm. If you do not follow this rule, then the frame will "go away" when jambs accumulate.
Before we talk about the nuances of designing and building a house, presented in the photo below, we will answer the question that is one of the first to arise before any person who wants to build a domed house.

What is the difference between a stratodesic domed house and a geodesic one? Without going into a detailed description of the technology, let's say that the key difference lies in the way the frame is erected.
Stratodesic dome It is erected from racks, for example, made of bent-glued wooden beams, and the stages of its assembly in many respects resemble the usual technology of frame construction.

The peculiarity of this technology is its resistance to vertical loads and the possibility of using standard windows and doors in the construction.
Geodesic dome erected in a slightly different way. First, the individual sections are made, for example in the form of triangles, which are then connected step by step to each other.

When assembling the edges (sections) of a geodesic dome, a connector technology can be used (for example, using a metal connector).

Or (less common in Russia) connectorless technology.

Rustadsettled on the last option and, as we said above, started with the development of the project.

Rustad
Building a domed house without a project or by scrawling something with a pencil on a piece of paper is a futile exercise. From the experience of my acquaintances, I can say that this always leads to only one thing - alterations and endless restructuring of what happened. It is also not a panacea - to outsource the project to a designer.
A designer can draw beautifully, but from a practical point of view, what he has created is often simply impossible to bring to life. A house should be designed by a person with a specialized education, but even a design engineer may not take into account the position of the building on the site relative to the cardinal points, the wind rose, and the size of finishing materials. therefore Rustad, having two free months at his disposal, he sat down to design a domed house, and that's what he got in the end.


Note that the project has been modified several times during this time, taking into account the recommendations of experienced builders, the availability of materials, the peculiarities of the arrangement of furniture and the introduction of wishes from the household.


Stages of construction of a geodesic domed house
Having completed the design stage of the domed house, Rustadmoved on to its construction. Here are a few of the user's recommendations regarding the organization of construction.

Rustad
I wanted to build the house in the shortest possible time, so I attracted assistants - one person who is well versed in the features of frame construction and an auxiliary. I will say right away, yes, these are unnecessary expenses, but if I were to build a house on my own, it would take me 3 summer seasons. At the same time, it would most likely not have been possible to achieve high-quality work. Because purely physically, it is impossible for one to hold the nodes (frame edges) on weight and at the same time fasten them to each other. During assembly, you have to pull or bend something all the time. The second and third pair of hands are vital. Otherwise - the accumulation of errors from row to row and, as a consequence, a "jamb" with the upper contour.
According to the user, he supervised the construction, and his personal - physical contribution is about 30%. The experience of the master (to avoid mistakes) of the skeleton builder was also useful. The speed of the contour assembly has also increased significantly, since 2 people do the work 4 times faster than 1, and 3 people "crank" the same amount of work 8 times faster.
Therefore, the entire construction is divided into a number of successive stages, each of which requires careful control.
1. Erection of the foundation for the domed house.
The plot is located on a slope. The angle of inclination is about 12 degrees. As a foundation Rustadchose a pile-screw. The pile field consists of 24 piles with dimensions:
- pile diameter - 108 mm;
- pile length - 2.5 m.

The piles were twisted in 2 days, being carried until the night. The user notes that, having trusted the foreman of the workers, he himself did not mark the pile field.

As a result: several piles were not where the house nodes are. To correct the error, the “16th” channel had to be welded on.

2. Making the frame: ribs, racks and rafters.
For the frame, we bought a winter forest and pre-cut all the blanks to size on a miter saw, in accordance with the project.


It took the user 4 days off.


3. Assembling the domed house.
Construction of the house began in April. The weather was, to put it mildly, "not flying": it rained, then snow, then wind.

The erection of the domed house began with the installation of a riser (cylindrical base).

The riser was recruited from triangles to make the house look like a whole.

At this stage, the question arose of how to make a takeout under the terrace. The user did not want to twist the piles for each log - it would have been one continuous pile field. It is economically unprofitable, and besides that, the terrace would look ugly.
Rustaddecided to make a terrace in the form of a "balcony" - a departure, which is a continuation of the ground floor. It remains to choose a material that will withstand such a load.

Rustad
When I took up this issue and turned to firms, they recommended me to make a take-out from I-beams glued wooden beams. Comparing these beams (OSB wall 18 mm thick) withLVL timber with a cross-section of 51x300 mm, I did not see any special economic benefits in purchasing an I-beam, but to doubt the strength and bearing capacityThere is no need for LVL timber. He put it.

After assembling the logs, a temporary floor was laid on them from boards, because weather conditions did not allow to do normal.


It took 2 days to assemble the dome (in snow, strong wind and rain).


An important nuance:to fasten the ribs and beams together, the user used constructional screws 6x140 mm.

Unlike conventional self-tapping screws (especially the so-called hardened "black" ones, which cannot withstand dynamic loads and break), the structural self-tapping screw can be bent into an arc, and it will not burst. A special notch cuts through, but does not push apart the wood fibers, so the self-tapping screw can be screwed into a knot or into the edge of the board, and it will not crack.
Also, the self-tapping screw is stronger than usual, and the "asterisk" head does not allow the bit to break off and cut off edges, which simplifies screwing.
The assembly of one assembly of six ribs requires 12 pcs. self-tapping screws.
Utilities - water pipes, electric cables were laid in the floor.

The electrical box was also assembled in accordance with the project at home and placed in the "plinth".

The next stage is covering the assembled dome with a moisture and windproof membrane, with obligatory gluing of overlapsspecial tape. Stuffing the crate for the ventilation gap. Installation of OSB (bases for flexible shingles).

The "pie" of the dome practically repeats the "pie" of the roof for the installation of a soft roof.
An important nuance:the covering of the dome was made of patterns (triangles) from OSB-3 sheets, 18 mm thick, with dimensions 1220x2440 mm.


The cladding was nailed with 6x60 mm brushed nails.


Rustad
Such a nail holds very well. You can pull it out only with "meat", but it clogs faster than twisting screws.

Having made the outer contour, the builders began to warm the floor. Ecowool was blown into the floor with a layer of 30 cm, using a homemade installation based on a garden vacuum cleaner and a plastic barrel.


After warming, the floor was covered with sheets of moisture-resistant GSP (gypsum particle boards) 12 mm thick, laying them in 2 layers.

Having assembled the base, we switched to wall insulation. For this, a synthetic non-woven material (insulation) 5 cm thick was used, laid in 3 layers.


Rustad
It is pleasant to work with this type of insulation. It does not prick, is not afraid of moisture, lightweight. It is only difficult to cut with a knife, it is better to use scissors or a special electric carpet cutter. And I will add: it is better not to put heavy objects on the insulation, and also not to store the rolls in height. The insulation may not recover its shape after removing the load. It is better to act according to this algorithm - we brought it in and put it right away.

After insulating the walls, a vapor barrier was pulled over the frame and everything was also sewn up with gypsum-particle boards, but only 10 mm thick.

At this stage, the house has already acquired a finished look. After the construction of the partitions, the installation of engineering systems and finishing processes began.

This includes the following works.
Dome-shaped buildings are capable of giving an unusual look to any suburban area. And in the Moscow region there are already such. Of course, not everyone dares to build a whole house with domes in the country. But spherical arbors, greenhouses or a garage will be quite appropriate. We will tell you in detail how to make them.
Domes for art and life
Throughout the history of architecture, various forms of domes have been used. Vaulted roofs were already in ancient Rome. The most famous dome from that era is the concrete roof of the Pantheon. A striking structure, built in an original way. First, the builders created an openwork brick frame, and then cast a concrete monolith on it.

A huge bulbous dome crowns the Taj Mahal in the Indian city of Agra. They say that stones, fastened with metal elements, play a bearing role in it.

The domes of Orthodox churches are based on a complex rafter system. Their shape is created using curved trusses.

But since ancient times, people have created round-shaped residential buildings with the help of a mesh frame. This is how the varieties of yurt were obtained.

Since the middle of the last century, attempts have been made to use a spherical shape in the construction of cottages. The history of domed houses is associated with the name of the American inventor and philosopher Richard Fuller. He even patented several designs.

Fuller's proposed house design has important advantages.
- The sphere resists wind and snow loads well.
- Mesh frame is earthquake resistant.
There are also economic advantages - the living space is created with a minimum wall area. In theory, this saves building materials and energy for heating.
The construction popularized by Fuller was called "geo-dome" or "geode". These terms are based on the concept of "geodetic line". Mathematicians put a lot of meanings into these words. For the layman, a typical example of a geodetic line is the meridian drawn on the globe. It's funny that in fact there are no geodesic lines in the outline of the "domed" houses (unlike the dome of the Pantheon). All framing edges are simple straight beams. But the beautiful name "geodom" stuck and is actively used by sellers and promoters of this technology.
How to draw a geode?
The construction of a geodoma is usually based on an icosahedron, that is, a volumetric 20-sided shape. Each of the faces is an equilateral triangle.

The icosahedron shape is a very rough approximation of a sphere. How to make this polyhedron more round? Increase the number of faces! Divide each edge in half and connect the center points with lines. Now we kind of "inflate" the figure from the inside. From the previous face (equilateral triangle), four new ones appeared, but smaller.
So it happens triangulation of a sphere by the faces of the icosahedron (may mathematicians and non-mathematicians forgive us).

So that developers do not have to rack their brains, imagining many triangles, kind people have created on the Internet website, on which this triangulation can be done in a couple of clicks. Open it for convenience in a new tab in your browser.
To avoid confusion, make these settings first.
1. Select the Russian language.
2. Frequency V \u003d 1. (By increasing the frequency V, we divide each edge in two, and each face - into 4 parts. That is, we carry out the next stage of triangulation).
3. Fullerren \u003d no. Fullerenes are a mesh structure for the dome, proposed by Fuller. It is not based on a triangle, but on a hexagon. Due to its complexity, it is not used in private housing construction.
4. Part of the sphere \u003d 1/4.
5. Material of ribs \u003d 50x150. This is the standard lumber sold in any construction market.
Use the mouse to rotate the resulting model. Place it on the “floor”.

Now you can increase the V number and bring the "part of the sphere" to 3/4.

There is no point in increasing the segment of the sphere to one, we are building a house, not a spaceship. And the house should have a floor. When building houses, a "glass" is usually built first, that is, vertical walls. They can be 1-2 meters high. And already a dome is being built over them.


Thus, the most common "part of the sphere" is a hemisphere. If you build a dome without a “glass”, then it is better to choose a “part of the sphere” 5/8. She's not on this site.
Let's take a closer look at the "connection method" item. Several options have been developed for frame elements. In serious construction, metal connectors are used (paragraph cone). These are such star-shaped parts that are made in good workshops.


But for the construction of arbors or greenhouses from wooden slats, other types of connections can be used. Aerobatics is a connection good karma.

Here the "beam" is assembled from several slats, that is, you can use a fairly thin lumber. Now pay attention to the "patterns" that are located on the site under the wireframe model. This is the size and number of frame beams and sheathing sheets. In all such calculators, the frame elements of the same length are indicated with the same color. Having dealt with this simple calculator, you can work in more complex programs.
How a geode is built
From the point of view of construction, a geode has a lot in common with an ordinary frame frame. But there are some differences. The dome uses shorter lumber. Therefore, the frame of the geo-house can actually be built from the scraps left after the construction of a conventional frame.
With materials for cladding, the situation is different. Board materials (OSB, plywood, etc.) will have to be sawn into triangles. As a result, there will be a lot of scraps. Therefore, the size of the "sphere" segments must be adjusted at the design stage to the sheet material that will be used.
An important point in the design of a geodom is chimneys. Pipes sticking out of the dome can ruin its appearance. Therefore, furnaces are often made in outbuildings. The general work plan looks like this.
1. We build any type of foundation. Piles with a grillage, a tape, and a slab will do. The choice will depend on the characteristics of the soil and on the desire of the developer to have a basement.
2. We erect a “glass” on the foundation, that is, the basement of the building. The plinth can be built like a regular frame wall: the vertical posts are installed on the lower strapping, and from above they are connected with the upper strapping.
It is not easy to lay out an almost round plinth made of rectangular bricks. It is easier to get the desired shape with a fixed foam formwork. You simply cut the blocks with a knife, and the wall turns to the desired angle.

3. If a wooden frame was not used for the plinth, then we make a rail of wood on the wall... In fact, this is a Mauerlat. Only in ordinary houses is it installed on the walls, but here - on the basement.
4. A wooden frame is assembled from pre-prepared elements... Make the boards even and calibrate in thickness, it is better to take planed ones. Curved boards cannot be connected with connectors, the construction site will come to a standstill.

5. We erect interfloor floors... To overlap inside the dome, you will have to put one or more supports. They can be pillars or walls. Brick walls are often erected inside the dome. They will be not only a support, but also a heat accumulator. They have ventilation ducts.


6. We carry out external cladding... In a conventional frame, a ventilated facade can be arranged, and the power cladding can be placed on the inside of the wall. This will prevent the formation of condensation inside the wall. In a domed house, it is very difficult to make a ventilated space under the roof, and it is usually avoided. Therefore, it is very important to design the “cake” of the dome so that there is no condensation inside it.
OSB is usually used for sheathing the frame. But if the size of the segments does not fit in any way with the standard size of the slabs, then it is better to use a board calibrated in thickness for cladding.
7. We lay the roofing material... There is no alternative to bitumen shingles in the covering of dome-cottages. When laying it, follow the manufacturer's instructions. Be sure to use a backing carpet.

8. Plinth trim and exterior trim.
9. Warming... Sometimes domes are insulated with mineral wool. But you will have to cut rectangular insulation mats into many triangles. Therefore, if possible, use not a slab insulation, but the so-called blown wool. Its most common type is cellulose wool (although it is possible to blow both mineral and synthetic into the wall).
Cellulose wool ("ecowool") is good because it is not afraid of moisture. If condensation appears in the thickness of the wall, the ecowool will absorb it and then dry out without losing its properties.
You can blow out cotton wool using a dry and wet glue method. To do this dry, pull the vapor barrier over the walls and then punch holes in it. The cotton wool is blown into the formed "bags". Then the holes are sealed.
It is much more technologically advanced to use the wet-glue method. Cotton wool mixed with glue is blown onto the dome from the inside and sticks to it. After drying, the excess insulation is cut off, and it is sealed with a vapor barrier film.
10. Dome interior decoration... The most practical finish is wood paneling. Because there are not many scraps left and there is no chance of cracking. Sometimes they use plate materials (gypsum fiber board or chipboard). They are then putty and pasted over with wallpaper or painted.

By the way, for interior decoration of domes "wet" wallpaper is much better than traditional roll wallpaper.
How to build a gazebo
A gazebo is a simplified geode. For a spacious gazebo, it is advisable to choose a height of 1/4 or even 1/6 of the sphere, that is, to make the dome more squat. A small decorative gazebo can be made in the shape of a full sphere.

It is not necessary to use connectors to hold elements together. Enough of the serrated plates.


A good frame for a gazebo can be made from metal pipes. They can be easily bolted together.

It is not necessary to build a full-fledged dome for the gazebo. There are also 2-3 entrances to the gazebo. In general, it can be formed from several domes, as if fused with each other. The sphere can be attached to a parallelepiped or a pyramid ... In general, there is a huge scope for creativity! A fabric is suitable to cover the gazebo, attach it to the frame with a stapler. A domed gazebo is also great for braiding it with climbing plants.
Features of the domed greenhouse
A domed greenhouse or greenhouse is even easier to build. It is not necessary to use wooden slats to make the frame. You can take plastic fittings. By the way, it is the flexible reinforcement, in contrast to the wooden slats, that allows you to get the same geodetic lines. The design is very close in shape to a sphere.

A reinforcement frame can be made in a couple of hours. We take a piece of reinforcement and stick it with two ends into the ground. It turns out an arc. The highest point of this arc will be the top point of the sphere. How to calculate the length of the first segment? It is enough to remember just one formula. The circumference is equal to the product of the diameter by the number Pi.
If we build a hemisphere, then our arc will be equal to half the circumference. But don't forget that part of the reinforcement that sticks into the ground. For this we put 50 cm at each end.
It turns out: L \u003d 1 / 2πD + 1 \u003d πr + 1 (meters).
The quantity r will be equal to the height of the structure if we build a hemisphere.
In other words, if you need a greenhouse with a height of 2 meters, then the length of the first piece of reinforcement is calculated as follows: 3.14x2 + 1 \u003d 7.28 (meters).
Now you need to stick a few more arcs into the ground so that they form a hemisphere. The centers of these arcs should converge at one point, that is, at the top of the structure, and the legs stick into the ground along its perimeter.
This is how we created the contours of the dome. Remember to identify where your doors will be. It is better to leave two exits to ventilate the greenhouse.
Now give the frame a mesh structure. For this, pieces of reinforcement are taken and woven between the arcs in the horizontal direction. Crossings are reinforced with clamps.
It remains to cover the greenhouse with foil. It is not easy to do this: the film will have to be cut, adjusting its plane to the sphere of the frame. Only reinforced film will withstand such treatment. They fix it with the same clamps and tape.
Why do you need such a greenhouse? Exclusively for beauty. In the vegetable garden, it is better to make a greenhouse in the form of a tunnel. A spherical greenhouse will help you decorate your garden wonderfully. Plant heat-loving plants in it in the spring, and remove the shelter in the summer. Run climbing plants along the frame and decorate with colored ribbons. Night illumination in such a greenhouse looks very impressive.
Go for it - and let everything work out for you!
We present step-by-step master classes with photos that will teach you how to make a church from a plastic bottle, plasticine, toothpicks, paper and even pasta.
If you know how to make a church, then you can make this craft from various materials. Not only cardboard, colored paper, but also matches, and even pasta will be used.
How to make a church out of paper?

To craft it, take:
- whatman;
- cardboard;
- acrylic paints;
- a plastic bottle with a domed top;
- acrylic paint of different colors, including gold and silver;
- scissors;
- glue;
- blue colored paper;
- marker;
- ruler;
- icons scanned on paper.
Before making a church, provide a pedestal for it. Make it from a sheet of thick cardboard, and cover the top with paving stones printed on a color printer. Now let's start painting the details. To make the walls, you need to cut four such blanks by connecting them.

Cut out rectangles from blue paper, use a ruler and a black marker to draw these future windows as follows.

Cut the door out of brown cardboard, on top of it you need to glue both rectangular and semicircular elements so that this part becomes more voluminous and it is clear that there are stones or bricks on it.

Cut two door handles from yellow cardboard. To make the steps for entering the church, you will need to cut semicircles of different sizes from cardboard, then glue them in order, starting with the smallest ones and ending with the large ones below.

To make a dome for a church, cut the top off of the matching bottle. All it needs to be pasted over with plasticine, close the hole in the neck area and make this part more elongated. Then cover the dome with pieces of newspaper, wetting them in PVA glue.

Prime the dome using real primer or white paint.


By this time, the primer has dried, now you can paint the dome with gold acrylic paint in two or three layers.

Glue the windows onto the corresponding markings. Glue the dome on top.

See how you need to assemble and arrange the workpiece. After gluing the windows to the walls, attach a brown tape with small windows from below, then glue the model of the church to make it three-dimensional. Do not forget to glue the icons in the appropriate places. Glue the paper on top to become the roof.

Paint it with silver paint interspersed with brown. And with the same composition, designate the forged elements above the visor of the first door, and the other column should be painted with brown paint. Glue a silver cross to the dome, then glue the tower in the center of the composition.

Here's how to make a paper church. The process is very interesting, but you and your child will create such a meaningful thing from scrap materials. This is a model of the church called "Hodegetria of Jerusalem" and it is located in Taganrog.
The next master class will also be easy for the child if you help him.
DIY pasta church
It is from this material that the next church will be created.

These flour products will create walls, openwork pasta will become decorative elements. Here's what you need to take:
- pasta of different texture;
- scissors;
- pencil;
- ruler;
- long cover;
- foil;
- hot gun;
- cardboard.

Create a hexagon out of the cardboard so that you can use it to make the walls of this shape. Cover it with pasta.

Attach the flat noodles at the corners and top to complete the finish. And with openwork elements you need to steal the top of the walls and make columns by stacking these pasta in a pile.

Cut out a hexagon and a cone from a piece of cardboard. Glue the elements together. Use a hot gun to stick flat pasta on top. Decorate the junction of these two figures with semicircular pasta.

Make a dome out of openwork vermicelli. To give it a shape, you can glue these pastry products over the top of a plastic bottle, which is made in the form of a dome. Glue a cross made from flat pasta in the center. Attach this dome to the roof you created.

Cut out the porch of the following shape from cardboard, glue it on the outside with pasta.

Decorate the corners of this product with flat noodles, and use these pasta and horns to decorate the roof over the porch.

Cover the elongated lid with plasticine, and then glue this part with foil.

You have a bell. Use a glue gun to stick it in place. Here's how to make a church with your own hands from pasta.

If an adult needs such a thing, then he can use matches as material. The work is more painstaking, but very interesting.
How to make a church out of matches - step by step instructions with a photo

To create this beauty, take:
- a box of chocolates;
- toothpicks or matches;
- pVA furniture glue;
- copper wire with a cross section of 0.33 mm;
- for the base - fiberboard, chipboard or plywood;
- flower candy foil;
- veneer.
Here are the tools you need:
- ruler;
- sharp knife;
- eraser pencil;
- curved or straight scissors;
- bar;
- tweezers;
- compass;
- clothespins;
- carnations 2 mm.

The Lazarevskaya church of the XIV century was taken as a basis.

The master used this photo, making markings here. Redraw or reprint this picture to know what dimensions will need to be considered when creating a church with your own hands. Calculations are in millimeters.
To make it easier to craft the temple, please note that you need to conditionally divide it into 3 parts. The central one is the church itself, the refectory is on the right, and the altar is on the left.
Here's how to make a church. To do this, take a thin cardboard and draw four walls, which are a square with sides 5 cm.

As you can see, you need to draw windows in two walls, then cut them out with a thin knife or scalpel.
You can use matches, toothpicks, or a wooden stack to build walls.
The next step is to determine the length of the wooden blanks. If you took a long stack, you will need to saw off parts from it. If using toothpicks, cut off the sharp ends.

Now you can start making the temple. First, decorate the wall that has glass on it.
See how you need to position the wooden pieces by gluing them.

As you can see, these logs need to be moved through one - then to the left, then to the right. Now cut a 5 x 2 cm strip of cardboard. Fold it about in half in the middle.

Make 4 such corners, and with their help, assemble the frame of the future structure. As you can see, these corners need to be arranged vertically and glued to two walls each.

Measure the width of the piece of wood so that you know how much larger the wall has become. Initially it is 5 cm, if the thickness of this wooden blank is 3 mm, then it turns out that now the wall is 53 mm. But since the "logs" protrude in both directions, it means that now the width of the wall is 56 mm. Therefore, you need to cut out two triangles of exactly this width for the pediment. If you have other calculations, then simply attach the wall to a sheet of cardboard and cut two triangles across its width.

Now you will need to glue these two triangles with wooden blanks.

Then attach these gables on both sides to the log cabins, glue them, until the glue dries completely, fix them in this position with clothespins.

Here's how to make a church from matches further. While the main building is drying up, you will be busy making the refectory. Also make four cardboard walls for it, mark the windows on three, and the door on one. The windows need to be cut out with a sharp knife, and the door must be cut through on three sides so that it opens.

Also, start sticking matches, pieces of a wooden stack or toothpicks to this blank, moving them to the right and then to the left.

From this strip, make such a box, glue its two opposite walls to make a log house. For a while, also fix this place with a clothespin.

Then, as in the previous case, attach and glue the gables. Pay attention, one of them is fixed on the side of the door.

Make the third room in the same way, it should be slightly smaller than the first two.


To make a roof, you need to measure the length of the refectory, altar, church. Add 4 mm.

Now, according to the marking of each building, cut out the roofs from the cardboard, bend these blanks in half.

Glue these roofs to each of your buildings. Now you need to cover them. To do this, cut a kind of planks from the veneer.


Make a cutout on the central roof, glue this pipe here. Cut wider and longer veneer planks, glue them so that they cover the cardboard roofs.

To make a cross, you can use the following tool. On such a block, you need to fill 3 groups of nails from the back side. Now start wrapping them with copper wire from above.

Here's a cross.

To make a dome, cut into circles. The largest will be 19 mm in diameter, the next 17 mm, 15 mm, 13 mm, 11 mm, 9 mm. Smallest 5mm. Glue them together as follows.

Punch a hole in the center of the round blanks with a stud. Now take a strip of colored foil 10 cm long, put a dome on it, drop glue into the depression, put a cross inside.

Now twist the foil to shape the dome like this.

Cut the foil at the bottom of the dome so you can glue it later.

From fiberboard, plywood or chipboard, cut out the two layers for the church and glue them together. Glue this blank to make the surface look like masonry. Pour glue inside, put the church here and attach it.

It will remain on the made pedestal in the form of a pipe to glue the dome. Here's how to make a church with matches to make it look like the real thing.

Sometimes a week of Orthodox culture is held in schools, you need to bring crafts on this topic. If you make such a beautiful blue and white church with your child, he will surely take a prize.

Before making a church like this, you will need to prepare:
- plastic bottle;
- cardboard box cover;
- wire;
- rope;
- lace and braid;
- blue and white plasticine;
- cotton wool;
- a strip of rolled padding polyester;
- pVA glue;
- foamiran or colored cardboard;
- double sided tape;
- scissors;
- brush;
- white paint.
First, take the lid on which the craft will be located, paint it with white paint. While the drying process is in progress, you will cut strips of cardboard or foamiran. They will help you set up a fence around the temple.

Sharpen the top ends of these strips to make them look like a picket fence.

In the meantime, the white paint on the box has dried, so it's time to glue the boards to the exposed edges.

Let the glue dry, in the meantime, take the bottle, cut off the bottom.

You need to take a bottle with the upper part reminiscent of the dome of a church, for example, from under mineral water.
Also cut off the top of this container. But here the plastic is strong, so it is better to heat the knife and gradually cut off the excess part.

Now measure 2 cm from the edge of the bottle and cut this part into strips. Then such a trick will help fix the church on a horizontal surface.

Cover the top of the bottle with plasticine, making a pointed tip out of it here.

To make a cross, take the wire in the winding. Here she is blue. First, bend it in half, make a loop here, then bend two more loops on the right and left sides.
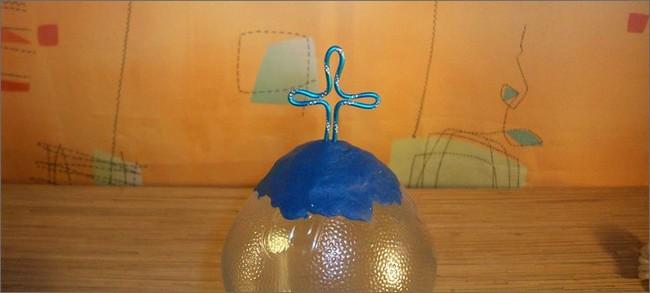
Stick the resulting cross into the plasticine dome cap.
Cover the bottom of the bottle with double-sided tape. Now start peeling off the top paper layer gradually. First remove it from the bottom loop of the tape. Wrap in yarn of your chosen color here.

Thus, you need to arrange the entire bottom of the bottle. Now glue the lace strips here. They can be blue above and in the middle, and silver below.

There is now more interesting work to be done that will also shed light on how to make the church. The dome needs to be decorated. To do this, together with the child, roll up balls of blue and blue and make cakes out of them. Start gluing them from below in a checkerboard pattern. The second row should be slightly shifted to the right and subsequent ones too.

Now attach the double-sided tape to the bottom of the cut strips from the plastic bottle and glue it to the box.

You can line the horizontal surface of the box with grass, glue trees and flowers here made of rubber, plastic or other materials. But in this case, the composition is white and blue, so cotton wool drifts will be appropriate. Place them on the box, glued on. And in the center, place a strip of padding polyester. It also needs to be glued. Here's how to make a church so amazing.

If you are interested in learning how to make a church out of matches, then the following master class will help.
An interesting idea is to make a temple out of paper using the art of origami. In just 12 minutes you will gain the skill and be able to make a church out of this material.