The professional flooring differs in high rates of rigidity, small weight, a practicality and simplicity of processing. You can even build a small building for parking a car from it, including an insulated one, even with your own hands. First you need to determine the appropriate type of construction, evaluating the drawings and photos of metal profile garages, calculate the dimensions and consumption of materials. After selecting the tools and familiarizing yourself with the installation technology, you can safely get to work.
Metal profile garage - practicality and simplicity of design
General requirements for a garage device
The set of requirements for the construction of an attached or detached garage is set out in SNiP 2.07.01-89 “Urban planning. Planning and development of urban and rural settlements”, as well as in the regulations of 07/21/97 “Fire safety of buildings and structures”. When designing, special attention is paid to the dimensions and location of the building:
- The minimum distance to the nearest plot is 1 m, from the veranda or windows of the neighboring house - 6 m.
- It is forbidden to place the gates on the same level with the "red line", the allowable indent is at least 5 m.
- The standard garage dimensions for one car are 3 * 5 m, the box for two cars should be 4.5-5 m wider (depending on the brand of the vehicle).
- The optimal height is 2-2.5 m, the passage around the machine is 1 m.
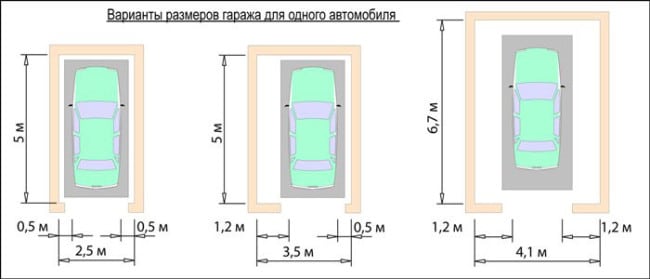
Garage dimensions determine ease of use
Trying to save space on the site as much as possible, it is necessary to build on the minimum allowable parameters:
- the height of the building is 0.5 m higher than a person's height;
- garage width - car size plus 80 cm;
- the length of the room is one and a half the size of the car.
Drawing example
Design selection: standard designs and drawings
The basis for the construction of a garage from corrugated board is the principle of frame construction. The technology for creating a box is the same for all types of metal structures. When choosing the type of building, it is necessary to focus on the device of the roof and isolation from other buildings. Typical drawings and photos of metal profile garages will help you make the right choice.
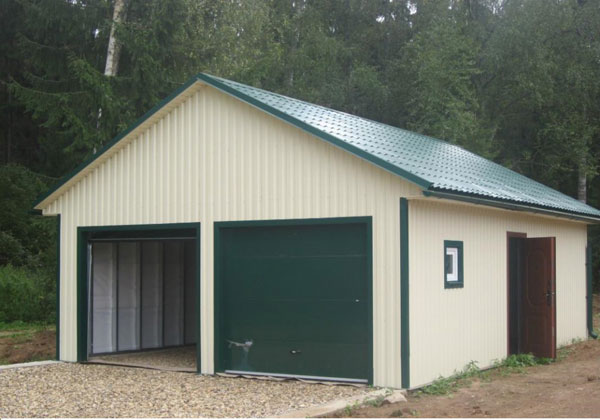
Compact design
Shed roof garage
The traditional construction is a building with a pitched roof. This is the easiest and most affordable option for building a garage. The slope is parallel to the short or long wall of the box. It is recommended to turn the lower part of the roof to the windward side.
Shed garage from corrugated board
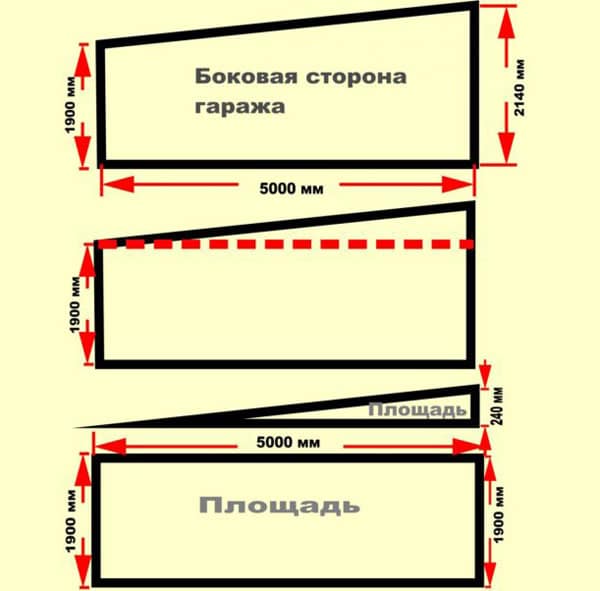
When calculating, it is important to correctly observe the slope, which ensures the free flow of water and snow. Determining the slope angle is based on the following factors:
- The climate of the region. A sloping roof of 5-7 ° is relevant for areas with moderate rainfall or areas of increased wind activity.
- Cover type. Decking is a versatile material that is applicable on flat and steep roofs.
- General architectural ensemble. When building a garage, you often have to adapt to neighboring structures.
Important! The angle of inclination of shed garage roofs should not exceed 30°.
Garage for two cars with hozblok
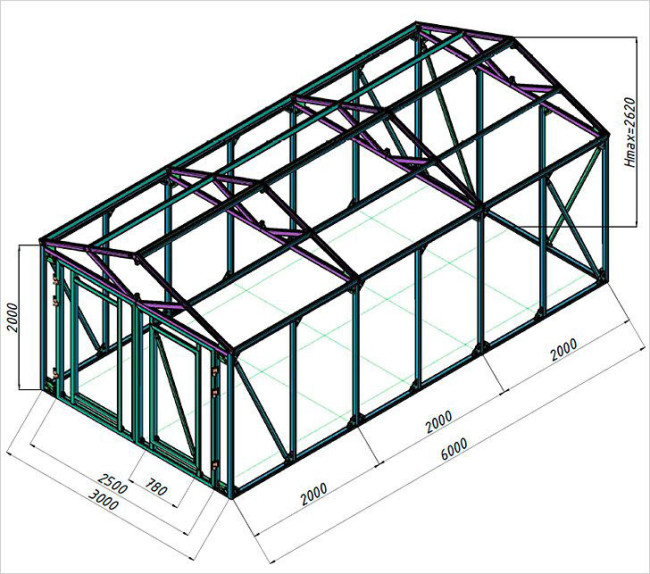
The scheme for building a garage from a metal profile with your own hands is displayed below.
Designations according to the drawing:
- foundation, consisting of a sand cushion, sand-cement bedding and concrete with a layer of 10 cm;
- roof (profiled sheet, crate and insulation);
- gate frame;
- sheathing panels;
- supporting metal poles;
- concrete piles;
- mounting brackets;
- floor beam;
- ventilation gap.
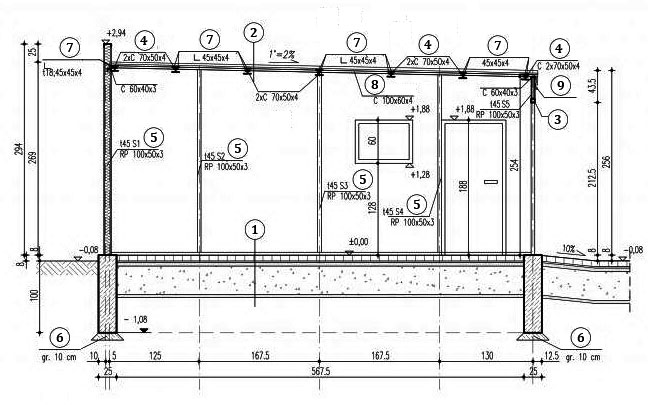
Drawing of a shed building
Detached gable building made of corrugated board
A gable roof, as a rule, is installed on garages made of a large metal profile or, if it is impossible to install a single-pitched roof, in regions with strong winds and heavy rainfall.
Advice. In northern regions with heavy snowfalls, the slope of the gable roof should be at least 40-45 °.
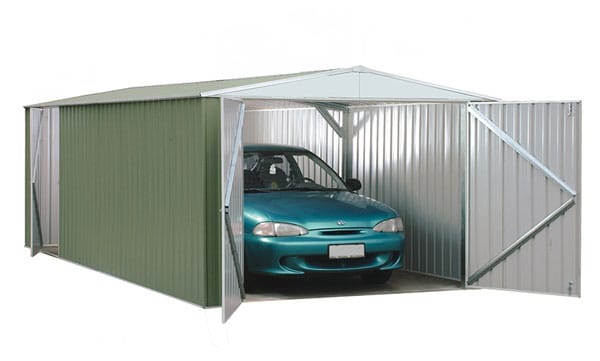
Photo of a gable garage made of metal profiles
Advantages of gable garage buildings:
- the possibility of arranging a spacious attic space;
- attractive appearance.
Spacious double garage
Disadvantages of a gable construction of a garage from a profile:
- the complexity of self-erection - the device of the truss system requires a certain experience from the performer;
- rise in price - the consumption of materials and the time to complete the work increases.
Inclined roof with emphasis on pillars
When constructing a truss system, layered or hinged technology is used.
The first option involves the use of reliable supports for the lower and upper edges of the rafter leg. The bottom of the rafter system rests on the vertical racks of the structure, and the top - on the running system. The construction of the roof begins with the installation of the frame and the ridge run. Further, with an emphasis on the frame, rafters are mounted in pairs.
The second option is the emphasis of the rafters on the walls of the box. The fulcrum of the upper heel of the hanging rafter is a similar part of the mirror-mounted counterpart. Usually, hanging truss systems are created using triangular trusses. Metal elements are available in finished form, as an option, you can make them yourself.
Important! The layered system is constructed when creating parking boxes for two or more cars, where a wall or additional support pillars are provided. The hanging structure of several roof trusses is optimally suited for covering spans up to 5 m.
![]()
A variant of a simple design of a gable garage
Attached garage: design features
The extension of a frame garage made of metal profiles to a brick house is quite rare. As a rule, the owners of suburban areas prefer capital buildings, trying to equip a warmed room.
Some nuances of the construction of a "connected" building:
- The common wall of buildings needs to be insulated with non-combustible material, since the extension increases the fire hazard of a residential building.
- The laying of the foundation of an additional structure should be carried out to the same depth as at the base of the house.
- The roof of the garage will be located below the roof of the main building, which will allow precipitation to flow freely onto the extension. In order to avoid "flooding" high-quality waterproofing is required at the junction of two roofs.
- During construction, it is necessary to provide that the slope of the garage roof is steeper than the slope of the house roof.

Attached garage frame
Do-it-yourself metal garage construction technology
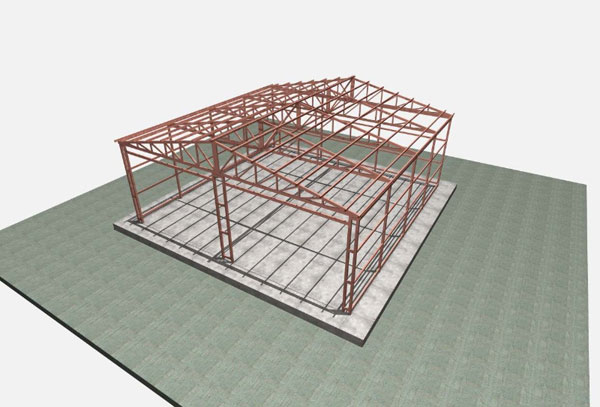
It is realistic to build a garage from a metal profile with your own hands in 1.5-2 months. The main time is devoted to solidification of the strip or monolithic foundation, as well as to the assembly of the frame. Below is a step-by-step example of the construction of a shed building for a car.
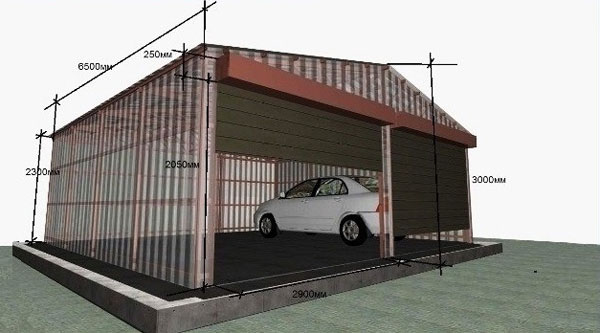
Garage construction drawing with 3D mockup
Development of a drawing and calculation of materials
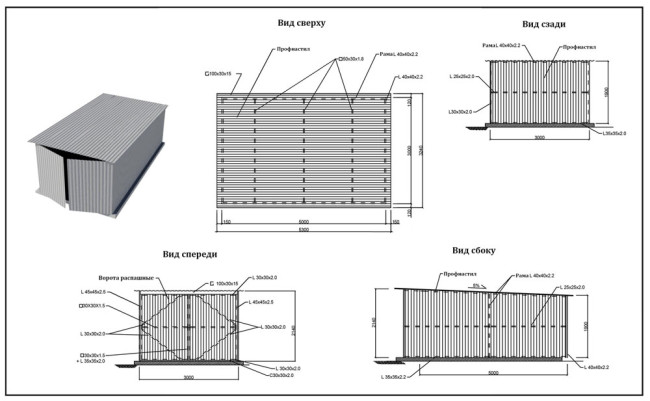
A complete construction project from corrugated board displays the following data:
- Construction scheme with a four-sided projection (view from above, side, back and front). The three-dimensional image conveys the general appearance and aesthetics of the building. The main drawing of a metal profile garage indicates:
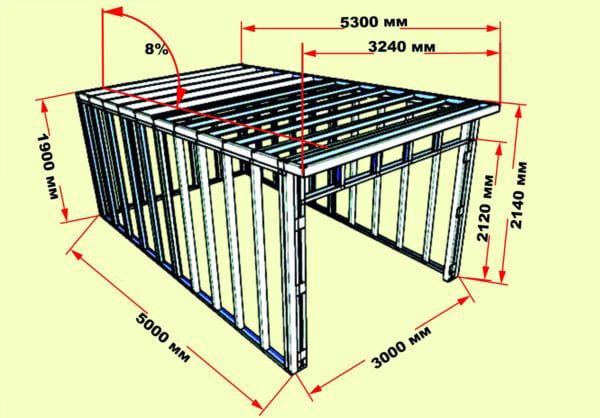
- total and internal width / length of the building;
- construction height;
- slope angle;
- type of entrance gate;
- roofing material;
- characteristics (diameter) and location of support posts, frame, stiffeners.
- Roof device.
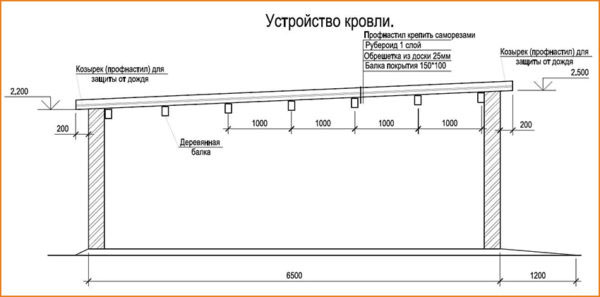
Scheme of a shed roof device
Calculation of concrete. When laying the column-strip base, separate calculations are made:
- Calculation of concrete for piles 40 cm long, 30 cm in diameter is performed according to the formula: V=πr2h, where V is the volume of the cylinder, r is the radius of the circle, h is the length of the pile, π is a constant (3.14).
- Calculation of concrete for a strip base. Separately, the volumes of the length and width of the foundation tape are calculated by multiplying the indicators of the sides.
- The total amount of the foundation is the sum of the obtained values.
Arrangement of structural elements into shapes
Calculation of corrugated board. To calculate, the entire area of \u200b\u200bthe shelter should be decomposed into simple shapes - rectangles and triangles:
- The area of a right triangle is half the product of the legs.
- The area of a rectangle is the product of length and width.
- After calculating all sides, gates and roofs, the areas are summed up.
In addition, for work you will need a metal profile with a cross section of 40 * 40 mm and fasteners. The consumption of profiled pipes for a garage of 3 * 5 m is about 130 m.
Important! For the construction of a garage, wall corrugated board C10 with a thickness of 0.5 mm is suitable. The width and height of the sheet is selected according to the preliminary cutting. It is advisable to choose a galvanized multilayer material with an anti-corrosion polymer coating and a protective mounting film.
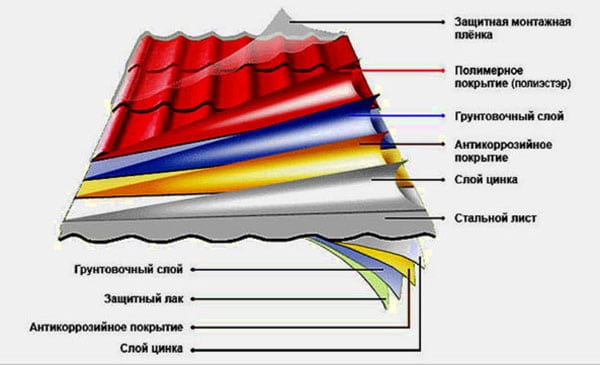
Wall corrugated board with polymer coating
Site preparation and necessary tools
The work will require the following equipment and tools:
- concrete mixer;
- screw shovel or electric drill;
- welding machine;
- screwdriver;
- shovel;
- wire cutters and pliers;
- scissors for cutting metal;
- plumb;
- building level;
- self-tapping screws, screws, nails, nuts and washers;
- stakes and cord for marking;
- rivets for corrugated board.
Site preparation procedure:
- Determine a suitable place and clear it of debris, bushes and grass.
- Install pegs in the four corners of the future garage and pull a rope between them.
- Install additional wedges, marking the foundation lines 30 cm wide.
- If you plan to place a viewing hole, then you need to outline its contours.
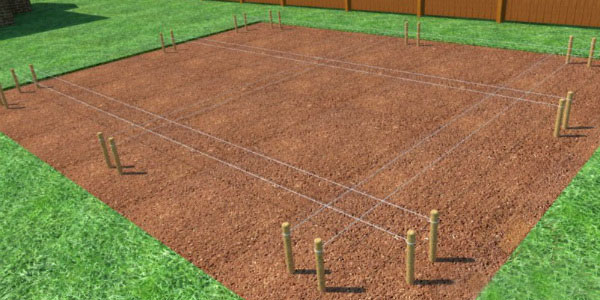
Foundation line marking
Construction of a pile-strip foundation
The foundation device is performed in the following sequence:
- Along the perimeter of the site, within the markings, dig a trench. The depth of the ditch is 40 cm.
- Align the walls of the moat as much as possible, making them vertical.
- Tamp the bottom of the trench with a heavy log.
- Prepare holes for the installation and pouring of concrete piles:
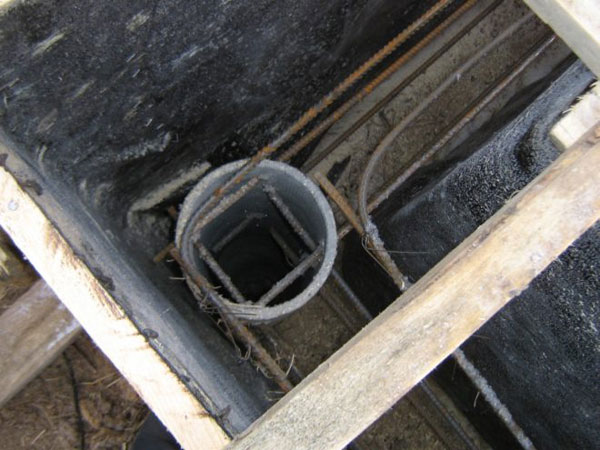
- Fill piles with concrete:
- pour the first pile by 50% with M200 concrete;
- slightly raise the pipe, allowing the mixture to fill the hole;
- install the pile in place and fill with concrete to the edge, relieving the working solution from the bubbles that have appeared;
- repeat the procedure with the rest of the pipes.
- Cover the piles with foil or roofing material. Water the concrete periodically during the first two days.
- Lay the foundation strip:
- build formwork from boards 8-10 cm high above the foundation level;
- install structural elements in a trench and fasten them with self-tapping screws;
- strengthen the sides of the formwork with props;
- lay roofing material, attaching it to the boards with staples;
- make a reinforcing frame 25 cm wide, 35 cm high;
- lay wooden blocks at the bottom of the trench at a distance of 1-1.5 m from each other;
- install a reinforcing structure;
- fill the trench with concrete.
- Leave the foundation until completely solidified - approximately 3-6 weeks.
- Remove wooden formwork.
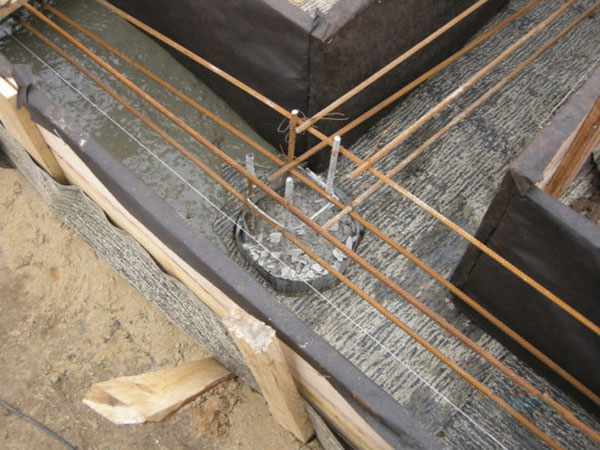
Strengthening the strip foundation
At this stage, a viewing hole is equipped. Its depth is 1-1.2 m from the level of the garage floor. Strengthen the walls of the pit with reinforcing mesh and putty. For convenience, you can build concrete steps.
Filling the floor and installing the frame
The next step is flooring. The work is carried out in several stages:
- Cover the base with roofing felt in three layers.
- Lay damper tape around the perimeter of the building.
- Place the formwork at the top of the walls of the inspection pit.
- Fill the floor with concrete with a layer of 30 cm.
- After hardening, make a finishing screed.
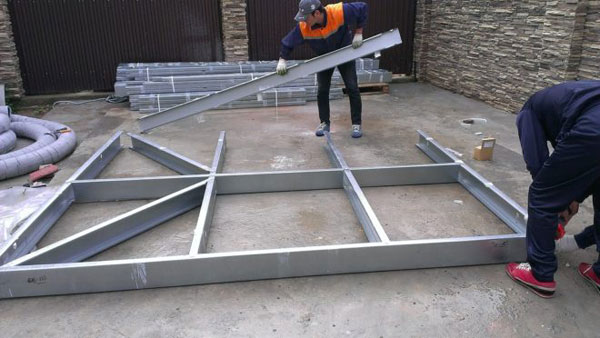
The metal frame is assembled separately by different elements or is erected on a foundation. Metal profile pipes are cut according to the drawing and joined together by electric welding or bolted connection. A starting profile is fixed along the foundation perimeter, and corner and intermediate supports are welded to it. The side, front and rear walls are reinforced with transverse struts.
Advice. There should be 2-3 racks per width of one sheet of corrugated board. The distance between the supports is no more than 80 cm.
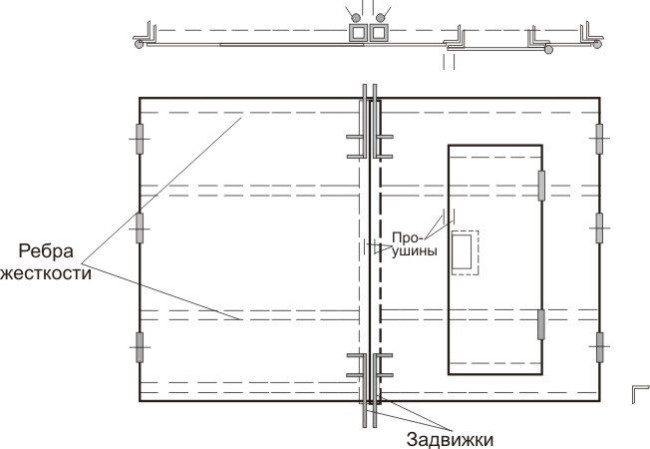
Swing garage door drawing
After erecting the frame of the walls, the base for the roof should be prepared. It is better to arrange and connect the elements of the rafter system to each other on the floor, after which the whole structure is lifted and installed from above. At this stage of construction, you need to take care of the device of the gate: make a frame and weld the hinges.
Sheathing the body with sheets of metal profile
Sequencing:
- Fasten the first sheet to the edge of the building, aligning its location vertically. First, the top of the canvas is screwed, and then the bottom.
- Install the second sheet with an overlap of one wave. Treat the joints with sealant and tighten the sheets with self-tapping screws.
- By analogy, "sew up" all the walls of the garage.
- Fasten corrugated wall sheeting with a thickness of 0.6 mm or more on the door frame.
- Cover the base of the roof with waterproofing material, fix the gutters.
- To the roof lath along its perimeter, install wind strips that protect the roof from the penetration of precipitation.
- Sheathe the roof with corrugated board:
- place the first sheet on top of the side wind bar;
- align the canvas along the edge and fix it with self-tapping screws through the wave;
- lay subsequent sheets with an overlap towards the opposite edge.
Fastening corrugated board to the frame
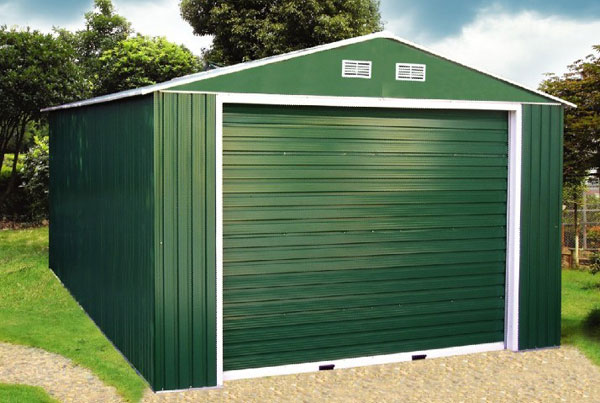
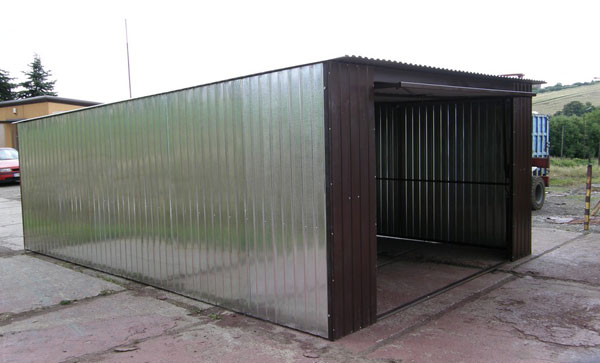
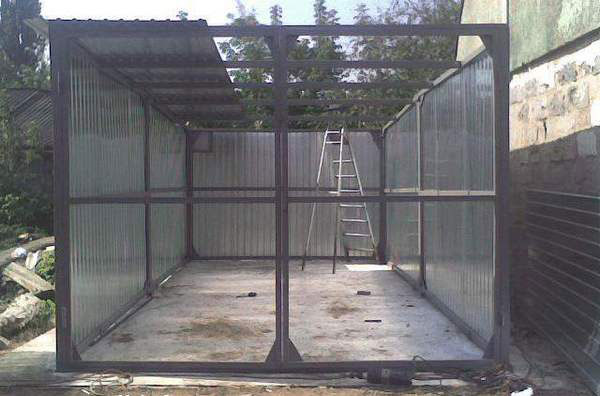
As a result of the work done by one's own hands, a "cold" garage from a metal profile will turn out, as in the photo below. However, you can not stop there and improve the functionality.
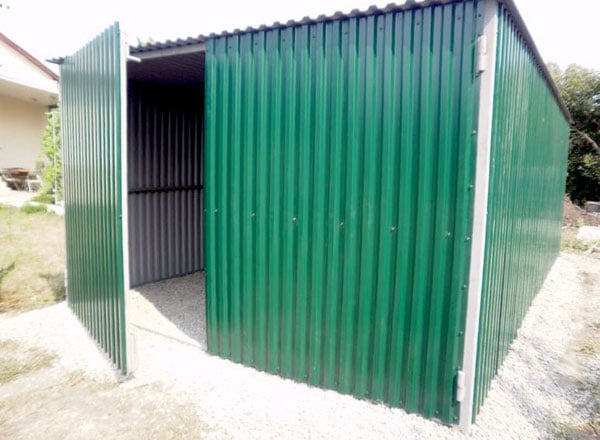
Ready-made "cold" garage from a metal profile
Insulation of a metal garage and interior decoration
The metal has a high thermal conductivity, so the corrugated garage needs to be insulated. Mineral wool, foam plastic or glass wool is suitable for thermal insulation.
The thickness of the mineral wool is selected in accordance with the thickness of the metal profile from which the frame is built. With this approach, it will be possible to lay the insulation flush and carefully sheathe the room from the inside with plastic panels, moisture-resistant drywall or clapboard.
Advice. Mineral wool is susceptible to moisture. Therefore, experts recommend replacing it with a less heat-intensive, but waterproof foam.
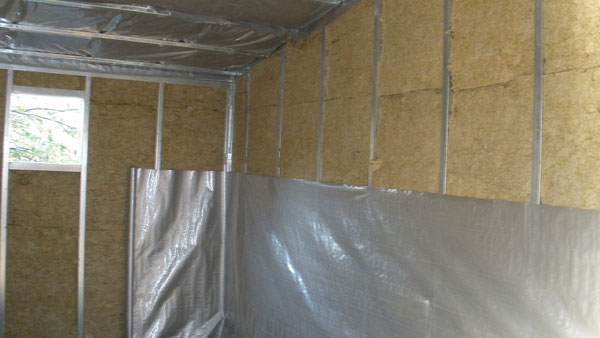
Thermal insulation of the building from the inside
To make the most of the space, the room needs to be supplemented with compact, but quite roomy storage systems, hanging shelves, racks, baskets.
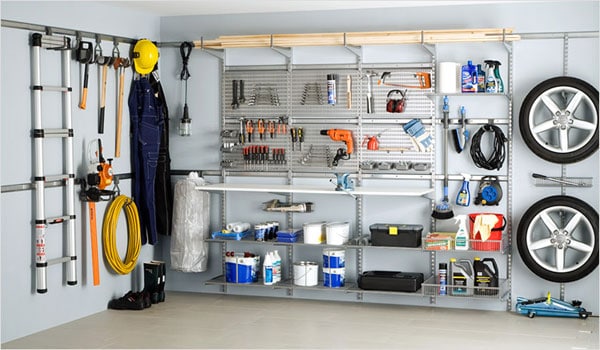
Modular systems for organizing space
With proper planning, calculations, selection of materials and observance of installation technology, there should not be any difficulties with building a garage from a metal profile with your own hands. When in doubt, it is recommended to seek professional help.