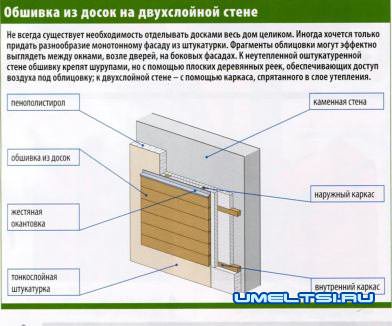
Wooden cladding, commonly called clapboard, is a popular way of decorating walls, not only internal, but also external. It was the tradition of wall cladding with boards that formed the basis of such a common method of facade decoration as siding. Under the cladding, you can hide both ordinary brick and frame walls. House fully boarded looks like real wood; but individual fragments of the facade can also be decorated with wood. Wooden cladding is one of the methods of external wall insulation by the “dry” method, a type of the so-called hinged ventilated facade. Carpenters or joiners are hired to complete the sheathing. Often such services are offered by firms that are engaged in the production of lining.
To be dry
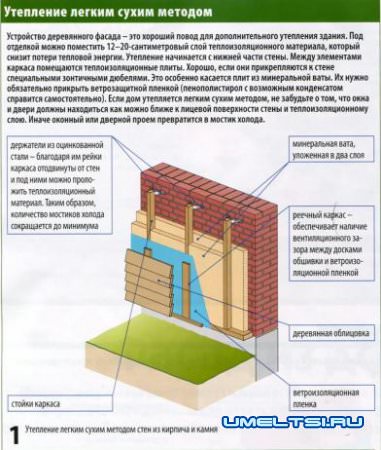
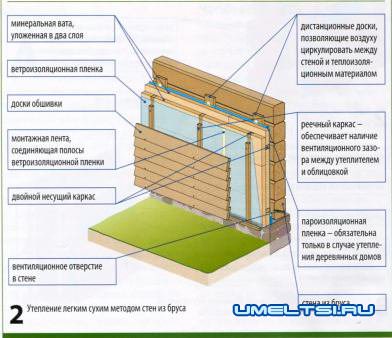
The cladding must be ventilated. Water vapor can condense between the sheathing and the wall or (if there is a heat-insulating layer) between the sheathing and the insulation, and moisture is the enemy of wood, walls, and heat-insulating material (especially mineral wool). To avoid wetting wood-lined walls, a ventilated space is provided in their design. By separating the sheathing boards from the insulation or wall, it ensures the removal of water vapor from under the cladding. We also recommend purchasing a windproof film. It is attached either directly to the walls, or (in the presence of insulation) directly to its surface. The film protects the walls from blowing, and the insulation - from mechanical destruction by intense air currents; at the same time, the film does not allow water to pass through, but allows the free exit of steam from the inside to the outside. In addition, moisture condensing under the cladding flows down the surface of the film and is removed through the ventilation gap.
frame
For the installation of the skin, a frame is used - a supporting sub-facing structure, to which the lining is attached. The frame consists of impregnated (that is, impregnated with special compounds) wooden slats 3-5 cm wide; if the building needs to be insulated, the frame studs are often made of wider planks, between which heat-insulating material is placed. In this case, the distance between the uprights depends on the width of the heat-insulating boards, since the spacer must densely fill the space between the frame elements.
Click and enlarge
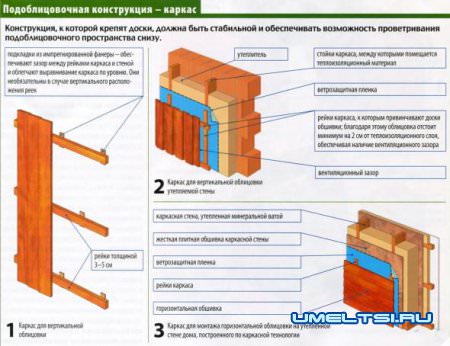
If the wall is not insulated, the frame slats are placed every 40-60 cm. If the sheathing boards are horizontal, then the slats to which they are attached must be installed vertically. Good specialists do not attach the frame to an uneven wall. First, with the help of a level, they check whether it is even enough. Any deviations from the vertical and horizontal are leveled by placing strips of impregnated plywood under the frame rails. It is imperative to check that the frame rails are nailed or screwed to the wall of the house with only one fastener across the width.
Two fasteners next to each other could give excessive rigidity to the structure, and the frame must be able to move due to changes in temperature and humidity. It is best that special elliptical holes are provided in the rails at the attachment points, providing a backlash of 1 cm in it. In this case, the attachment of the frame to the wall will be more elastic, which increases the strength of the cladding.
wall cladding
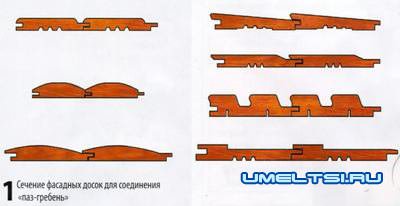
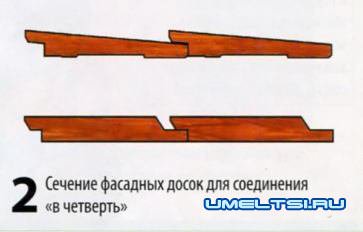
Before the first board is connected to the frame, make sure that the workers place it at least 30 cm from the ground surface - this will protect the sheathing from splashes of raindrops falling on the ground. The method of fixing the boards depends on their profile. Boards with straight edges are overlapped so that the top board partially overlaps the bottom board. In this case, the joints overlap and water does not penetrate under the cladding. A similar effect can also be achieved with boards with the so-called quarter, as well as grooved boards, which are joined according to the “groove-comb” principle. Horizontal sheathing starts from the bottom of the wall. Vertical sheathing is made either from boards connected according to the “groove-comb” principle, or from boards with straight edges. In the latter case, the boards are stacked side by side, and their joints are closed with narrower flashing strips. You can also do the opposite - place the flashing strips at the back (that is, behind the boards) so that the boards rest on them on both sides. The cladding can also be mounted diagonally.
It is worth prompting the performers to start cladding work with large wall fragments. The trimmings remaining after fitting the long boards will be useful for finishing facade parts - with this approach, there will be less waste. Make sure that workers attach the boards with rust-resistant nails or screws - galvanized. To prevent cracks in the boards during screwing, the screws should be placed at least 10 cm from the edge. Before screwing in the screw, you must first make a hole in the board. It should be slightly smaller than the diameter of the screw. Make sure that the heads of the screws do not stick out above the surface of the boards and are not too deep.
For strength and appearance
Under the influence of sunlight and atmospheric precipitation, facade boards can be subjected to biological destruction and therefore need to be protected. To preserve the color and texture of wood, you should choose a colorless varnish. To change the shade of wood, it can be covered with tinted varnish or decorative impregnate, which will also protect against fungal infections. If the look of natural wood does not inspire you, the lining can be painted. The wooden facade needs to be inspected every 4-5 years and, if necessary, to replace or update the decorative coating. To avoid these problems, you can immediately decide and use expensive teak or cedar wood, which does not require protection. On the market there are also facade boards painted in the factory. Performers must independently paint only the cut ends of the boards.
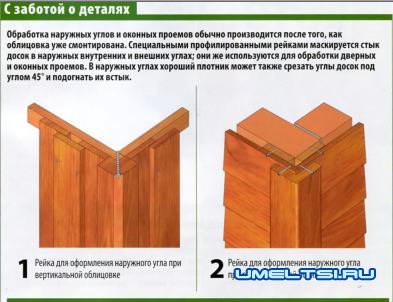
WHICH ELEMENTS SHOULD BE PAYED SPECIAL ATTENTION
Umbrella dowels supporting mineral wool slabs must be recessed at least 5 cm into solid masonry
and at least 7.5 cm into hollow brick masonry.
Separate strips of the windproof film must be fastened together with a special mounting self-adhesive tape.
Sheathing boards connected according to the “groove-comb” type, with a horizontal arrangement, must always be installed with the ridge up and the groove down, so that flowing rainwater will not penetrate into the junctions of the boards.
If the joints of the horizontal cladding boards are on the same line, it must be masked with a vertical lath in order to protect it from water and improve the appearance of the facade. The ventilated space under the cladding should have an inlet for air flows in the lower part of the wall, and an outlet under the roof canopy. The lower ventilation gap must be protected with a mesh so that insects and rodents do not penetrate there. The lower ventilation gap must be provided with a tin edging with a drip to drain condensate outside the wall.