The horizontal bar is a universal sports equipment that can be used to effectively work out several major muscle groups at once and increase overall strength indicators. Working with your own weight is an effective, popular and affordable training method. By installing a horizontal bar at home, you can successfully train at home, performing various exercises with your own weight on the horizontal bar.
Depending on the design and method of fastening, the following types of horizontal bars are distinguished:
Wall horizontal bar
The design of the horizontal bar involves vertical fastening to the wall with anchor bolts (in two, sometimes in four places). A reliable option for a home horizontal bar. Mounting to the wall gives the structure stability.
The wall horizontal bar can only be mounted on a reliable wall made of concrete or brick. Install such a horizontal bar on thin wooden or plasterboard partitions it is forbidden.
Corner wall horizontal bar
A wall-mounted option in which the horizontal bar is fastened in a corner, between two perpendicular walls. The corner location allows you to create additional space for the trainee by using the corner.
Above-door horizontal bar
 The horizontal bar is mounted above the doorway. Thus, while performing various exercises, the body and legs of the trainee can go into the doorway.
Horizontal bar in the doorway
The most popular option for home horizontal bars. For training, a doorway is used, so that the trainee has sufficient space both in front and behind. However, such horizontal bars are often unreliable. Although the horizontal bar in the doorway can withstand 130 - 150 kg, it is not recommended to perform complex exercises on them, in particular exercises in an upside-down position. Due to the fact that both ends of the horizontal bar go deep into the door frame, it is sometimes difficult to assess the real reliability of the horizontal bar. Over time, the wood may become deformed and the reliability of the structure will decrease. Fastening directly to a concrete or brick wall is more reliable than to a door frame.
There are two types of horizontal bars in the doorway: 
Spacer horizontal bar
It is secured by an internal spacer spring. Such horizontal bars are usually made removable. Usually it can withstand the weight of an adult, but due to improper installation, swaying during exercise, or excessive load, it can break.
Sliding horizontal bar
Fixed using retractable telescopic pipes. It is fastened with anchor bolts, therefore it is considered more reliable than a spacer.
Horizontal bar in the opening between two walls
An analogue of a horizontal bar in a doorway, but the horizontal bar is not attached to the door frame, but directly to the walls.  Not all rooms have the opportunity for such an installation, but if such an opportunity exists, then this is an excellent place for a horizontal bar.
Ceiling horizontal bar
Horizontal bars attached to the ceiling are in many ways similar to wall-mounted horizontal bars.
Ceiling horizontal bars come in a variety of designs, from the simplest to the more complex, implying the ability to do pull-ups with different grips.
Horizontal bar combined with parallel bars
An effective complex exercise that allows you to significantly expand your training opportunities by adding dips to pull-ups.
If there is such an opportunity, try to make for yourself a horizontal bar combined with parallel bars, because parallel bars use additional muscle groups, and in combination with a horizontal bar they will give a more significant result.
What can you make a horizontal bar from?
The most reliable material for making a horizontal bar is metal (preferably steel). There are examples of successful wooden horizontal bars, there are even entire wooden bars with a built-in horizontal bar, however, if you are not a professional carpenter who understands types of wood and woodworking, then it is better to focus on a metal horizontal bar.
Structural stability and weight bearing are two of the most important characteristics of any horizontal bar. When making a horizontal bar yourself, you need to make sure of the reliability of the materials and the stability of the structure under load.
To make home horizontal bars, metal pipes (water or gas) are often used, as well as all kinds of angles for pipes, allowing you to create a reliable and functional structure from pipes. Threads are cut at the ends of the pipes, allowing the pipe to be screwed into the corner when assembling the horizontal bar. In some cases, the pipe is used without thread, like a regular strip that is mounted in a doorway.
However, the best and most reliable way is to weld a functional and reliable horizontal bar from metal parts, using a pipe as a pull-up bar, a steel profile and corners to create a high-quality and reliable fastening.
Horizontal bar and parallel bars-press on your own in a private house or apartment
For serious and full-fledged home workouts, the best option is to get a combined horizontal bar, which includes parallel bars and a back support for pumping up your abs.
Making such a horizontal bar with your own hands is a good option for those who prefer to create training equipment for themselves, based on their own needs and preferences. And also for those who have access to a welding machine, metal cutting equipment, metal pipes and profiles. If desired, you can always use the services of a specialist to cut or weld the metal parts of the horizontal bar. You can contact a metalworking shop for cutting and welding metal. The cost of the material is minimal ($25-30 - 900-1000 rubles) compared to a finished product in a sports store, so it makes sense to take the trouble to make the horizontal bar yourself.
It is worth noting that creating such a horizontal bar is quite painstaking and time-consuming work, requiring precise measurements and careful execution. First of all, you need to develop a drawing of the future horizontal bar, or use a ready-made one (drawings of any sports equipment are widely available on the Internet).
A simple drawing for a horizontal bar with parallel bars is shown in the photo below. 
To create a horizontal bar you will need
1. Steel pipe with a diameter of 30 mm:
750 mm – 1 piece;
150mm – 6 pcs.
2. Steel profile 30 x 30 mm:
700 mm – 1 pc.
550 mm – 2 pcs.
400 mm – 2 pcs.
650 mm – 2 pcs.
550 mm – 1 pc.
3. Steel plate:
140x120x5 mm – 1 piece.
300x70x5 mm. - 2 pcs.
 It is necessary to weld all the prepared metal parts into the structure shown in the drawing. After this, it is advisable to paint the structure. Then you can start creating the soft back and armrests. To do this, you will need chipboard, or plywood, rubber handles for the horizontal bar and parallel bars (you can purchase them on the Internet, or use electrical tape instead, wrapping the places you will be holding, so that the horizontal bar does not slip out of your hands), foam rubber and a couple of square meters of leatherette . From chipboard you need to cut boards that are suitable in shape and size for the back and armrests, then glue a layer of foam rubber and wrap it with a sheet of leatherette, which can be fixed with Moment glue, or with a powerful stapler, if available.
This design weighs about 15 kg. If desired, you can increase the grip width or other parameters.
Such a horizontal bar is made removable and means it can be attached in two different ways: for training on the uneven bars and for training on the horizontal bar.
Horizontal bar in the doorway
If working with metal described above seems too complicated, you can limit yourself to the simplest option - making a home horizontal bar in the doorway.
The optimal material for organizing a horizontal bar in a doorway is a steel pipe with a diameter of 30-40 mm. When selecting and cutting a pipe, the length should be taken with a small margin in order to make the fastening. To correctly calculate the required length of the pipe, you need to add 40mm to the width of the doorway.
The simplest way to securely fasten a pipe in a doorway is to make four cuts on both sides of the pipe, then cut off two parallel petals on each side, and drill a hole in the other two for the anchor bolt and bend it 90 degrees. These petals will become the mount for the horizontal bar. Through the drilled holes, using bolts, the horizontal bar is attached to the doorway.
 There is another way to fix the pipe in the doorway, in which you can do without cutting the pipe. To do this, you need to attach two metal corners to the doorway, having previously drilled 4 holes in them (2 holes for attaching to the doorway and 2 for the fastening bracket that will hold the pipe stationary) in the places where the ends of the horizontal bar will be located. The corners must be positioned in such a way that the pipe can be placed on the corners and secured in a stable position. The pipe is fixed with special fastening brackets with threads for nuts at the ends (can be purchased on the building materials market). This method of installing a horizontal bar is the simplest and requires minimal metal work.
Gymnastic equipment is very expensive, so it is not available to everyone. However, lack of funds should not stand in the way of maintaining good physical shape. Therefore, we suggest making a horizontal bar yourself and installing it in your apartment; it’s not difficult.
A few words about the types of horizontal bars
Before we start making a home horizontal bar, let's look at what designs exist. In fact, there are only three of them. A horizontal bar installed in a doorway is an extremely simple structure in the form of a crossbar that is attached to the door frame or to the walls. Anyone can do it themselves. True, usually such horizontal bars are installed only for children, since the height is limited by the size of the opening. In addition, not every door frame can support the weight of an adult. If the opening is high enough and an adult will use the horizontal bar, then the crossbar should be attached to the wall, and not to the door frame.
The inter-wall horizontal bar differs from the one described above in that it is installed not in the opening, but between two parallel walls located next to each other. As a rule, he has a place in the corridor. The location of the crossbar between the walls allows it to be securely fastened, so even an adult can use the horizontal bar. The only thing is that the walls must be strong; we’ll talk more about the requirements for walls below.
The wall horizontal bar is attached to one wall, so it can be installed in any place convenient for you and at any level. The design itself is relatively complex. As a rule, it is a projectile with bars, i.e. 3 in 1. It allows you to do pull-ups with a wide and narrow grip, as well as perform exercises on the uneven bars.
Making an interwall horizontal bar
Every home craftsman can make an inter-wall or a horizontal bar installed in an opening, since for this you will need a simple set of tools:
- electric drill;
- grinder or hacksaw;
- file.
The set of materials required is also minimal:
- pipe with a diameter of ~25–40 mm with a wall thickness of at least 2–3 mm;
- metal corner with a steel thickness of at least 3 mm;
- U-shaped clamps (must match the outer diameter of the pipe).

We begin production by preparing the crossbar - cut the pipe to the width of the opening or the distance between the walls. Thoroughly sand the section with zero-grade sandpaper, and then treat it with GOI paste and a piece of felt.
Then make a fastening for the crossbar - cut the corner to get two pieces 10-15 centimeters long. In the resulting sections, drill 3-4 holes for screws or dowels on one of the walls. On the second wall of the corners, drill two holes for horseshoe clamps, always in the center of the corners.
To refine the resulting fasteners, file the corner cuts and then paint both parts. For these purposes, you can use hammer paint to give the product a “branded” look.

At this point the horizontal bar is ready, now all that remains is to secure it correctly. To ensure that the crossbar is level, apply markings to the walls, indicating the level of its location with horizontal lines. Both lines must be in the same horizontal plane. Attach the corners to the resulting lines and drill holes in the wall. Immediately secure with dowels or screws (if the walls are wooden).
Now take the crossbar and place it on the installed “shelves” so that it is between the two holes. Immediately place the clamps on the pipe, thread their edges through the holes and tighten with nuts from below.
I must say that the children's horizontal bar in the opening can be made even simpler. For this you only need one pipe. Its length should be 40 mm greater than the width of the opening. On each side of the pipe you need to make cross-shaped cuts 20 mm deep. The result should be four petals of the same size.
Drill through holes in each pair of petals. After this, simply bend the petals to the sides at 90 degrees relative to the pipe. Lightly process the sections with a file and sandpaper to avoid sharp edges and burrs. As a result, we got a crossbar with a ready-made fastening. To complete the work, mark the opening and secure the crossbar with screws or dowels.
Making a horizontal bar three in one
Now we will make a 3 in 1 wall horizontal bar. Let us immediately note that the manufacturing process is quite complex and it will not be possible to make it at home, since this requires a welding machine. True, if you don’t have a welding machine, it doesn’t matter. You can prepare the parts and take them to the nearest workshop or to a familiar welder.
Since the design is quite complex, be sure to prepare drawings before starting to manufacture it. Take the finished project presented below as a basis. The only thing is to adjust the dimensions of the crossbar to suit you. To do this, stand straight, extend your right arm to the side parallel to the floor and measure the distance from your left shoulder to the fingers of your outstretched right hand. The resulting value will be the length of the crossbar.

The structure itself is L-shaped. At one end there is a crossbar with handles for a narrow grip, and the other end is parallel bars. Sometimes perpendicular handles about 200 mm long are welded to the beams.
To make a 3-in-1 horizontal bar for your home with your own hands, you need to have the following materials:
- round pipe with a diameter of 30 mm;
- square profile 30x30 mm;
- two hooks made of sheet steel with a thickness of at least 5 mm;
- heat shrink tube with an internal diameter of 30 mm.
If you do not have a 30x30 mm profile pipe, you can use round pipes to make a horizontal bar. The only thing is that the thickness of their walls must be at least 3 mm. Let's start manufacturing the product by cutting the blanks:
- 1. Cut off a round pipe that will serve as a crossbar. The length, as we said above, is selected individually;
- 2. Next, we cut six handles from the same pipe - 2 for a narrow grip, 2 handles will be fixed parallel to the bars at their ends, and 2 will be located perpendicular to the bars. The length of the handles should be 200 mm;
- 3. We prepare brackets for the crossbar from the profile - we make 2 sections 600 mm long;
- 4. Then we cut off two sections of the profile pipe, which will serve as beams. Their length should be 850 mm;
- 5. Cut two 700 mm long sections from the profile - these will be the jumpers between the brackets and beams;
- 6. Now we prepare the braces - we cut two 400 mm long sections from the profile pipe.

First, we make the crossbar - measure 205 millimeters from the edges, apply marks and bend the edges of the crossbar at an angle of 195 degrees along them. For these purposes you need to use a pipe bender. If you don’t have the latter, you can make wide cuts along the marks, then bend the handles by hand, and then weld the places of the cuts.
The edges of the brackets to which the crossbar will be welded should be bored with a round file. As a result, semicircular recesses should appear along the diameter of the pipe. This will allow the crossbar to be securely welded to the brackets and ensure a neat joint. If you have a welding machine, you can immediately weld the crossbar to the brackets.
When connecting parts, make sure that the angle between the pipe and the brackets is 90 degrees. As a result, a U-shaped structure should be formed. In addition, position the crossbar correctly so that in the working position of the horizontal bar, i.e. when it hangs on the wall, the handles are directed towards the wall. In other words, their plane must be parallel to the plane of the brackets, which is clearly visible in the drawing.
In the center of the crossbar, weld two handles parallel to the brackets at a distance of 250 mm from each other. Pre-prepare the edges of the handles with a round file, as well as the edges of the brackets, for joining to the crossbar. You can immediately weld profiles that will serve as beams to the brackets. The angle between them and the brackets should be 90 degrees.
To strengthen each L-shaped part, weld brackets between the beams and braces. Pre-cut the edges of the brace at the angle at which it will adjoin the beam and bracket. To do this, place it in working position and mark the cutting line.
After this, you need to additionally connect the L-shaped parts with two jumpers. One jumper connects the beams, and the second connects the brackets. The planks should be located at a distance of about 250-300 mm from the corner. I must say that it is with these jumpers that you can hang the structure on the wall.

At this point, the horizontal bar is almost ready, all that remains is to weld the four handles to the bars, according to the drawing. When all the parts are in place, be sure to process the welding seams with a file and sandpaper, and then coat the structure with paint. Then you need to put heat-shrinkable tubes on all the handles and heat them with a hair dryer or any other method. Now the multifunctional home horizontal bar is ready.
Folding horizontal bars 3 in 1 are also made using the same scheme, with the only difference being that the jumpers are attached to the L-shaped parts with bolts. To do this, sheet steel platforms are welded to the ends of the lintels, in which holes are drilled for bolted connections. The crossbar is attached to the brackets using U-shaped clamps. You can carry such a horizontal bar with you, for example, when traveling to the country.
To hang such a structure in your apartment, secure two hooks to the wall using anchors. For reliability, you can install an additional third fastener. When installing the hooks on the wall, make sure that they are located on the same horizontal line. After this, you can hang the structure by the jumpers in the position you need.
A few words about strength and safety
When making sports equipment, you must understand that all responsibility for possible negative consequences, and this can be both bruises and serious injuries, falls on you. Therefore, the design must be made with a large margin of safety. The fact is that even with a normal pull-up, the load on the crossbar increases by two and a half times the person’s weight.
Therefore, a home horizontal bar for an adult must withstand loads of at least 250 kg. The proposed materials already contain the necessary margin of safety, so do not try to replace them with less durable parts.
Another important point is the strength of the walls. A homemade horizontal bar for an adult can only be mounted on concrete, brick or wooden walls. Foam block and especially plasterboard walls are completely unsuitable for this. In addition, it is advisable not to attach the structure to load-bearing walls, since exercise on the horizontal bar can lead to cracks appearing in them. For this reason, in some countries, installing a horizontal bar on load-bearing walls is completely prohibited.
If the horizontal bar is intended for a child, it is allowed to be attached to foam block walls and partitions. But for this you should use special chemical “butterflies”.
To maintain physical fitness, not everyone has the opportunity to visit the gym, but exercises can be done at home. To strengthen the muscles of the arms, back and abs, you can make a horizontal bar for your home. There are different designs - the simplest and the most complex.
Types of horizontal bars
To stay fit, it is advisable to have sports equipment at home. The simplest of them is the horizontal bar. This is one or more small crossbars that allow you to train the muscles of the arms, chest, abs and back. You just need to find a suitable set of exercises.
For home (apartment)
It is usually easier to find a place for a horizontal bar in the house. In an apartment, this is usually more difficult to do, so many are looking for options that take up little space, are easy to remove and install: so that they can be stored, say, in a closet and hung only during classes. For indoor use there are the following models:
Which type to choose depends on the set of exercises you plan to perform. For regular pull-ups, even an ordinary stick in the door is enough. It allows you to adjust the grip width within the width of the doorway. For more complex complexes, something more serious will be required.
On the street
An outdoor horizontal bar is usually a more complex design. The minimum is two posts dug deep into the ground, to which, in addition to the crossbar, beams and/or crossbar can also be welded. There may also be an inclined bench. This is the minimum for those who are serious about getting in shape.
There are very simple outdoor horizontal bars - two racks with a crossbar, there are whole complexes. A universal option - with a wall bars and devices for pumping all muscle groups
In general, you can hang a wall-mounted horizontal bar on the outside wall of your house - an option for summer training.
Selection of materials
Typically, a home horizontal bar is made of metal pipes. They come in round and rectangular (square) sections. Rectangular ones with the same cross-section (diameter and diagonal) and wall thickness have greater rigidity and can withstand a greater load. But if the pipe is crushed, then the rectangular one is sharply refracted, and the round one slowly bends. To prevent this from happening, choose thicker walls (2.5 mm or more). The horizontal bar will be heavier, but will be more reliable and will be able to withstand heavy loads.

You also need to choose pipes for the horizontal bar based on convenience. If we talk about operation, then the round one fits more comfortably in the hand. But the rectangular one is easier to cook, since the round one requires a higher degree of skill. A rectangular one “fits” better on the wall; it has a larger support area. This is important for wall structures. Apparently, this is why the frames and stands of home horizontal bars are made from square (profiled) pipes, and the crossbars are made from round ones.
As a rule, the diameter of the horizontal bar crossbar ranges from 27 mm to 32 mm.
Horizontal bars for the home are also made of wood. But since wood is heterogeneous, it is difficult to predict its behavior under loads. Considering that the movements can be jerky, there is a high probability that the wooden crossbar will crack. So if you want to make a horizontal bar, it’s better not to use wood.

Reliability is the most important thing. Both in design and in fasteners
A few words about the type of steel that can and should be used. You can make a horizontal bar for your home from an ordinary pipe - from ferrous metal. After welding, it is cleaned to bare metal, treated with primer and painted. This is quite enough for use in a house or apartment. For outdoor horizontal bars, it is better to treat them with an anti-corrosion compound after cleaning, then with primer, and then with paint in two or three layers. If possible, apply powder paint. It has an uneven surface and does not slip under your hand. Some types of hammer paints can have the same surface. They also give an unusual effect: uneven color. Looks very good on metal things.

You can also make a horizontal bar for your home or outdoors from stainless steel. It is hardly reasonable to transfer expensive material to the frame, but the crossbars can be made from stainless steel. Just don’t take food-grade stainless steel pipes - they are made with thin walls, so they often don’t hold up and bend. Take good alloy structural steel. It will not rust and will withstand heavy loads. But there is another point: the pipe may be too smooth, which is inconvenient. When gripping, your hands may slip.
Schemes and sizes
The horizontal bar diagrams are what is important. Pipe diameters and wall thickness are important. This is really important and the dimensions are approximate. They may vary depending on the height and size of the person. Usually they are given for “average” height and average chest size. If your parameters are larger than “average”, increase the size so that it is comfortable for you.

Wall models
Some of the most convenient and functional are wall-mounted horizontal bars. Some of them are more bulky and complex in design, and some are quite simple. Let's start with the more difficult ones.
The picture shows a horizontal bar on which you can exercise in two positions. In the picture on the right is a position for working the abs, on the left is for working the arms, back and pectoral muscles. This design can be improved. In the diagram on the right there are two crossbars that are used for working with a narrow grip. You can install additional crossbars for the middle one, and use the outer ones for the “normal” one. A wide grip is provided by handles protruding from the sides. It is more convenient if they have an inclination of about 30°.

It is not always convenient to turn the horizontal bar over, so another design was invented - with handles on the front bar. It is less massive and requires fewer pipes. But you will have to pump up your abs on a different machine. This one does not provide such an opportunity.

Diagram and dimensions taken from the finished wall horizontal bar
Despite its shortcomings, the above design has been repeated many times. It is simple, reliable, takes up little space, and is therefore popular. The dimensions are slightly adjusted, leaving the pipe diameters and the thickness of the corners unchanged or increasing the wall thickness. An example is in the photo below.

There is an even simpler design. This is only one bar on which you can only do pull-ups. But this design is one of the most compact. It can be hung above the doorway and it will not interfere or attract attention. It makes sense to make a horizontal bar of this design if there is no room to place a more serious projectile or if there is a wall bars.

Sizes - for short height
Above-door structures are among the most compact. The only ones that take up less space are those that are installed in a doorway or between two closely spaced walls (here, all you need is a pipe with special fastenings for it).
Horizontal bars for the yard
More complex structures are usually installed in the yard: there is no need to save space, so they make the most comfortable model possible. At the same time, it is worth approaching the issue carefully: to make a horizontal bar reliable, you need pipes with a solid wall thickness, and they are not cheap. Therefore, since there are already racks and crossbars, you can make a wall bars and a mount for a swing - so that both children can play and adults can train.

Please note that the racks are connected in pairs by jumpers. The jumper is buried in the ground and serves to stabilize the position during lateral loads. What else to pay attention to is the depth to which the pillars are buried. If the soil is prone to heaving (clay and loam), it is advisable to bury below the freezing depth. In central Russia, this is about 120-130 cm. In order for the racks to stand securely, pieces of pipes can be welded perpendicularly to the underground part. This will complicate installation, but the poles will definitely not become loose.
How to make a horizontal bar for an apartment with your own hands - photo report
Even for the most complex wall model, 2-2.5 meters of profile pipe and about 1.5 meters of round pipe are enough. To make a horizontal bar for your home with your own hands, a sheet with the selected model and dimensions is pre-printed. For the frame, a profiled metal pipe 20*30*3 mm was used, for the crossbar and “handles” - a remnant from a curtain rod from Soviet times. The pipe is thin, but still holds up. To begin with, using a grinder, I sawed the profile pipe into pieces of the required length.

Beginning - cut the pipes into pieces of the required length, file the angle of the stops
There are no corner stops in the diagram; they are made “by eye”. The angle is about 50°. Next, the smallest thing is to cook. With help it's not too difficult. Moreover, the pipe has a thick wall: 3 mm is welded normally.
The result is two halves of the frame in the shape of the letter “G” - they must be connected by jumpers. To ensure that the frame posts are parallel, we use strips that fix the parts at the same distance. At the same time, from scraps of stainless steel pipe, we weld handles at the bottom, which we will hold on to when pumping the press.

To make a tight connection between the round pipe and the rectangular one, a semicircle was cut out in the stand using a grinder. I had to modify it with a file, but the fit is very good. All that's left to do is boil it.

To weld handles for a narrow grip to a round pipe, we also form recesses in the pipe sections. It is more difficult to cook them - the thickness of the pipe is much less. And generally speaking, . Due to lack of experience, the seams turned out ugly, but without obvious defects.
Next you need to bend the pipe along the edges. To do this, insert a rod of smaller diameter into the pipe, take a gas burner, heat the bend, bending it little by little. You need to bend it 30°. To do this, I drew an angle on the floor with chalk, bending it and checking it against the drawn lines.

Add “holders” for a narrow grip, bend it and you can paint it
We put an emery wheel on the grinder and clean the welding areas. Then, using a circle with a smaller grain, we remove plaque from the entire structure, additionally sanding the seams. Ready for painting. Spray paint was applied in three layers.

For wall mounting, hooks are made from a 15*4 mm metal strip. It was not easy to bend - holding the whole piece in tongs, we managed to bend it on both sides. The finished hooks were cut to the required length and holes were drilled for the dowels. A drill with a diameter of 8 mm was used, drilled 12 mm for the fastener heads. The hooks are cleaned and painted with the same paint.

Before making a horizontal bar, decide on the place where you will hang it. Not all spouses will calmly accept such an innovation... Homemade horizontal bar 3 in 1 on the wall in two working positions
Almost everything is ready. All that remains is to make pillows for the shoulders. For the base, pieces of plywood were taken, on them - thin furniture foam rubber in two layers, covered with eco-leather with holes. To fasten the leatherette, staples and were used, but you can also use furniture nails if you don’t have a stapler.

Based on operating experience: wall hooks should be made longer, with at least three dowels. And one more thing: the design has been improved - the handles for a narrow grip in the version shown in the picture are uncomfortable, so another crossbar was welded.

The homemade homemade horizontal bar turned out to be a little heavy - 19.8 kg, but in this form it is more convenient.
In conclusion, a short entertaining video prank “Grandfather punishes turnstile makers.” Be healthy!
To keep your back and arm muscles in good physical shape, you don’t have to go to the gym. One of the main sports equipment - a horizontal bar - can be installed at home, even in a small apartment.
Structurally, the horizontal bar can be divided according to 2 criteria:
- At the installation location - indoors or outdoors.
- In terms of functionality, it will only be a horizontal bar, or other projectiles will be combined with it.
Let's take a closer look at these differences.
Types of horizontal bars for indoors and outdoors
If you need to make a horizontal bar for an apartment (room), the following options are available:
- Wall-mounted - attached to a “clean” section of the wall. Structurally, they are made in the form of a supporting part (which is attached to the wall with bolts) and a crossbar located from it.
- Wall mounted - above the doorway. Structurally, it is the same as a regular wall horizontal bar, only it is installed above the doorway. It is more convenient for the user because the legs will not rest or cling to the wall when doing pull-ups.
- Angular. Another wall option. The horizontal bar is mounted on two adjacent walls forming an angle. The advantage compared to a simple wall-mounted design is that such a product is more securely held on the wall.
- Sliding, mounted in the doorway. Not everyone will be able to make such a product on their own - it is more difficult to manufacture. Another disadvantage is that a low-quality design may not withstand a lot of weight. The advantage is ease of installation and quick dismantling.
- Curtain walls between two walls located close to each other. They are hung where there is no more than 1-1.5 meters from wall to wall.
- Removable between two walls located close to each other. Variant of the previous paragraph. In this case, the crossbar itself is not attached to the walls. Grooves are cut into them into which the crossbar can be placed. After completing the exercises, the horizontal bar is removed, the grooves remain on the walls.
- Wall bars for wall bars (if there is one in the room).
- Ceiling. Attached to the ceiling.
If you need to build a horizontal bar for the street, the following options are available:
- Crossbar between two trees (if 2 thick trees grow at a distance of 2-2.5 m from each other).
- U-shaped free-standing horizontal bar.
Types by functionality
The simplest version is a regular crossbar attached to a suitable surface. On such a horizontal bar you can simply do pull-ups.
The design can be upgraded in several ways:
- By adding several handles to the crossbar, allowing you to grasp it with different grips. A different grip will allow you to distribute the load on the muscles differently.
- By adding bars.
Pros and cons of homemade structures
There is only one advantage: you can make a design yourself that is ideal for the free space in the apartment.
Of the obvious disadvantages:
- A homemade horizontal bar is unlikely to cost less than a purchased one. You will have to spend around 1000 rubles on the material alone - not to mention the costs of welding and cutting metal (if you don’t do it yourself). A simple wall horizontal bar will cost around 1500-2000 if you buy a new one in the store. That is, this method cannot be called economical.
- Expenses by time. Depending on the model, you will have to spend at least 2-3 hours on manufacturing and fastening (not counting calculations and going to the store for materials).
- The difficulty of metal processing at home. If you don’t have a free garage, basement or workshop, you will have to work with metal in your apartment. It is noisy, dirty, and can stain (at least with metal filings) the interior.
To summarize: a homemade horizontal bar is worth making if you like to make something, or want to get something unusual that is not in the store.
List of materials and tools for making horizontal bars
The list of materials will depend on the selected type of horizontal bar. Therefore, here is a general list of what may be required - without specific sizes and quantities:
- 1 round pipe about 100-110 cm long - for the crossbar.
- 1 square pipe with a cross-section of 30-40 mm, about 3-4 meters long - to create a frame. It will need to be cut into several pieces (the length and number of pieces will depend on the design).
- 4-8 anchors.

For processing you will need:
- Welding machine.
- Tool for cutting metal (saw, grinder).
- File (for processing metal after cutting).
- Marker and ruler.
- Drill (to drill holes in the horizontal bar for fasteners).
- Paint and brush (to paint the finished product).
How to choose the crossbar diameter
To choose the diameter to fit your hand size, you need to measure the width of your palm at the base of your fingers and multiply the resulting number (in centimeters) by 3.3. The result should be rounded up, preferably to the numbers 5 or 0.
For example, if the width of your palm is 9 cm, multiplying by 3.3 gives 29.7. This means that the diameter of the crossbar should be 30-35 mm.
Fastening rules: about the length of the anchor and the number of fastening points
This question is relevant if the horizontal bar is planned to be hung on the wall in the apartment. Of course, we are not talking about drywall - you cannot attach a horizontal bar to it.
The main indicator for calculating attachment points: the load-bearing capacity of 1 point, including bending and shear: it must be at least 130 kg/s.
The number of fasteners is calculated using the following formula:
(PH x 2.5) / 130, where:
- The estimated load - for an adult man weighing about 80 kg will be about 200 kg.
- 2.5 - fixed coefficient.
- 130 - minimum load-bearing capacity of 1 point.
The result must be rounded up to the nearest even number.
Let's give an example, if a person weighing 80 kg is working out on the horizontal bar (that is, the estimated load is 200 kg):
(200×2.5) / 130 = 3.85.
Round up to 4 - this is the minimum number of attachment points. For reliability, you can add 2 more points - up to 6.
All the indicators above are the average minimum, relevant for an adult man weighing up to 80-90 kg.
As for the fasteners themselves: only bolts from M8 in size are suitable, and only in steel anchors. Plastic dowels cannot be used (unless the horizontal bar is hung not for an adult man, but for a child weighing up to 35-40 kg).
Depth to which the anchor should be inserted into the wall:
- Not less than 120 mm - for concrete.
- At least 150 mm - for brick.
- At least 180 mm - for timber made of durable wood.
- At least 220 mm - for coniferous trees or glued timber.
The bolt should protrude no more than 20 mm outward.
How to make and install a horizontal bar
Since there are many ways to create each method, we will consider only one at a time, as an example.
One of the simplest options in terms of implementation for a narrow section of the corridor. You will need:
- Round pipe, 20-30 mm in diameter. The length is equal to the width of the doorway (or the distance between the walls), but during installation it may be necessary to shorten it slightly.
- A metal plate 3-5 mm thick, the width of the door panel.
- 2 wooden blocks measuring approximately 10x10x3 cm - for the “nest” in which the crossbar will sit. The bars can be replaced with plywood, a semicircular metal plate (if the horizontal bar is removable) or a piece of pipe (3-5 cm long) of such a diameter that the crossbar can be inserted into it.
The installation process looks like this:
- The installation height of the crossbar is selected.
- The sockets are attached to metal plates. If the sockets are metal, they are welded to the plates. If wooden, a hole (round or semicircular) is cut in the wood for the crossbar, and the piece of wood itself is attached to the wall on top of the plates.
- The plates cut into the door panel at the selected height.
- The crossbar is “fitted” into the sockets and trimmed if necessary. It will definitely need to be trimmed - at least because a few millimeters will be taken away by the plates on both sides.
- The crossbar is installed in the sockets. If the nests are semicircular, it can be easily removed. If the sockets are round, after installation the crossbar can only be removed together with the plates.
2 options for the street
For the street there are 2 simple options:
- Between 2 trees, if they grow at a distance of no more than 2-2.5 meters.
- Construction of a free-standing U-shaped horizontal bar.
In the first case, the crossbar cuts into the tree into 2 plates, as described above. If the distance between the trees is more than 1.7-2 meters, it is advisable to add 2 oblique pipes to the tree to the crossbar (for additional support).

When creating a U-shaped horizontal bar, 2 square pipes measuring about 7x7-10x10 cm are dug into the ground (ideally with a concrete base). The distance between the support pipes is about 150 cm. A crossbar is welded between them.

Separate horizontal bar for wall or ceiling
We will consider the simplest design. You can hang it both on the wall and on the ceiling.
Approximate drawings with dimensions:


To create you will need:
- Round pipe for the crossbar, 100-120 cm long. If desired: you can bend the outermost 15-20 cm at a slight angle to the floor, and also weld 2 more short tubes (12-15 cm long, the distance between the tubes is about 18-25 cm ) perpendicular to the crossbar - for different grips.
- 2 metal plates or corners, 35x5 cm.
- 4 metal square pipes, 43x5 cm. Instead of a square pipe, you can use a rectangular pipe of the same length.
If your weight is more than 90 kg, for reliability, you can weld 2 more plates between 2 plates - so that they form a rectangle. Additional attachment points can be made in long plates.
All elements are fastened together by welding, assembling the structure according to the diagram above.
Mounted - for wall bars
If there is a wall bars in the room, you can make a horizontal bar that will hang on it.
You can take the design from the drawing above as a basis, changing it slightly. The plates are taken longer (about 50-60 cm) and bent. The bent section should completely “encircle” the crossbar of the wall bars, with a margin of at least a few centimeters.
Horizontal bar- This is a sports equipment, which is a round steel bar fixed in a horizontal position. The horizontal bar is usually placed at a height exceeding the height of a person.
Horizontal bars are used for various sets of strength exercises that train the muscles of the arms, back, chest, abs and thighs.
Hanging on a bar helps correct posture in adults and children.
How to make a horizontal bar for home?
Pull-up exercises develop muscle strength in the arms and help to form a beautiful
Types of horizontal bars
1. Horizontal bar in the doorway- the simplest type of horizontal bars, which is a crossbar fixed in a doorway or a narrow opening between walls.
May be removable or non-removable. The advantage of such models is their low cost, compactness and ease of installation. The disadvantage is the prohibition on performing exercises involving an upside down position and weight restrictions for the trainee. Although most of these horizontal bars can withstand up to 130 - 150 kg. Their price ranges from 900 to 1700 rubles.
According to the method of fastening, there are 2 types of horizontal bars in the doorway
- Spacer- secured by the expansion of the spring structure.
Removable, does not always require additional fastening with screws. If installed incorrectly and overloaded, it can break and cause injury, but in general, such models are considered quite reliable.
- Sliding— designed on the principle of telescopic pipes pushed into one another. Anchors and screws are used for fastening to door slopes or walls, so it is not removable.
Wall horizontal bar- a more reliable and functional type of horizontal bars than models for doorways. Allows you to perform a variety of exercises, including upside down positioning. They are fastened with special anchor bolts no shorter than 8-10 mm to the vertical surface of the wall. It is important that installation of the horizontal bar is only possible on a brick or concrete main wall.
You cannot install a horizontal bar on plasterboard partitions. Wall horizontal bars can be removable (only the fastening remains on the wall) and folding. They cost, depending on the brand and complexity of the design, 800 - 10,500 rubles.
Types of wall horizontal bars
- Horizontal bar parallel bars- consists of several transverse crossbars and, most often, handles located perpendicular to the crossbars.
The beams are attached to the wall with anchors and screws, but the main structure is usually removable, allowing it to be fixed in several positions, or foldable.
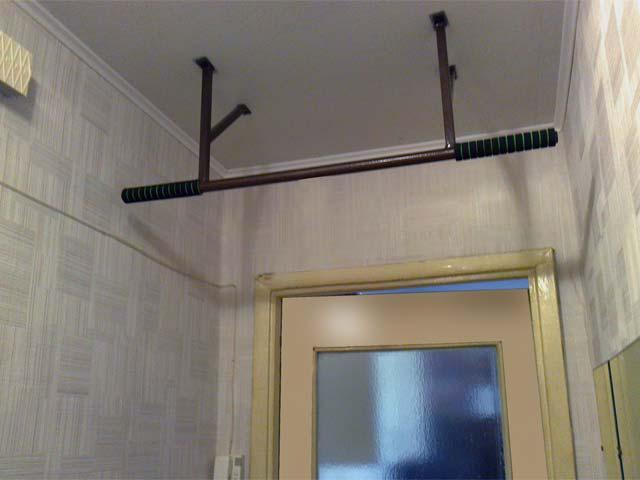
- Above-door horizontal bar- a simpler and more compact sports equipment, mounted above the doorway.
It is a single crossbar at a short distance from the wall. During the exercises, the trainee's torso and legs go into the doorway. The advantage is that it takes up virtually no space. Disadvantage - the short distance of the horizontal bar from the wall imposes restrictions on a number of exercises.
- Corner wall horizontal bar- attached to the corner of the room to two perpendicular walls.
3. Floor horizontal bar. As a rule, it is not just a horizontal bar, but a training set of parallel bars for performing strength exercises.
Different models can be equipped with a bench, holders for dumbbells, barbells, punching bags, etc. The position of the bars and accessories is usually adjustable. The average cost of floor horizontal bars ranges from 4,000 to 20,000 rubles, depending on the brand and configuration.
What to look for when choosing a horizontal bar
- Type of horizontal bar.
It is important to compare the height of the person who will train on it with the height of the crossbar. For tall people, horizontal bars in a doorway and a number of floor-standing models may not be suitable.
- Size. When choosing a horizontal bar for a doorway, it is important to compare the width of the opening with the length of the horizontal bar. This point is especially important for spacer models.
- Materials. The crossbar of the horizontal bar can only be made of steel; its surface should be smooth, better painted or embossed - this will reduce the slipping of your hands.
If the horizontal bar is equipped with handles, it is important that they have a rubberized coating.
- Sustainability. Important for floor models. The stability of such a horizontal bar is ensured by wide supports and weight, which should not be less than 40 - 50 kg.
Which horizontal bar to choose for your home
Let's consider all types of home horizontal bars.
When buying a horizontal bar for home training, it is important to focus on the free space. If the home is small, the best option would be a removable horizontal bar model installed in the doorway (if the person is not very tall), or an above-the-door wall horizontal bar.
Of the models considered, this is a horizontal bar in the opening “SHIP” or an over-door one - Hermes light. Both of these options are fairly inexpensive and available.
If the space in the apartment allows you to allocate at least 1.5 meters of wall area and the same amount of free space in front of this wall, it is worth considering the options of wall-mounted horizontal bars or horizontal bars. In this case, you do not have to limit yourself in the volume of exercises performed.
If the area occupied by sports equipment is not important, but there is a desire to purchase a mini-complex for various types of strength training, including dumbbells and a barbell, you should pay attention to floor horizontal bars with the necessary additions for the desired type of exercise.
But the decision to make such a purchase must be thoughtful and balanced, since such models are not cheap, and it will not work to put the horizontal bar in the far corner if it is no longer needed.

To increase body tone and train muscles, it is necessary to systematically engage in physical exercise. It is best to do this on a crossbar or special equipment.
There is not always time to visit the gym, so many people make their own horizontal bar for home and attach it to the wall. This is not the only accommodation option. It is important to observe safety precautions and convenience in performing physical exercises.
Accommodation options
The most convenient and simplest way is to place it between two load-bearing walls, for example, in a corridor or any place where there is not a large distance between them.
Many people do it in the doorway, but this is not the most convenient location.
One of the most popular places to place a projectile is a wall. The material for the projectile must be made of durable metal.
Tip: at your dacha, place a horizontal bar on the lawn or between 2 trees.
Installation
The first step is to choose a location for installation. It should be somewhere between 2 walls, but so that it is convenient to do exercises, and the distance between them is the smallest in the entire apartment.
Required material:
- metal pipe (diameter 100 mm, length equal to the length of the distance between the walls);
- fastenings (wooden or metal);
- fastening screws (diameter – up to 5 mm, length – from 60 mm).
The grooves must be of such a size that the pipe fits tightly into the mount.
If the house is made of brick, you will simply need to drill holes. And if the house is made of panel blocks, you will also need a hammer drill.
The fastening screws need to be powerful, as the safety of those who will exercise on the horizontal bar depends on them.
You need to drill 2 holes at the required height on opposite sides of the walls and secure the fasteners. Then install the pipe at both ends and the horizontal bar is ready.
Here is a video of the installation of such a horizontal bar.
Corner installation

Horizontal bar diagram for installation
The projectile must have a number of properties: a certain load resistance, safety of use, convenience and compactness.
One of the most convenient, inconspicuous and compact horizontal bars is a projectile in the shape of a corner. That is, it is attached to the wall at one end, and the other to the wall, which creates an angle with the first wall.
Materials for work:
- metal pipe (diameter - 25 mm, length - optional);
- metal corner (32 by 32 mm, about 1 meter);
- bolts, washers, nuts (4 pcs. - 20 mm, 3 pcs.
– 50mm, 5-6 nuts, 10-11 washers, respectively with a margin);
- anchor bolts for fastening to the wall (diameter 10 mm, length 60 mm, 4-5 pcs.).
Tools required: a drill with a metal drill (8 mm), a grinder, a hammer drill, a wrench and a vice.
Tip: you can hang a punching bag on this wall-mounted horizontal bar for home use.

The pear can be attached to the horizontal bar
One side of the pipe must be attached with a corner to the wall, and attached to the other wall using fasteners made from corners.
Attach the corner in this way: attach the bottom corner at a right angle (its length is about 30 cm), attach the second corner to the wall and to the first corner, it will turn out to be inclined at an angle (its length is about 38 cm). All that remains is to attach the pipe to the corner and fasteners of the other wall.
Before drilling holes in the walls, check the area for wiring.
In the courtyard
At the dacha or on the site near the house, you can easily install the projectile. It wouldn't be bad if there was a grass lawn underneath.
This is not difficult to do.
It is necessary to bury and fill with concrete 2 pipes with a diameter of 90 mm at a distance of one and a half to two meters, strengthen them with 2 more pipes of smaller diameter (insert until the concrete hardens).
Metal pipes can be replaced with wooden poles. The pipes need to be buried to a depth of one to one and a half meters, but the part that will be above the ground should be about 2 meters. Bend the upper crossbar pipe so that both ends fit into the posts.
Make sure that the entire structure is strong and safe.
It should withstand loads well and not wobble.
A horizontal bar with parallel bars is also suitable for home use, on which you can do even more exercises.
Making a design for children
Wall bars are mainly made for children.
Do-it-yourself horizontal bar: instructions for making a homemade apparatus
But for small athletes, a hanging bar will be an excellent additional equipment. It can be made smaller and at a lower distance from the floor.
But since the apartment does not allow you to have several apparatus at the same time, you can make a horizontal bar of adjustable height and you will get a children’s apparatus. As the child grows, during adolescence he will need to raise the bar higher, and the adjustable height of the bar will allow a child of any age to play sports.
When installing a children's equipment on the street, you need to choose a place where the sun will not burn and there will be at least partial shade.
The area where children will play should have either sand or grass. You can make a combined horizontal bar with the placement of rings, a pear, a ladder, or a simple street one.
Here is another interesting video with incredible tricks that you can perform on the horizontal bar.
Play sports - it's useful.
 Have you just purchased a wall-mounted horizontal bar, and with your head held high, refused the additional costs associated with its installation? Or is there simply no such service in the store?
In any case, now you need to install the wall horizontal bar yourself.
Arriving home, changing into home clothes, you need to prepare all the tools for such work. But the main question is where to start installation?
In this article, we will tell you in detail about the installation of a horizontal bar called “Prima Monolith”.
Don’t despair if you have a different horizontal bar - the installation process may differ only in minor features that will have virtually no effect on the speed and quality of installation.
Let's return to our horizontal bar - it is an all-welded structure made of a special pipe.
Along with it comes the corresponding pipe end caps, neoprene handles (also known as grips), and a hardware kit for fastening, consisting of four 12 mm dowels and four plumbing bolts, the size of which is 8x70 mm.
Sometimes, instead of bolts, anchors 8-10 mm in diameter may be added to the product.
After checking the complete set of the product, you need to choose the place where you want to install the horizontal bar. Before you start marking, be sure to pay attention to the following details:
- the wall to which you want to attach the horizontal bar must be strong.
If possible, install the horizontal bar to a load-bearing wall (this should be indicated in the apartment layout, you can also check with the housing office representatives);
- the minimum thickness of the partition should exceed the length of the bolt or anchor by several centimeters (at least 2-3 cm).
If you’re not too lazy, you can make a wall-mounted horizontal bar for your home with your own hands
This thickness is needed in order to avoid knocking out a fragment of the wall from the opposite part when drilling;
- Make sure that there are no wiring elements in the drilling areas. Very often they can be found above sockets or electrical switches. What to do? The easiest way is to open a passport for the apartment - it contains all the necessary information about the wiring;
- from the crossbar of the wall horizontal bar to the ceiling there should be a height of at least 30 cm.
If you continue to pull yourself up to your chest, the distance must be increased;
- make sure that there is no furniture close to the sides of the horizontal bar, as it may interfere during training.
This is especially noticeable when performing wide-grip pull-ups;
- if you install a wall-mounted horizontal bar behind a door, then first make sure that the door will not rest against the horizontal bar; If possible, install the horizontal bar in a place where there will be a sufficient flow of fresh air.
So, have you already chosen a location?
Now you need to prepare the tools for installation.
To install a wall horizontal bar yourself, you will need the following tools:
- stepladder (chair, stool);
- pencil or marker;
- roulette;
- a hammer drill for concrete walls or an electric impact drill designed for brick;
- auger (drill). A 12 mm dowel diameter is optimal;
- bubble level.
It’s very good if you have a magnetic level, because during installation it will allow you to use both hands;
- a wrench, possibly an adjustable one, or better yet with a ratchet of the appropriate size, or a screwdriver with a suitable attachment;
- hammer;
- perhaps el. extension.


After selecting the necessary tools for the job, you should proceed to the installation process itself and marking.
We need a stepladder so that we can conveniently secure the horizontal bar above our height. We stand on a chair. Carefully apply the horizontal bar to the surface of the wall, and carefully measure the distance between the crossbar and the ceiling. We position the horizontal bar evenly and level and mark on the wall the top hole (left or right, whichever is more convenient for you) for fastening the product.
After this, you should put the horizontal bar aside and pick up a heavier “weapon” - a hammer drill (or impact drill). We drill a hole in the wall, into which we then hammer a dowel.
Now we apply the horizontal bar to the wall and begin to tighten the first bolt on its fastening.
Please note: since adjustments will be required in the future, we do not tighten the first bolt all the way!
We take the level again and begin to set our horizontal bar exactly on the horizon. We mark the remaining three fastening holes on the wall and carefully lower the horizontal bar so that it is below the marks left. Using a hammer drill, we drill the remaining holes and secure the dowels in the same way as we secured the first one.
Then you can securely tighten all the bolts.
That's all! Congratulations! You installed the wall horizontal bar yourself! Be sure to check it for strength.
If you still have some strength left, you can immediately start doing pull-ups.
The most common little things that can negatively affect the installation:
- You should not measure the distance between the ceiling and the marked holes for drilling with a tape measure.
It happens, but extremely rarely, when the builders of a house have brought the floor level (read: ceiling) “to the horizon.” Therefore, we recommend that you always use only a level for marking in order to avoid possible errors during installation;
- It is recommended to make preliminary holes with a drill of a smaller diameter, after which it will be necessary to “walk” it with the appropriate size.
This type of work is needed for greater accuracy;
- If you hit reinforcement in a wall while drilling (drilling), then there are three ways to solve the problem:
- The easiest option is to choose a new location. Move the horizontal bar a little (~1-4 cm) down or up diagonally, since it is not known exactly how the reinforcement you hit is located (vertically or horizontally).
- You can also try to drill into the same hole at a slight angle.
This can help if you hit thin reinforcement, or not in the very center of it.
- the most difficult and last method: you can try to drill through the reinforcement. To do this, you need to take a small drill for metal and gradually increasing the diameter of the drill used, widen the hole until the drill passes through the concrete.
This is a very labor-intensive procedure that will take a lot of time, and does not guarantee a successful result.
Follow our website updates.
In this new article we will try to tell you in detail how you can install a ceiling horizontal bar with your own hands.

The horizontal bar is the simplest way to keep your body in good shape. It can be installed in many places in the apartment. It is often placed in doorways, but such placement will not allow you to take full advantage of the horizontal bar - there will not be enough free space in height.
The best place to place a ceiling horizontal bar would be a wall or ceiling surface.
Types of horizontal bars
This simulator can vary not only in the location of attachment. There are several types of simulator, each of which has its own characteristics:
- Standard. Suitable for both wide and narrow grip pull-ups
- For a wide grip. This device is suitable for more serious training, as it has additional handles on the sides that increase the grip width.
- The most multifunctional type - with an emphasis for the press and parallel bars.
Suitable for serious training
- Horizontal bar with spacer fastening. Typically, this type is installed either between walls, securing the projectile with anchor bolts, or in a doorway
- Mounted. This type of horizontal bar is suspended with special devices on the wall bars and can be removed if necessary.
All these types of simulators are manufactured in factory conditions and meet all standards accepted in the sports world.
But what if the equipment is not needed for professional training, but just to do some pull-ups a couple of times a day? Is it really necessary to shell out several thousand rubles for a pair of pieces of iron that will be screwed to the ceiling?
As always, there is a way out.
Instead of purchasing a finished product, you can make a ceiling horizontal bar with your own hands. In terms of functionality, such a horizontal bar will be slightly inferior to the factory ones, but it will perform its main function - the ability to pull yourself up.
Such sports equipment made from scrap materials is not suitable for intense and serious training.
It is necessary to maintain the body in good shape and nothing more.
What is needed for self-production
A ceiling horizontal bar made with your own hands is, of course, only suitable for use at home.
How to make a horizontal bar with your own hands
Such a device should not be installed in gyms and other places where you can train.
To make it, you will need very few tools and materials:
- A metal pipe or a wooden handle that will serve as a crossbar.
If a wooden option is chosen, you need to make sure that it can withstand the expected loads
- A pair of anchor bolts with loops or rings - for mounting to the ceiling
- Several fire carbines
- Hanging ropes, about 8 mm in diameter
- Hammer
- Marker or pencil for marking
- Roulette

The listed materials and tools will be quite enough to build a simple ceiling exercise machine.
There will be no significant material costs, and no special skills will be needed to assemble such a device.
Naturally, you need to understand that it hardly makes sense to use such devices for significant loads - they can easily be broken.
In this case, it is better to order the production of a simulator from a welder.
It will be a little more expensive, but the cost will still be less than the store price. In terms of strength, welded horizontal bars will be much stronger.
Manufacturing
First of all, you need to decide how the pipe or wooden crossbar will be secured.
Metal is fastened in one way, and wooden parts can be fixed in another way.
If you use wood, the load on such a horizontal bar should be small. To prevent the rope from slipping off the crossbar while using the projectile, you need to make indentations along its edges that will prevent the rope from slipping.
In the case of a metal pipe, you can thread a rope through it. You can do it differently - drill holes at its edges into which the rope will be threaded and tied from the outside.
You can also use chains as a hanging element.
In this case, you can only use an iron crossbar. The wooden one may break if it is drilled to secure the chain.

Chains, like a rope, can simply be threaded through a pipe, or you can insert bolts threaded into the outer links of the chains into the drilled holes.
After this, two nuts are fixed on the bolts - one will secure the chain, and the second will prevent it from unwinding, acting as a lock nut.
The projectile is suspended from the ceiling using anchor bolts. You will need to prepare holes for them. This is where a hammer drill comes in handy. But first, you need to apply markings to the ceiling.
Two points should be noted where the anchors will be screwed in.
Either a rope or a chain is attached to them, using fire carabiners, to which the horizontal bar crossbar will be attached.
The simplest ceiling horizontal bar can be easily made with your own hands.
You won't need practically any serious tools, and you won't need much materials. The design is quite reliable if a metal pipe is used as a crossbar.
Wooden crossbars can withstand less load, but making such a part is much easier.
In any case, making it yourself will help you save a considerable amount.